MySQL入门及安装
什么是数据
数据(data)是事实或观察的结果,是对客观事物的逻辑归纳,是用于表示客观事物的未经加工的的原始素材。
数据可以是连续的值,比如声音、图像,称为模拟数据。也可以是离散的,如符号、文字,称为数字数据。
在计算机系统中,数据以二进制信息单元0,1的形式表示。
数据的定义: 数据是指对客观事件进行记录并可以鉴别的符号,是对客观事物的性质、状态以及相互关系等进行记载的物理符号或这些物理符号的组合。它是可识别的、抽象的符号。*
什么是数据库管理系统
DBMS(database management system)
数据库管理系统分类
关系型数据库(RDBMS)
- 以多张二维表的方式来存储,又给多张表建立了一定的关系(关系型数据库)
非关系型数据库(NoSQL)
- 左边rdbms右边nosql 很多以json格式进行存储数据的(mogodb)
- key:value
- 姓名:周杰伦
关系型数据库和非关系型数据库对比
功能对比
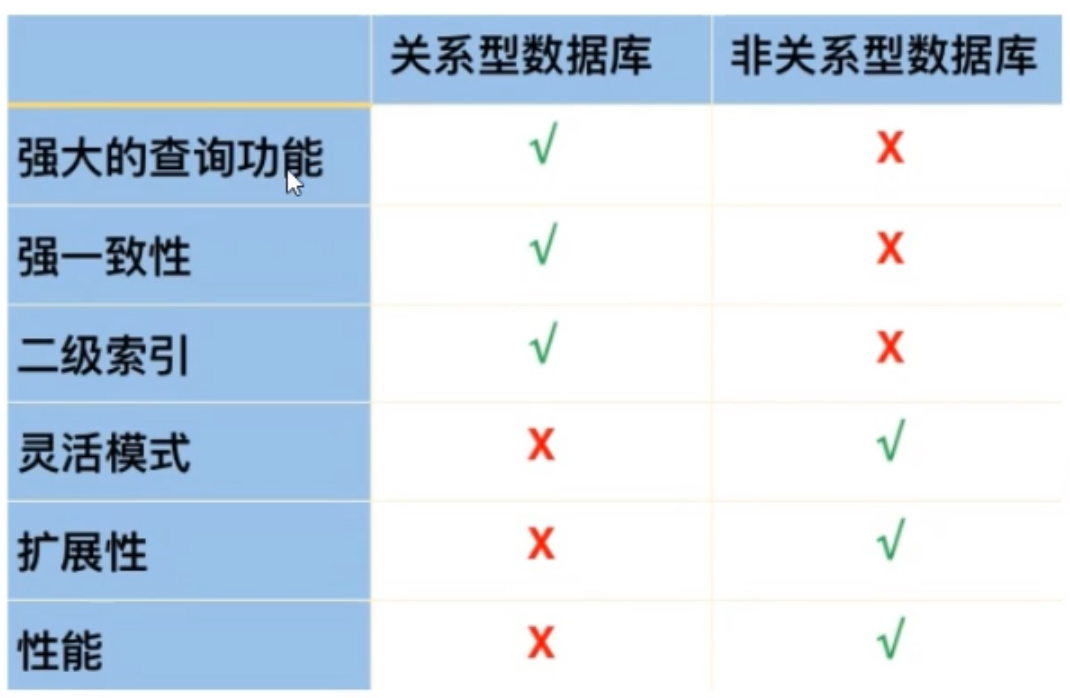
关系型数据库(RDBMS)的特点:
- 二维表
- 典型产品Oracle传统企业,MySQL互联网企业
- 数据存取是通过SQL(Structured Query Language结构化查询语言)
- 最大特点数据安全性方面强(ACID)
非关系型数据库(NoSQL:Not only SQL)的特点:
不是否定关系型数据库,而是做关系型数据库的补充。
想做老大,先学会做老二
时代特点对比:
web1.0时代
- 企业提供内容,用户浏览,所以关系型数据库够用,并发并不高,所以不需要nosql。
web2.0时代
- 核心是企业提供平台,用户参与提供内容,这个时代关系型数据库无法满足需求了。
2003NoSQL出现
- memcache的诞生,关注的点是性能,但是针对安全性能关注比较低,随着安全性能需求不断提升,所以有了redis。
redis的特点
- 依然高性能高并发
- 数据持久化功能
- 支持多数据类型,主从复制和集群
- 管理不再使用SQL了
NoSQL特性总览
- 不是否定关系型数据库,而是做关系型数据库的补充,现在也有部分替代的趋势mongodb。
- 关注高性能,高并发,灵活性,忽略和上述无关的功能。
- 现在也在提升安全性和使用功能。
- 典型产品:redis(持久化缓存,两个半天)、MongoDB(最接近关系型数据库的NoSQL)、memcached。
- 管理不适用SQL管理,而是用一些特殊的API或数据接口。
NoSQL的分类、特点、典型产品
- 键值(KV)存储:memcached、redis
- 列存储(column-oriented):HBASE(新浪、360)Cassandra(200台服务器集群)
- 文档数据库(document-oriented):MongoDB(最接近关系型数据库的NoSQL)
- 图形存储(Graph):Neo4j
MySQL安装
- yum
- 源码
- 二进制
版本选型
5.6:GA 6-12个月,小版本号是偶数版
5.7:GA 6-12个月,小版本号是偶数版,必须是5.7.20以上版本(MGR)
MySQL源码安装
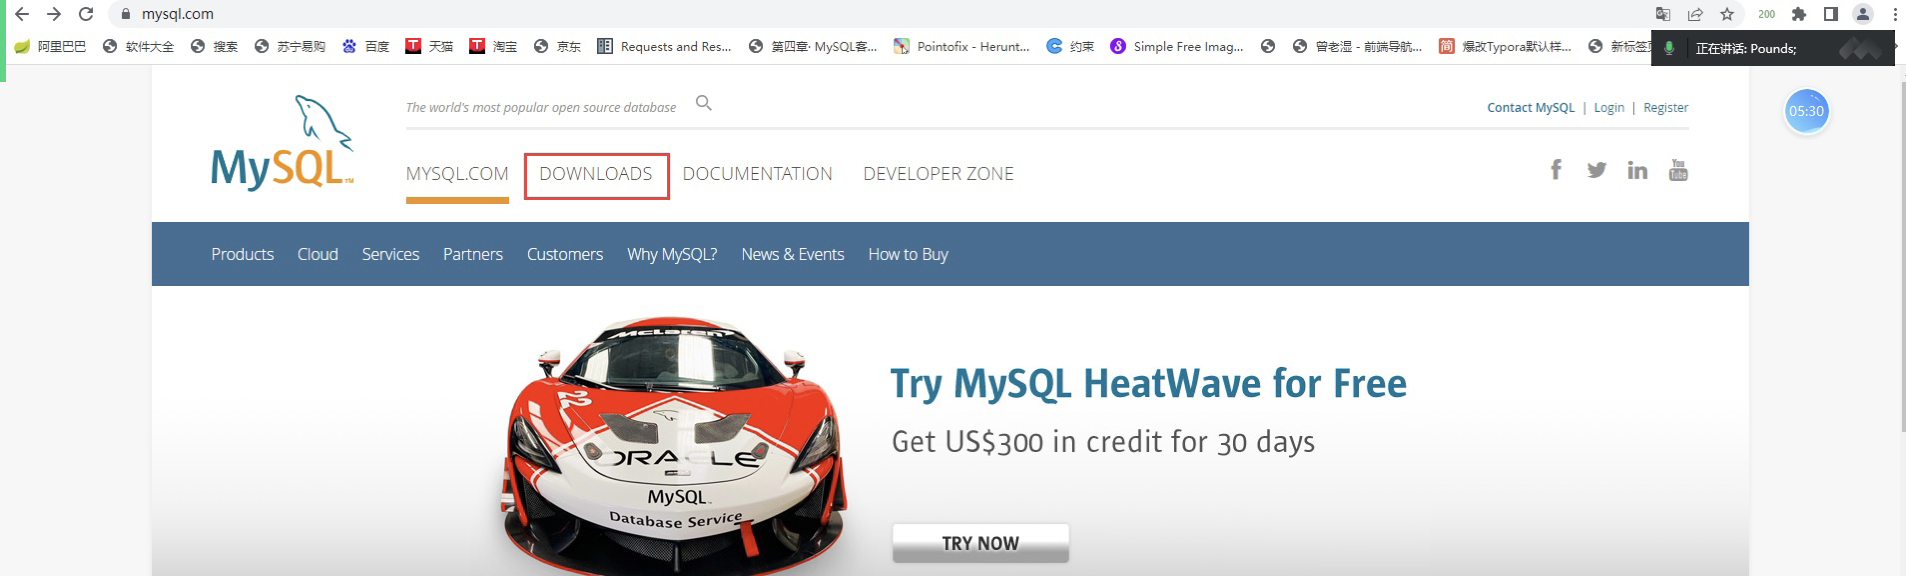
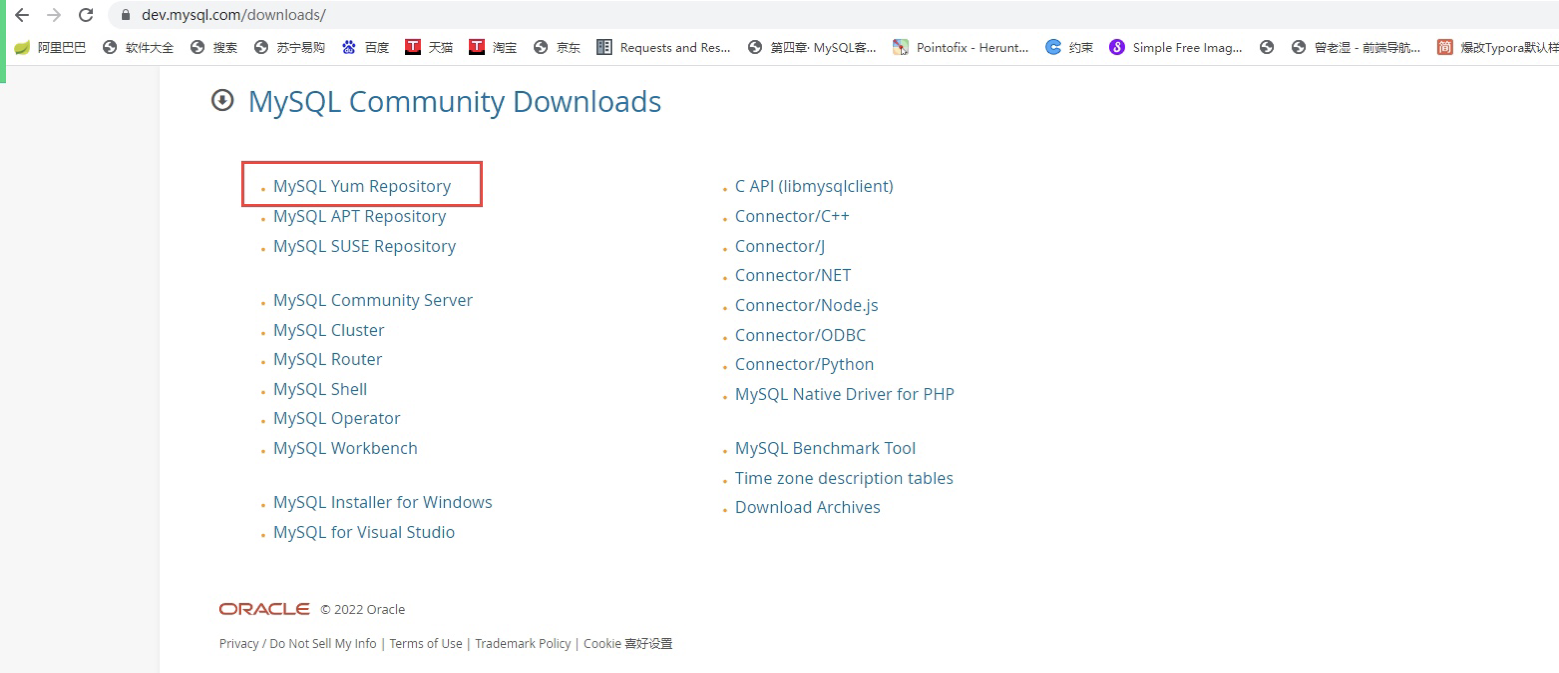
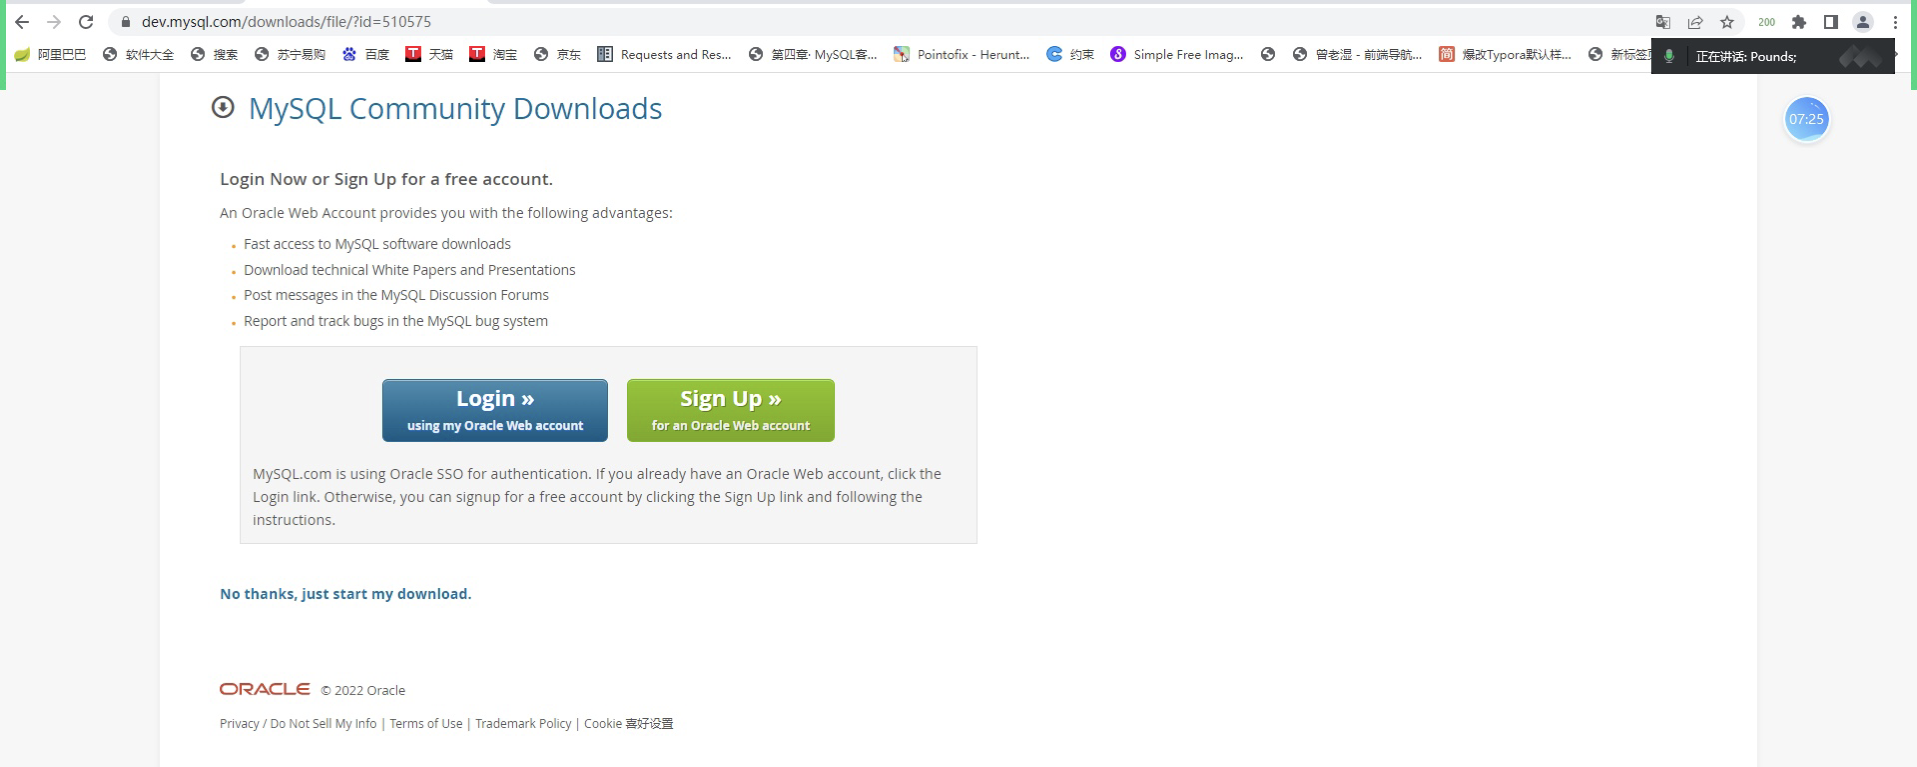
MySQL官网:https://www.mysql.com/
1 | # 0.安装MySQL依赖 |
初始化报错

1 | #没有安装Perl模块 |
MySQL二进制安装
1 | # 0.安装依赖 |
优化
1 | ## 查看MySQL用户 |
MySQL体系管理
客户端与服务端模型
C/S架构的服务
Client/Server
客户端
- mysql
- mysqladmin
- mysqldump
MySQL的连接方式
- TCP/IP
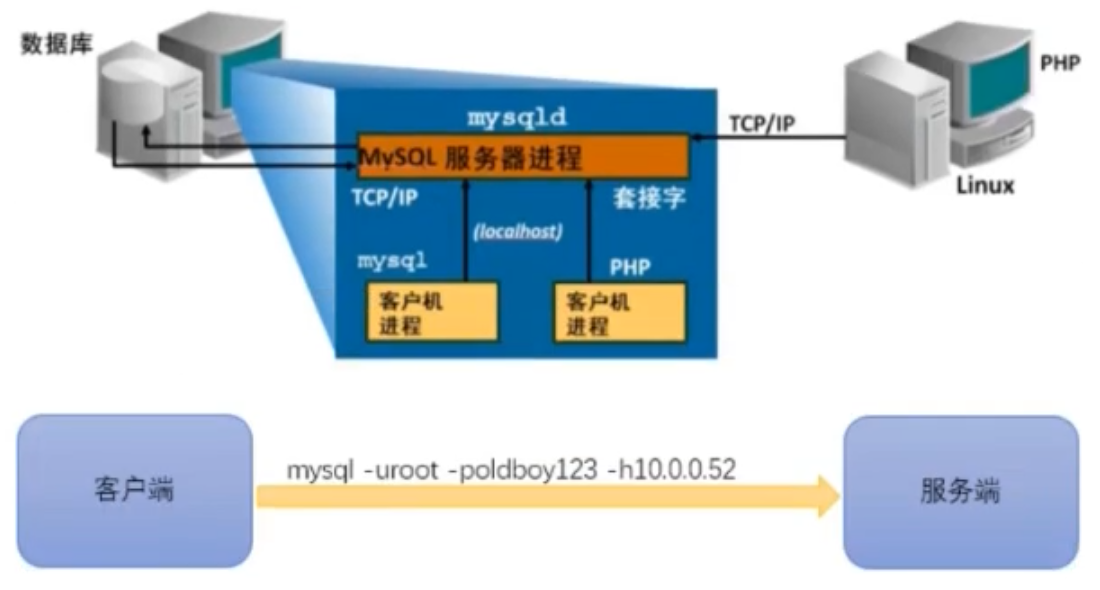
1 | mysql -uroot -p123 -h10.0.0.51 |
- Socket
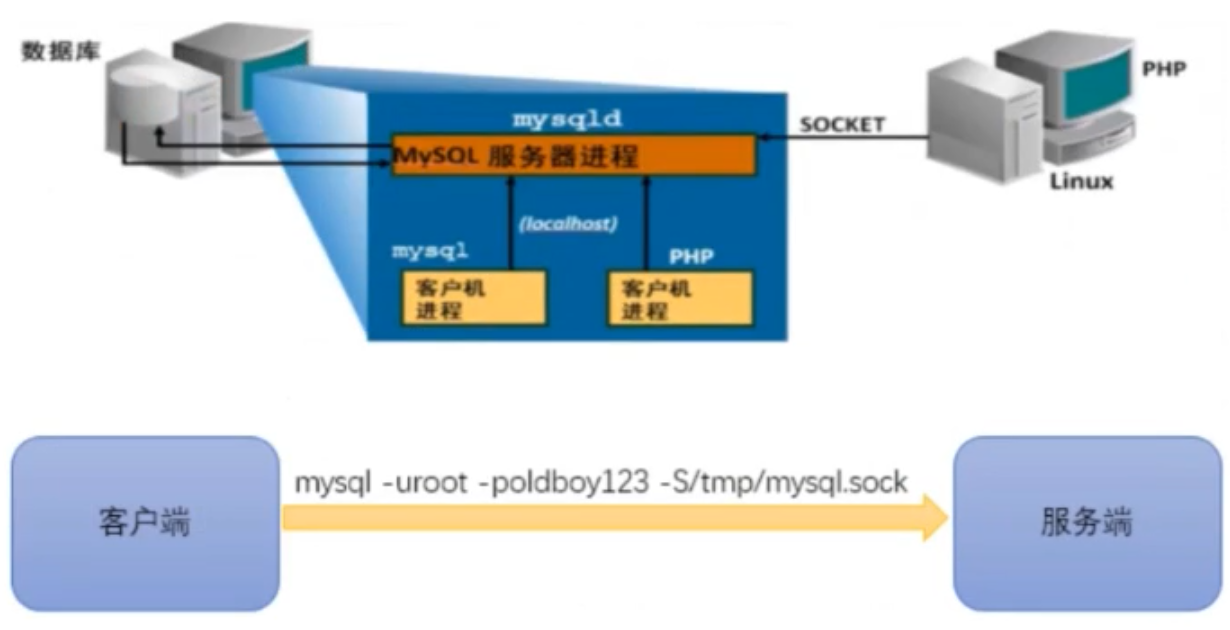
1 | mysql -uroot -p123 -S /application/mysql/tmp/mysql.sock |
问题:
1 | 1.mysql默认的连接方式是什么? # Socket |
MySQL服务器构成
实例
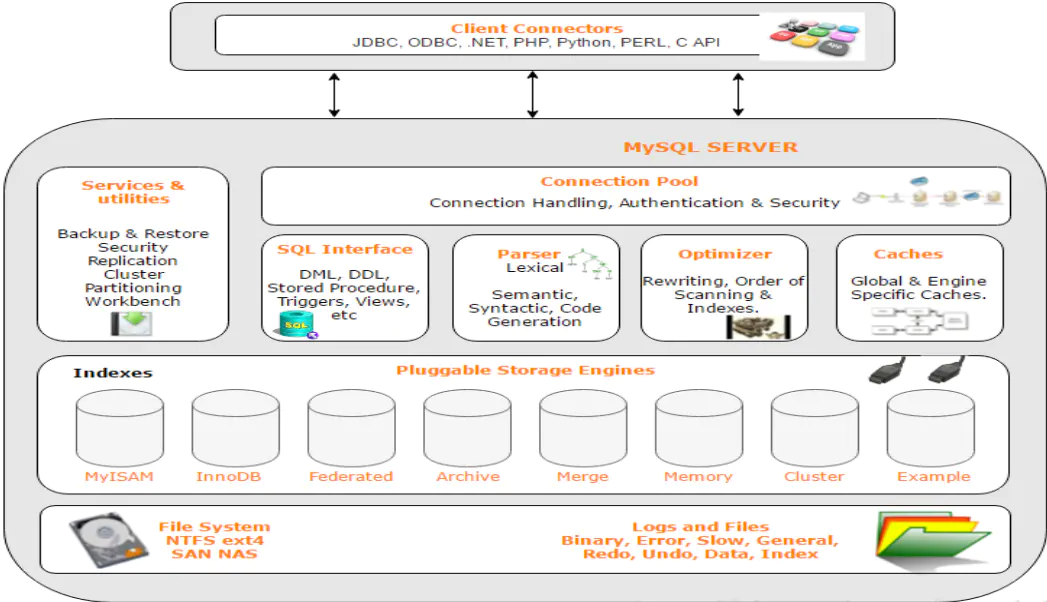
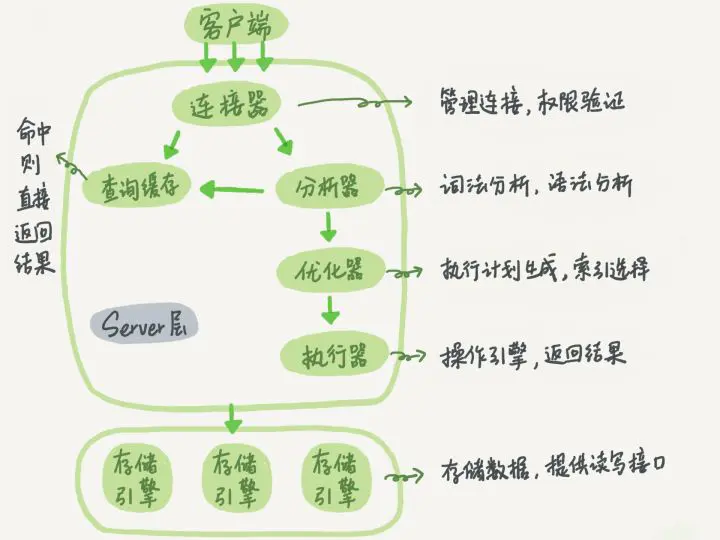
mysqld守护进程的程序结构
- 连接层
1 | 1.提供两种连接方式 |
- SQL层
1 | 1.接收连接层传递来的有权限的SQL语句 |
- 存储引擎层
1 | 1.接收SQL层传递来的SQL语句信息 |
MySQL的结构
逻辑结构
- MySQL数据库管理员的操作对象
- 库
- 表
- 元数据
- 列(字段,列名)
- 其它属性(数据类型、是否非空、默认值、主键、唯一、自增…….)
- 真实数据
- 元数据
- MySQL数据库管理员的操作对象
物理结构
- 最底层的数据文件
MySQL 表结构划分
段:由多个区构成,一张表,就是一个段
区:由多个页构成,一个区,由64个页构成,1M
块、页 block:MySQL最小的存储单元,默认16k
使用systemd管理MySQL
1 | [root@m01 ~]# vim /usr/lib/systemd/system/mysqld.service |
MySQL 版本区别及管理
MySQL5.6与MySQL5.7安装的区别
1 | # 1.编译,需要下载boost |
yum安装MySQL

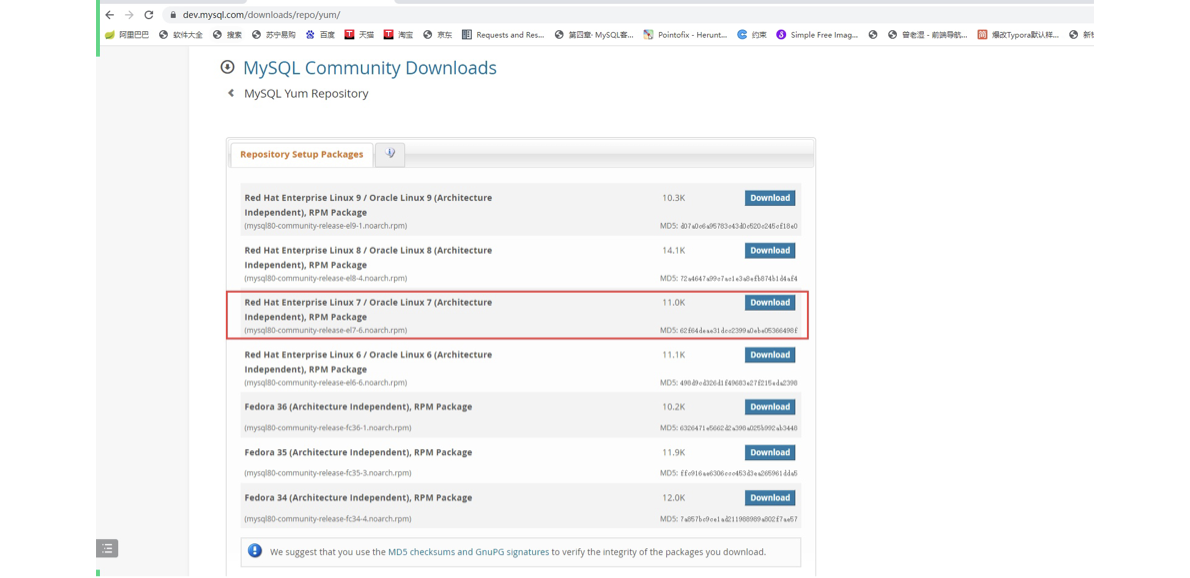
1 | # 1.下载MySQL的yum源 |
MySQL用户权限管理
MySQL用户操作
Linux用户的作用:
- 1)登陆系统
- 2)管理系统文件
Linux用户管理:
- 1)创建用户:useradd adduser
- 2)删除用户:userdel
- 3)修改用户:usermod
MySQL用户的作用:
- 1)登陆MySQL数据库
- 2)管理数据库对象
MySQL中的用户定义
在MySQL中,用户不仅仅是用户名
用户名@主机域
主机域:
- localhost
- 127.0.0.1
- %
- 10.0.0.%
- 10.0.%.%
- 10.%.%.%
- 10.0.0.5% (10.0.0.50-10.0.0.59 包括 10.0.0.5)
- db01(不能直接连,需要做解析)
- 10.0.0.0/255.255.255.0 == 10.0.0.%
- 10.0.0.0/24 (不支持)
用户管理
增
1 | # 5.6创建用户 |
删
1 | # drop user 用户名@'主机域'; |
改
1 | ## 改权限 |
忘记root密码
1 | ## 方法一: |
查
1 | # 查看所有用户 |
用户的权限
1 | INSERT,SELECT, UPDATE, DELETE, CREATE, DROP, RELOAD, SHUTDOWN, PROCESS, FILE, REFERENCES, INDEX, ALTER, SHOW DATABASES, SUPER, CREATE TEMPORARY TABLES, LOCK TABLES, EXECUTE, REPLICATION SLAVE, REPLICATION CLIENT, CREATE VIEW, SHOW VIEW, CREATE ROUTINE, ALTER ROUTINE, CREATE USER, EVENT, TRIGGER, CREATE TABLESPACE |
作用对象分解
*.* [当前MySQL实例中所有库下的所有表]
wordpress.* [当前MySQL实例中wordpress库中所有表(单库级别)]
wordpress.user [当前MySQL实例中wordpress库中的user表(单表级别)]
脱敏:脱离敏感信息
1 | mysql> grant select(user,host) on mysql.user to test@'%' identified by '123'; ## 单字段级别 |
企业中给开发开权限
1 | INSERT,SELECT, UPDATE, DELETE |
开发:请给我开一个用户
沟通:
- 1.你需要对哪些库、表进行操作
- 2.你从哪里连接过来
- 3.用户名有没有要求
- 4.密码要求
- 5.发邮件
(*****)
开发:你把root用户给我呗?
权限小练习
1 | #创建wordpress数据库 |
MySQL多实例
单实例:一个后台进程 + 多个线程 + 一个预分配的内存结构
多实例:多个后台进程 + 多个线程 + 多个预分配的内存结构
多个配置文件
- 多个端口
- data目录
- socket文件
- 多个日志文件
- pid文件
多个启动脚本
1 | # 1.准备多个配置文件 |
SQL语句入门
MySQL的连接管理
自带的连接工具(客户端)
- mysql
1 | -u:user指定MySQL的用户 |
- mysqladmin
- mysqldump(逻辑备份)
第三方连接工具(客户端)
- Navicat
- SQLmanager
- SQLyog
MySQL启动关闭流程
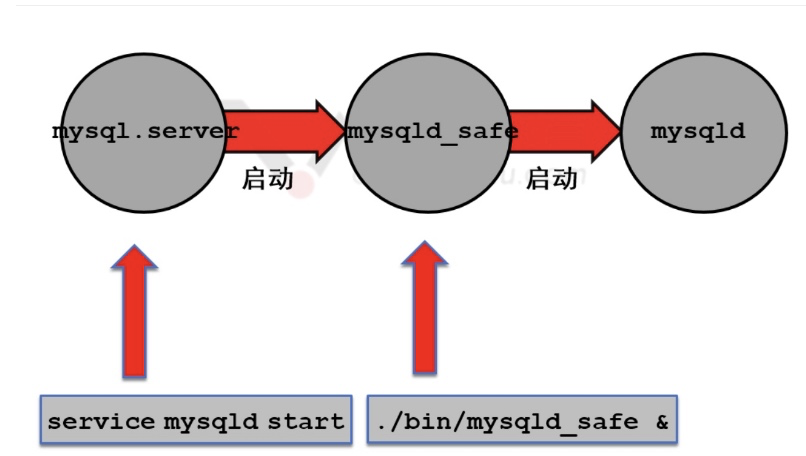
启动
1 | /etc/init.d/mysqld start |
关闭
1 | /etc/init.d/mysqld stop |
MySQL实例初始化配置
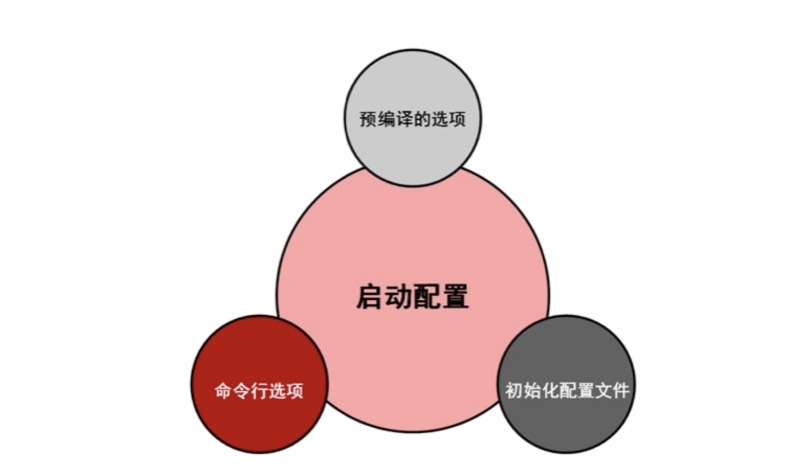
- 预编译
- 命令行
- 配置文件(读取顺序)
- /etc/my.cnf 10
- /etc/mysql/my.cnf 20
- $basedir/my.cnf 30
- –defaults-extra-file=/opt/my.cnf
- ~/.my.cnf 40
优先级
~/.my.cnf > –defaults-extra-file=/opt/my.cnf > $basedir/my.cnf > /etc/mysql/my.cnf > /etc/my.cnf
注意:如果启动MySQL加了--defaults-file=/etc/my.cnf选项,其它位置的配置文件都不读取
思考
1 | #cmake: |
初始化配置的作用
1.影响实例的启动(mysqld)
2.影响到客户端的连接
1 | [mysqld] [server] ## 这两个标签下的配置,都是来影响服务端启动的 |
MySQL的SQL语句
客户端命令
- mysql
1 | ## 查看命令帮助 |
- mysqladmin
1 | mysqladmin password '密码' # 修改密码或者设置密码 |
SQL层的SQL语句
什么是SQL语句
结构化的查询语句
标准:SQL-92
SQL语句的分类
- DDL
1 | Database Definition Language |
- DML
1 | Data Manipulation Language |
- DCL
1 | Database Control Language |
- DQL
1 | Database Query Language |
select 高级用法
传统连接
1 | ## 多表连查 |
自连接(NATURAL JOIN)
1 | 自动找到等价条件,前提:两张表的等价条件字段名,必须一样 |
内连接(join on)
1 | select 字段1,字段2,字段3 |
外连接
1 | ## 左外连接 left join |
联合查询
1 | #范围查询OR语句 |
1 | # 事务控制语句 |
字符集设置
操作系统设置字符集
1 | ## CentOS6 |
连接工具设置字符集
Xshell
1 | ## windows |
建库建表级别设置字符集
1 | ## 建库设置字符集 |
数据库配置设置字符集
1 | vim /etc/my.cnf |
MySQL索引及执行计划
索引的算法类型
BTree索引(Innodb存储引擎)
B-tree
B+tree
B*tree
HASH索引
FULLTEXT索引
RTree索引
索引类型
主键索引
- 联合索引
唯一键索引
- 前缀索引
- 联合索引
普通索引
- 前缀索引
- 联合索引
1 | ## 增 mysql> alter table city add 字段名 数据类型 属性; 添加字段 # 创建普通索引 |
前缀索引
1 | id text |
联合索引
原则:把最常用来做查询条件的列放在最前面
1 | ## 创建普通索引的联合索引 |
索引建立原则和规范
优先选择唯一键索引
1 | select count(字段名) from 表; |
唯一键索引的是唯一的,可以更快速的通过该索引来确定某条记录
- 重复值较多情况下,优先选择使用联合索引
- 为经常需要排序、分组和联合操作的字段建立索引
- 经常需要ORDER BY、GROUP BY、DISTINCT和UNION等操作的字段,排序操作 会浪费很多时间。
- 如果为其建立索引,可以有效地避免排序操作
- 经常查询
- 列值的重复值少
- 尽量使用前缀索引(在唯一键或联合索引基础之上创建前缀)
注意:
1.一定要限制索引的数目
索引的数目不是越多越好。每个索引都需要占用磁盘空间,索引越多,需要的磁盘空间就越大。
修改表时,对索引的重构和更新很麻烦。越多的索引,会使更新表变得很浪费时间。
2.删除不再使用或很少使用的索引
表中的数据被大量更新,或者数据的使用方式被改变后,原有的一些索引可能不再需要。数
据库管理员应当定期找出这些索引,将它们删除,从而减少索引对更新操作的影响。
企业问题:
我们网站响应速度很慢?如何排查?如何处理?
1)网站的服务器,负载高
1 | stress是Linux系统压力测试工具,这里我们用作异常进程模拟平均负载升高的场景。 |
2)代码逻辑问题,代码有bug
1 | 查看程序日志 |
3)网络带宽、网络波动
1 | 升级带宽 |
4)缓存失效
1 | 错峰设置缓存失效周期 |
5)数据库查询速度慢
1.找出哪一条SQL语句执行的慢(开启慢查询日志)
1 | [mysqld] |
2.分析SQL语句为什么慢
1 | # Time: 2023-04-11T01:03:33.279720Z |
全表扫描
1
type:ALL 全表扫描
该字段没有创建索引
有索引但是没走索引
SQL语句执行效率级别
1 | 0)ALL |
key_len:越小越好(前缀索引去控制)
rows:越小越好
不走索引的情况
1 | # 1.全表扫描 |