Nginx服务 Nginx概述 Nginx是一个开源且高性能、可靠的Http Web服务、代理服务
开源:直接获取源代码
高性能:支持海量并发
可靠:服务稳定
Nginx非常轻量
功能模块少 (源代码仅保留http与核心模块代码,其余不够核心代码会作为插件来安装)
代码模块化 (易读,便于二次开发,对于开发人员非常友好)
互联网公司都选择Nginx
Nginx采用Epool网络模型,Apache采用Select模型
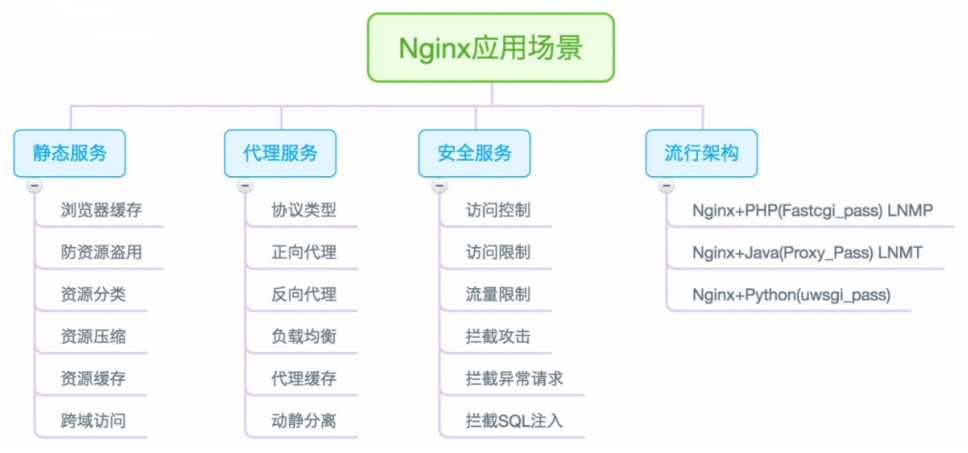
Nginx应用场景
静态WEB软件(主要跑前端代码)
1
2
3
4
5
6
nginx apache IIS lighttpd tengine openresty-nginx
动态WEB软件(主要跑后端代码)
1
2
3
4
Tomcat Resin weblogic Jboss
Nginx快速安装 Nginx的安装方式
1.源码编译=>Nginx (1.版本随意 2.安装复杂 3.升级繁琐 4.规范 5.便于管理)
2.epel仓库=>Nginx (1.版本较低 2.安装简单 3.配置不易读)
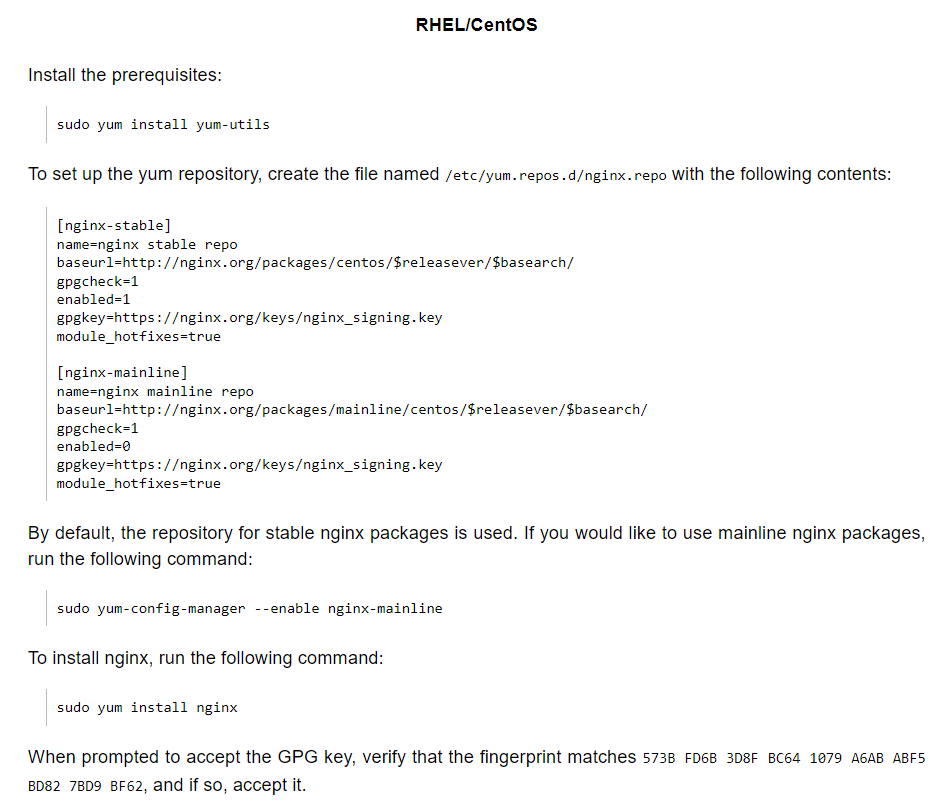
3.官方仓库=>Nginx (1.版本较新 2.安装简单 3.配置易读)
Nginx官方网站:https://nginx.org/
1 2 3 4 5 6 7 8 9 10 11 12 13 14 15 16 17 18 19 20 21 22 23 24 [root@web01 ~] [nginx-stable] name=nginx stable repo baseurl=http://nginx.org/packages/centos/$releasever /$basearch / gpgcheck=1 enabled=1 gpgkey=https://nginx.org/keys/nginx_signing.key module_hotfixes=true [root@web01 ~] [root@web01 ~] [root@web01 ~] [root@web01 ~] nginx version: nginx/1.22.0 [root@web01 ~] --prefix=/application/nginx-1.22.0 --user=nginx --group=nginx --with-compat --with-file-aio --with-threads --with-http_addition_module --with-http_auth_request_module --with- http_dav_module --with-http_flv_module --with-http_gunzip_module --with- http_gzip_static_module --with-http_mp4_module --with-http_random_index_module --with- http_realip_module --with-http_secure_link_module --with-http_slice_module --with- http_ssl_module --with-http_stub_status_module --with-http_sub_module --with-http_v2_module --with-mail --with-mail_ssl_module --with-stream --with-stream_realip_module --with- stream_ssl_module --with-stream_ssl_preread_module --with-cc-opt='-O2 -g -pipe -Wall -Wp,- D_FORTIFY_SOURCE=2 -fexceptions -fstack-protector-strong --param=ssp-buffer-size=4 - grecord-gcc-switches -m64 -mtune=generic -fPIC' --with-ld-opt='-Wl,-z,relro -Wl,-z,now - pie'
Nginx的启停 1 2 3 4 5 6 7 8 9 10 11 12 13 14 15 16 17 18 19 20 21 22 23 24 25 26 27 28 29 30 31 32 33 34 35 36 37 38 39 40 41 42 43 44 45 46 47 48 49 50 51 52 53 54 55 56 57 58 59 60 systemctl start nginx nginx /目录/nginx/sbin/nginx nginx -s stop /目录/nginx/sbin/nginx -s stop systemctl reload nginx nginx -s reload /app/nginx/sbin/nginx -s reload -c:指定配置文件的路径 -t:检查配置文件的语法(无法检测单词拼写) -s:启停重载,服务操作 -v:查看版本号 -V:查看版本和编译参数 [root@web01 ~] [Unit] Description=nginx - high performance web server Documentation=http://nginx.org/en/docs/ After=network-online.target remote-fs.target nss-lookup.target Wants=network-online.target [Service] Type=forking PIDFile=/var/run/nginx.pid ExecStart=/usr/sbin/nginx -c /etc/nginx/nginx.conf ExecReload=/bin/sh -c "/bin/kill -s HUP $(/bin/cat /var/run/nginx.pid) " ExecStop=/bin/sh -c "/bin/kill -s TERM $(/bin/cat /var/run/nginx.pid) " [Install] WantedBy=multi-user.target [root@web01 ~] ln -s /application/nginx-1.20.2 /opt/nginx echo 'PATH="/usr/local/nginx/sbin:$PATH"' > /etc/profile.d/nginx.sh cat >> /usr/lib/systemd/system/nginx.service <<EOF [Unit] Description=nginx - high performance web server Documentation=http://nginx.org/en/docs/ After=network-online.target remote-fs.target nss-lookup.target Wants=network-online.target [Service] Type=forking PIDFile=/application/nginx/nginx.pid ExecStart=/application/nginx/sbin/nginx -c /application/nginx/conf/nginx.conf ExecReload=/bin/sh -c "/bin/kill -s HUP $(/bin/cat /application/nginx/nginx.pid) " ExecStop=/bin/sh -c "/bin/kill -s TERM $(/bin/cat /application/nginx/nginx.pid) " [Install] WantedBy=multi-user.target EOF
Nginx配置文件
路径
类型
作用
/etc/nginx/nginx.conf
配置文件
nginx主配置文件
/etc/nginx/conf.d/default.conf
配置文件
nginx网站示例配置文件
路径
类型
作用
/etc/nginx/fastcgi_params
配置文件
Fastcgi代理配置文件
/etc/nginx/scgi_params
配置文件
scgi代理配置文件
/etc/nginx/uwsgi_params
配置文件
uwsgi代理配置文件
路径
类型
作用
/etc/nginx/win-utf
配置文件
Nginx编码转换映射文件
/etc/nginx/koi-utf
配置文件
Nginx编码转换映射文件
/etc/nginx/koi-win
配置文件
Nginx编码转换映射文件
/etc/nginx/mime.types(*)
配置文件
Content-Type与扩展名
路径
类型
作用
/usr/sbin/nginx
配置文件
Nginx命令行管理终端工具
/usr/sbin/nginx-debug
配置文件
Nginx命令行与终端调试工具
路径
类型
作用
/var/log/nginx
目录
Nginx默认存放日志目录
/etc/logrotate.d/nginx
配置文件
Nginx默认的日志切割
Nginx配置文件详解 1 2 3 4 5 6 7 8 9 10 11 12 13 14 15 16 17 18 19 20 21 22 23 24 25 26 27 28 29 30 31 32 33 34 35 36 37 38 39 40 41 42 43 44 45 46 47 48 49 50 51 52 53 54 55 56 57 58 59 60 61 62 63 64 65 66 67 68 69 70 71 72 73 74 75 76 77 78 79 80 81 82 83 84 85 86 87 88 89 90 91 92 93 94 95 96 97 98 99 100 101 102 103 104 105 [root@web02 nginx] 注意:nginx配置文件,每一行,都';' 结尾 [root@web01 nginx] user nginx; worker_processes auto; error_log /var/log /nginx/error.log notice; pid /var/run/nginx.pid; events { worker_connections 1024; } http { include /etc/nginx/mime.types; default_type application/octet-stream; log_format main '$remote_addr - $remote_user [$time_local] "$request" ' '$status $body_bytes_sent "$http_referer" ' '"$http_user_agent" "$http_x_forwarded_for"' ; access_log /var/log /nginx/access.log main; sendfile on; keepalive_timeout 65; include /etc/nginx/conf.d/*.conf; } $remote_addr :远端的IP(上一个节点的IP) $remote_user :登录的用户 [$time_local ]:时间 "$request " :请求方式、请求uri、HTTP协议版本号 $status :状态码 $body_bytes_sent :流量 "$http_referer " :跳转地址(从哪个网站跳转过来的) "$http_user_agent " :客户端浏览器相关信息"$http_x_forwarded_for " :记录透传IP地址(获取用户的真实IP)$request_length :请求的长度(包括请求行, 请求头和请求正文)。$request_time :请求花费的时间,单位为秒,精度毫秒Syntax: access_log path [format [buffer=size] [gzip[=level]] [flush=time] [if =condition]]; access_log off; Default: access_log logs/access.log combined; Context: http, server, location, if in location, limit_except server { listen 80; server_name localhost; location / { root /usr/share/nginx/html; index index.html roger.html; } } http{ access_log /var/log /nginx/access.log main; server { listen 80; server_name www.baidu.com; ... access_log /var/log /nginx/www.baidu.com.access.log main; } server { listen 80; server_name zhidao.baidu.com; ... access_log /var/log /nginx/zhidao.baidu.com.access.log main; } server { listen 80; server_name map.baidu.com; ... access_log /var/log /nginx/map.baidu.com.access.log main; } }
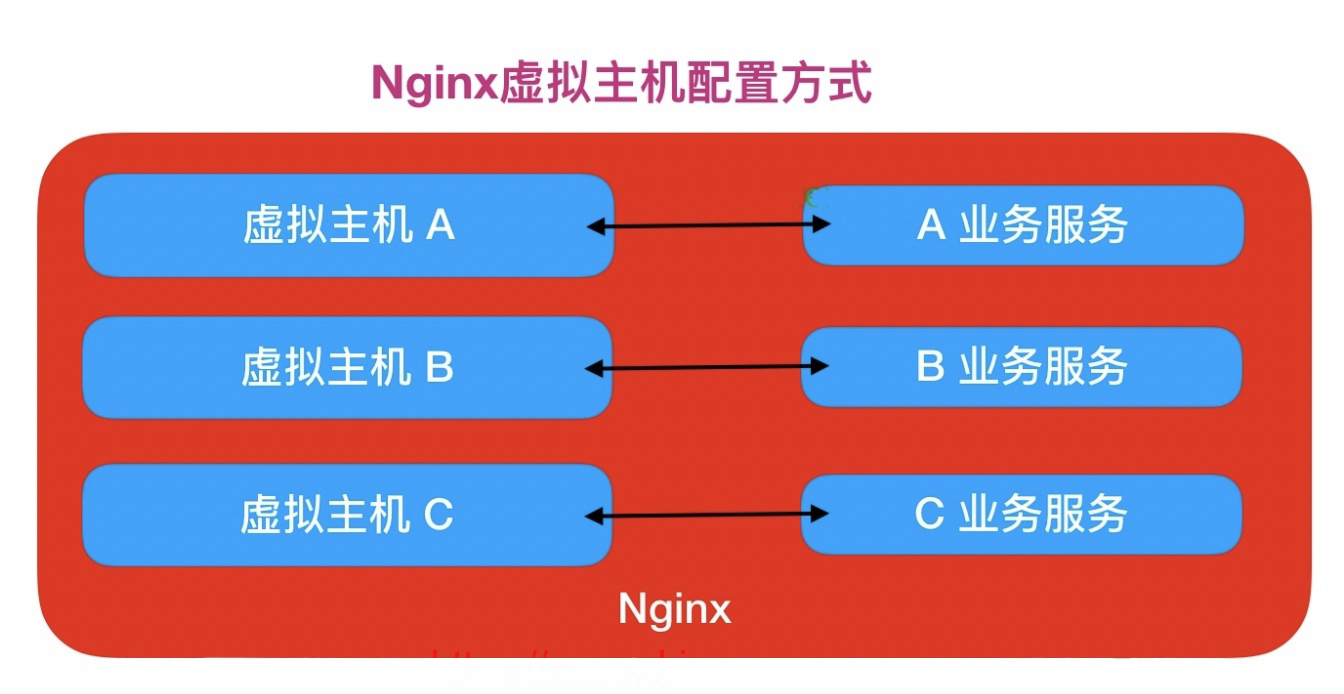
多虚拟主机(多web网站配置) 在企业中,是不可能用一个nginx对应一套业务,多个网站都在一个nginx中配置
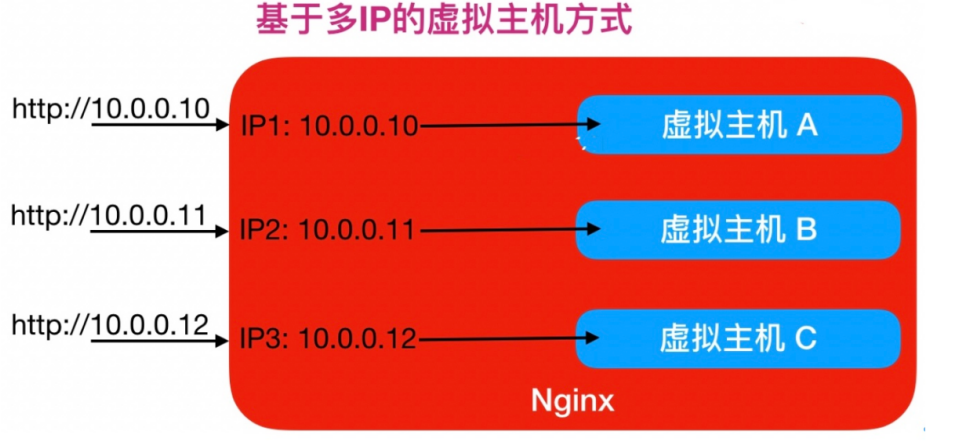
基于IP的多虚拟主机
1 2 3 4 5 6 7 8 9 10 11 12 13 14 15 16 17 18 19 20 21 22 23 24 25 26 27 [root@web01 conf.d] [root@web01 conf.d] [root@web01 conf.d] server { listen 80; server_name 10.0.0.10; location / { root /game/h5_games; index index.html; } } [root@web01 conf.d] server { listen 80; server_name 10.0.0.11; root /code; location / { index index.html; } location /roger { index index_1.html roger.html; } }
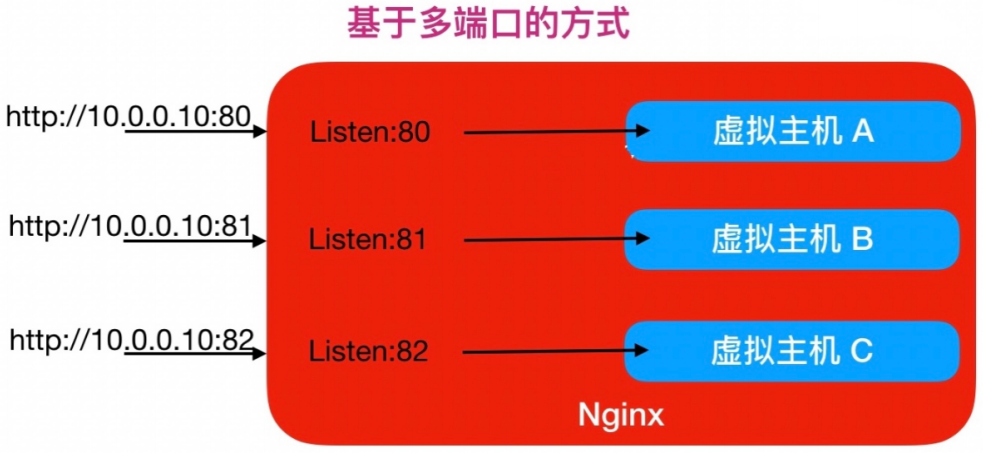
基于多端口的虚拟主机
1 2 3 4 5 6 7 8 9 10 11 12 13 14 15 16 17 18 19 20 21 22 23 24 [root@web01 conf.d] server{ listen 8081; server_name 10.0.0.7; location / { root /game/h5_games; index index.html; } } [root@web01 conf.d] server{ listen 8082; server_name 10.0.0.7; root /code; location / { index index.html; } location /roger { index index_1.html roger.html; } }
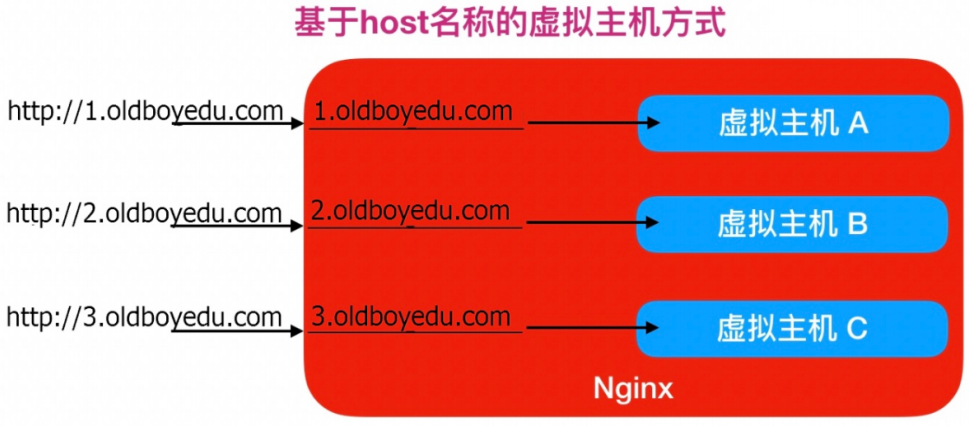
基于多域名的虚拟主机
1 2 3 4 5 6 7 8 9 10 11 12 13 14 15 [root@web01 conf.d] server { listen 80; server_name blog.roger.com; root /roger1; index index.html; } [root@web01 conf.d] server { listen 80; server_name www.roger.com; root /roger; index index.html; }
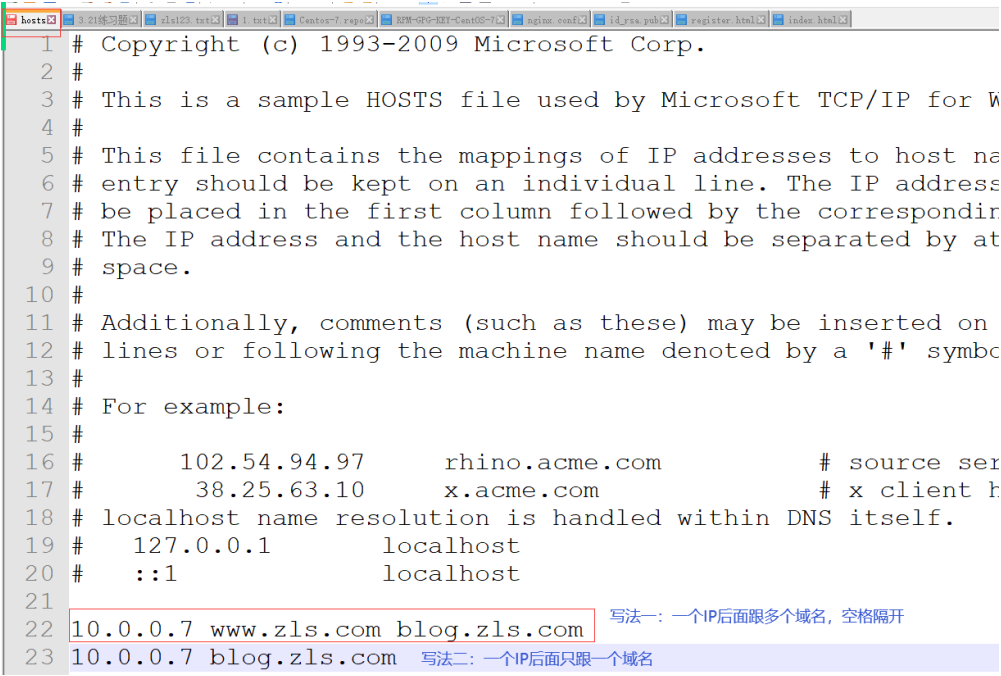
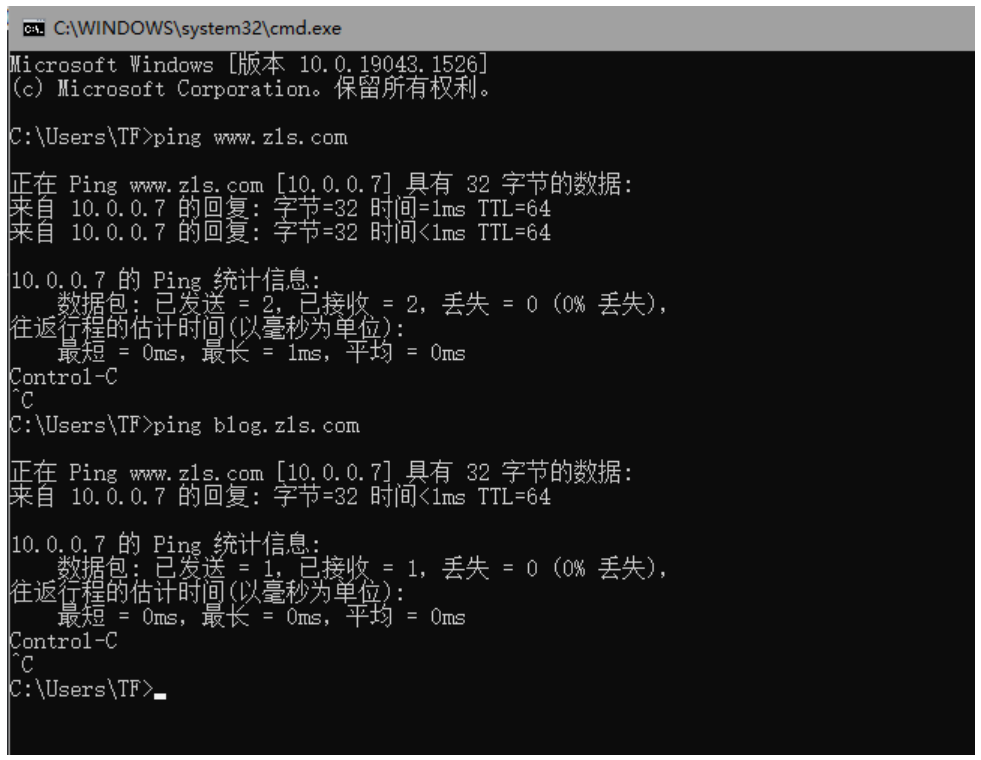
在windows系统中,配置本地的DNS
1.按win+r打开运行
2.输入:drivers
3.进入与etc目录
访问不到:
Nginx日志切割 使用logrotate切割日志
1 2 3 4 5 6 7 8 9 10 11 12 13 14 15 16 [root@nginx conf.d] /var/log /nginx/*.log { daily missingok rotate 52 compress delaycompress notifempty create 640 nginx adm sharedscripts postrotate if [ -f /var/run/nginx.pid ]; then kill -USR1 `cat /var/run/nginx.pid` fi endscript }
日志切割后的效果
1 2 3 4 5 6 [root@oldboy ~] total 4044 -rw-r----- 1 www adm 54438 Oct 12 03:28 access.log-20181012.gz -rw-r----- 1 www adm 28657 Oct 13 03:48 access.log-20181013.gz -rw-r----- 1 www adm 10135 Oct 12 03:28 error.log-20181130.gz -rw-r----- 1 www adm 7452 Oct 13 03:48 error.log-20181201.gz
Nginx常用模块 Nginx目录索引模块 ngx_http_autoindex_module 模块处理以斜杠字符(’/‘)结尾的请求,并生成目录列表
当 ngx_http_index_module 模块找不到索引文件时,通常会将请求传递给 ngx_http_autoindex_module 模块
1 2 3 4 5 6 7 8 9 10 11 12 13 14 15 16 17 18 19 20 21 22 23 24 25 Syntax: autoindex on | off; Default: autoindex off; Context: http, server, location server{ listen 80; server_name _; location / { root /test ; autoindex on; autoindex_exact_size off; autoindex_localtime on; } }
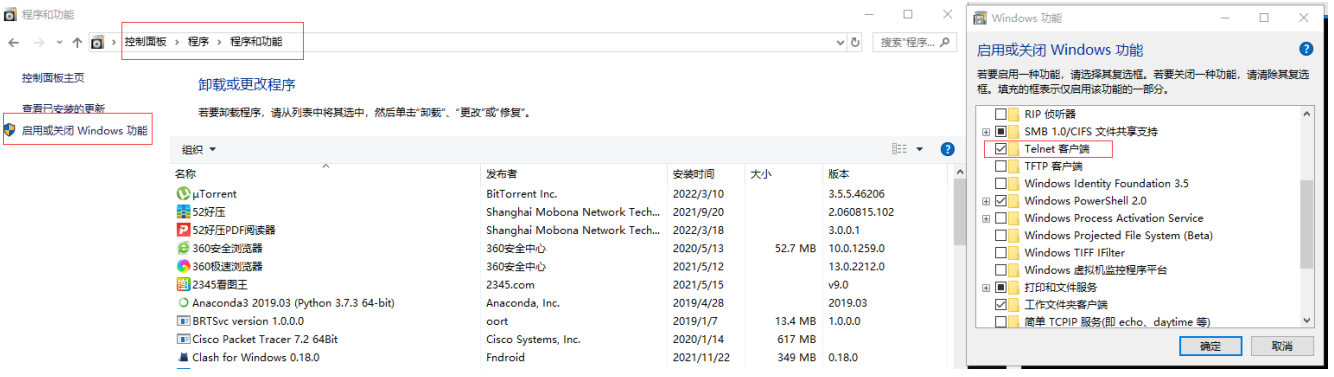
windows启用telnet命令
Nginx状态模块 1 2 3 4 5 6 7 8 9 10 11 12 13 14 15 16 17 18 19 20 21 22 23 24 25 26 27 28 29 30 31 [root@web01 conf.d] server{ listen 80; server_name _; location / { root /test ; autoindex on; autoindex_exact_size off; autoindex_localtime on; } location /roger { stub_status; } } Active connections accepts handled requests Reading Writing Waiting 注意, 一次TCP的连接,可以发起多次http的请求, 如下参数可配置进行验证 keepalive_timeout 0; keepalive_timeout 65;
Nginx访问控制模块 基于用户密码(auth_basic) 1 2 3 4 5 6 7 8 9 10 11 12 13 14 15 16 17 18 19 20 21 22 23 24 25 26 27 28 29 30 31 32 33 34 35 36 37 [root@web01 conf.d] [root@web01 nginx] -b:允许命令行中输入密码 -c:创建一个新文件,将用户名和密码保存到指定文件中 [root@web01 nginx] [root@web01 nginx] roger:$apr1 $ohAvPJlj $I8viSCSG8FjwOE4z8VelQ . [root@web01 nginx] server{ listen 80; server_name _; auth_basic "password is 123" ; auth_basic_user_file /etc/nginx/auth/roger_auth; location / { root /test ; autoindex on; autoindex_exact_size off; autoindex_localtime on; } location /roger { stub_status; } } [root@web01 ~] [root@web01 ~] roger:$apr1 $ohAvPJlj $I8viSCSG8FjwOE4z8VelQ . zls:$apr1 $txPXciw9 $mgO3UhGuXkNhu7j4WvLre .
基于IP访问控制(access) 1 2 3 4 5 6 7 8 9 10 11 12 13 14 15 16 17 18 19 20 21 22 23 24 server{ listen 80; server_name _; auth_basic "password is 123" ; auth_basic_user_file auth/zls_auth; location / { root /test ; autoindex on; autoindex_exact_size off; autoindex_localtime on; allow 10.0.0.8; deny all; } location /roger { stub_status; } } curl http://用户名:密码@10.0.0.7 注意:默认nginx是allow all;如果只允许某一个IP需要配合deny all使用,deny all;要放在最下面
访问频率限制 连接频率限制(limit_conn) 1 2 3 4 5 6 7 8 9 http{ limit_conn_zone $remote_addr zone=内存空间的名字:10m; server { limit_conn 内存空间的名字 1; } } conn_zone:内存空间的名字 1:连接次数
请求频率限制(limit_req) 1 2 3 4 5 6 7 8 9 10 11 12 13 14 15 16 17 18 19 20 21 22 23 24 25 26 27 28 29 30 31 32 33 34 35 36 37 38 39 40 41 42 43 44 45 46 http { limit_req_zone $binary_remote_addr zone=req_zone:10m rate=1r/s; } server { listen 80; server_name module.oldboy.com; limit_req zone=req_zone burst=3 nodelay; location / { root /code; index index.html; } } [root@web01 ~] http { limit_req_zone $binary_remote_addr zone=req_zone:10m rate=1r/s; } server{ listen 80; server_name _; auth_basic "password is 123" ; auth_basic_user_file auth/zls_auth; limit_req zone=req_zone burst=3 nodelay; limit_req_status 508; error_page 508 /508.html; location /{ root /test ; autoindex on; autoindex_exact_size off; autoindex_localtime on; } location /roger { stub_status; } }
location优先级
匹配符
匹配规则
优先级
=
精确匹配
1
^~
以某个字符串开头
2
~
区分大小写的正则匹配
3
~*
不区分大小写的正则匹配
4
!~
区分大小写不匹配的正则
5
!~*
不区分大小写不匹配的正则
6
/
通用匹配,任何请求都会匹配到
7
1 2 3 4 5 6 7 8 9 10 11 12 13 14 15 16 17 18 19 20 21 22 23 24 25 26 27 28 location / { ... } location ~ \.php$ { ... } location ~ \.jsp$ { ... } location ~* .*\.(jpg|gif|png|js|css)$ { ... } location ~* \.(jpg|gif|png|js|css)$ { ... } location ~* "\.(sql|bak|tgz|tar.gz|.git)$" { ... }
Nginx实现web架构 企业中网站架构 1 2 3 4 5 6 7 8 LNMP:Linux Nginx MySQL PHP LAMP:Linux Apache MySQL PHP LNMT:Linux Nginx MySQL Tomcat LAMT:Linux Apache MySQL Tomcat Nginx Apache:运行html css js PHP:运行php代码 Tomcat:运行Java代码
LNMP架构概述 什么是LNMP
LNMP是一套技术的组合,L=Linux、N=Nginx、M=MySQL、P=PHP
LNMP架构是如何工作的
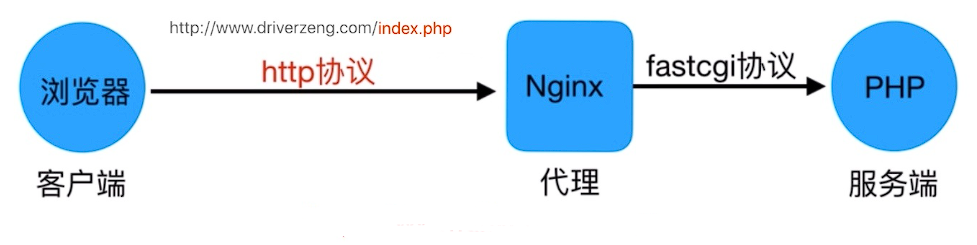
当用户发起http请求,请求会被Nginx处理,如果是静态资源请求Nginx则直接返回,如果是动态请求Nginx则通过fastcgi协议转交给后端的PHP程序处理,具体如下图所示
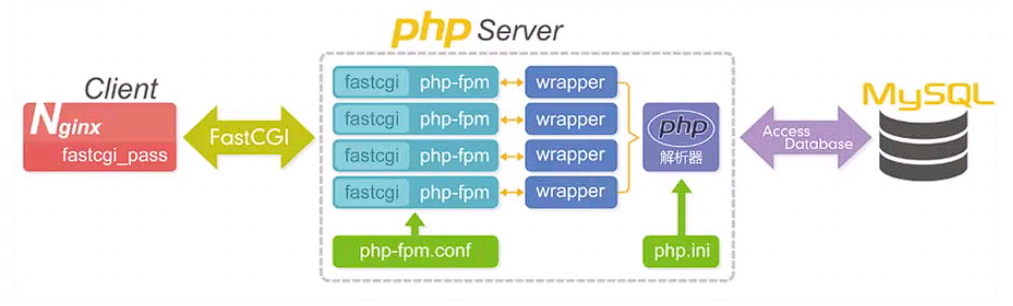
Nginx与Fast-CGO详细工作流程
1.用户通过http协议发起请求,请求会先抵达LNMP架构中的Nginx
2.Nginx会根据用户的请求进行判断,这个判断是有Location进行完成
3.判断用户请求的是静态页面,Nginx直接进行处理
4.判断用户请求的是动态页面,Nginx会将该请求交给fastcgi协议下发
5.fastgi会将请求交给php-fpm管理进程, php-fpm管理进程接收到后会调用具体的工作进程warrap
6.warrap进程会调用php程序进行解析,如果只是解析代码php直接返回
7.如果有查询数据库操作,则由php连接数据库(用户 密码 IP)发起查询的操作
8.最终数据由mysql->php->php-fpm->fastcgi->nginx->http->user
部署PHP 1 2 3 4 5 6 7 8 9 10 11 12 13 14 15 16 17 18 19 20 21 22 23 24 25 26 27 28 29 30 31 32 33 34 35 36 37 38 39 40 41 42 43 44 45 46 47 48 49 50 51 52 53 54 55 56 57 58 59 60 61 62 [root@web01 ~] [root@nginx ~] [php-webtatic] name = PHP Repository baseurl = http://us-east.repo.webtatic.com/yum/el7/x86_64/ gpgcheck = 0 或 yum -y install epel-release yum-utils rpm -Uvh http://mirror.webtatic.com/yum/el6/latest.rpm rpm -ivh http://rpms.famillecollet.com/enterprise/remi-release-7.rpm yum install -y --enablerepo=remi --enablerepo=remi-php74 mod_php php-gd* php php-opcache php-mbstring php-mysqlnd php-phpunit-PHPUnit php-pecl-xdebug php-pecl-xhprof php-fpm yum install -y --enablerepo=remi --enablerepo=remi-php74 php-cli php-redis php-pecl-mcrypt php-process php-devel php-pear php --version php -m [root@web01 ~] [root@web01 ~] [root@web01 ~] [root@web01 ~] user www; [root@web01 ~] php-fpm作用:用来管理php程序运行 /etc/php-fpm.conf /etc/php.ini /etc/php-fpm.d/www.conf [root@web01 ~] [www] user = www group = www 注意:php配置文件中;是注释 [root@web01 ~] [root@web01 ~] 或 [root@web01 ~] [root@web01 ~] root 7764 1 0 06:02 ? 00:00:00 php-fpm: master process (/etc/php-fpm.conf) www 7765 7764 0 06:02 ? 00:00:00 php-fpm: pool www www 7766 7764 0 06:02 ? 00:00:00 php-fpm: pool www www 7767 7764 0 06:02 ? 00:00:00 php-fpm: pool www www 7768 7764 0 06:02 ? 00:00:00 php-fpm: pool www www 7769 7764 0 06:02 ? 00:00:00 php-fpm: pool www root 7772 7043 0 06:02 pts/1 00:00:00 grep --color=auto php [root@web01 ~] tcp 0 0 127.0.0.1:9000 0.0.0.0:* LISTEN 7764/php-fpm: maste
配置nginx连接php 1 2 3 4 5 6 7 8 9 10 11 12 13 14 15 16 17 18 19 20 21 22 23 24 25 26 27 28 [root@web01 movie] server{ listen 80; server_name movie.roger.com; location / { root /movie; index index.php index.html; } location ~ \.php$ { root /movie; fastcgi_pass 127.0.0.1:9000; fastcgi_param SCRIPT_FILENAME $document_root $fastcgi_script_name ; include /etc/nginx/fastcgi_params; } } [root@web01 movie] [root@web01 movie] <?php phpinfo(); ?>
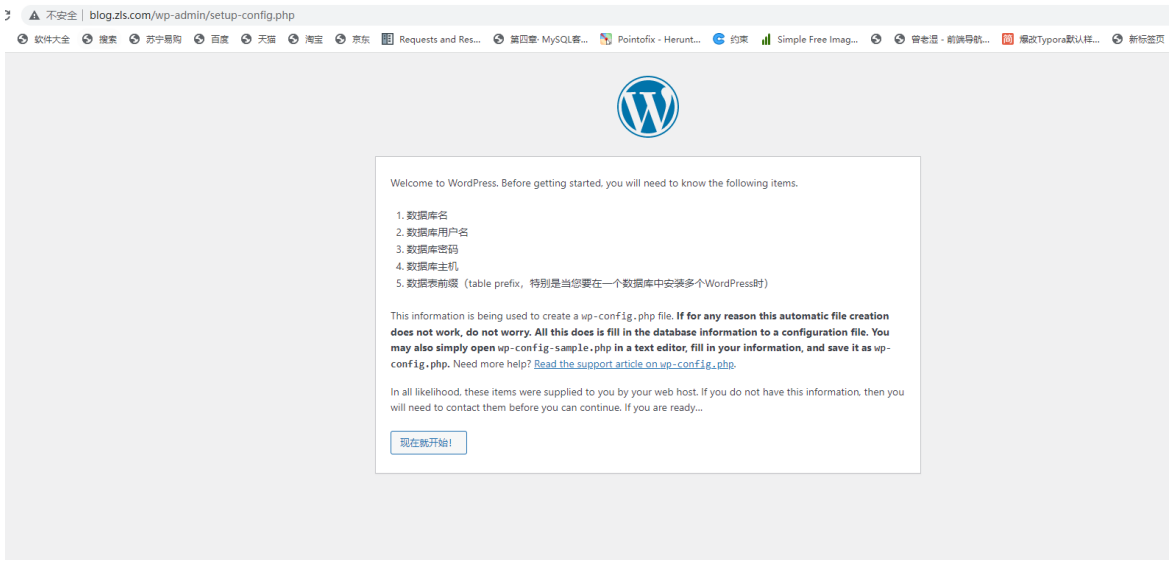
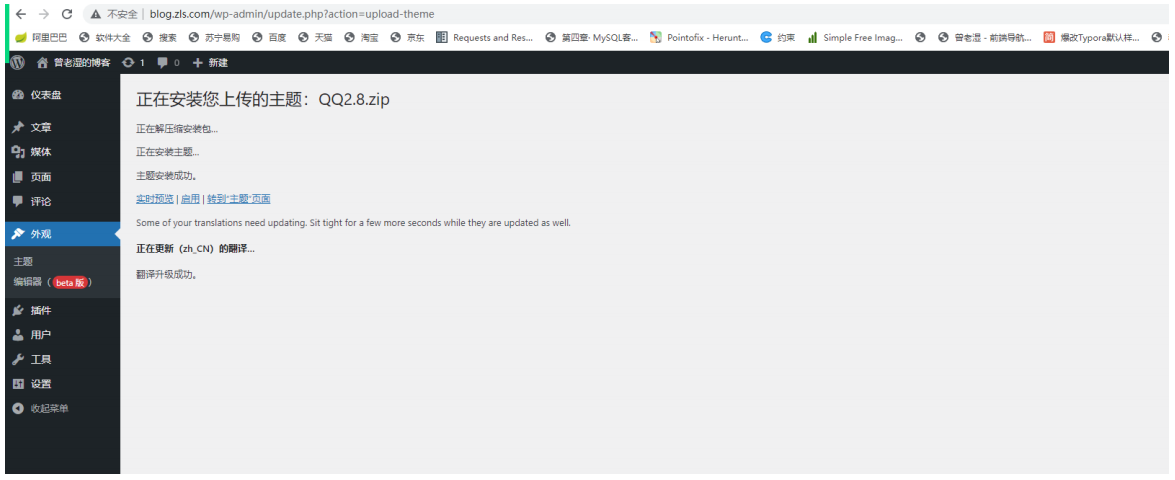
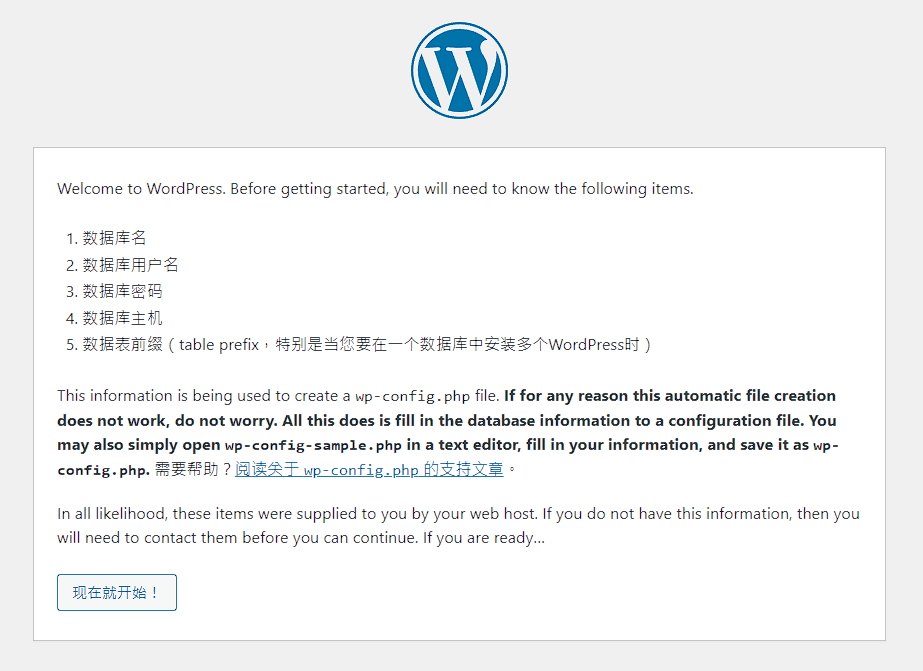
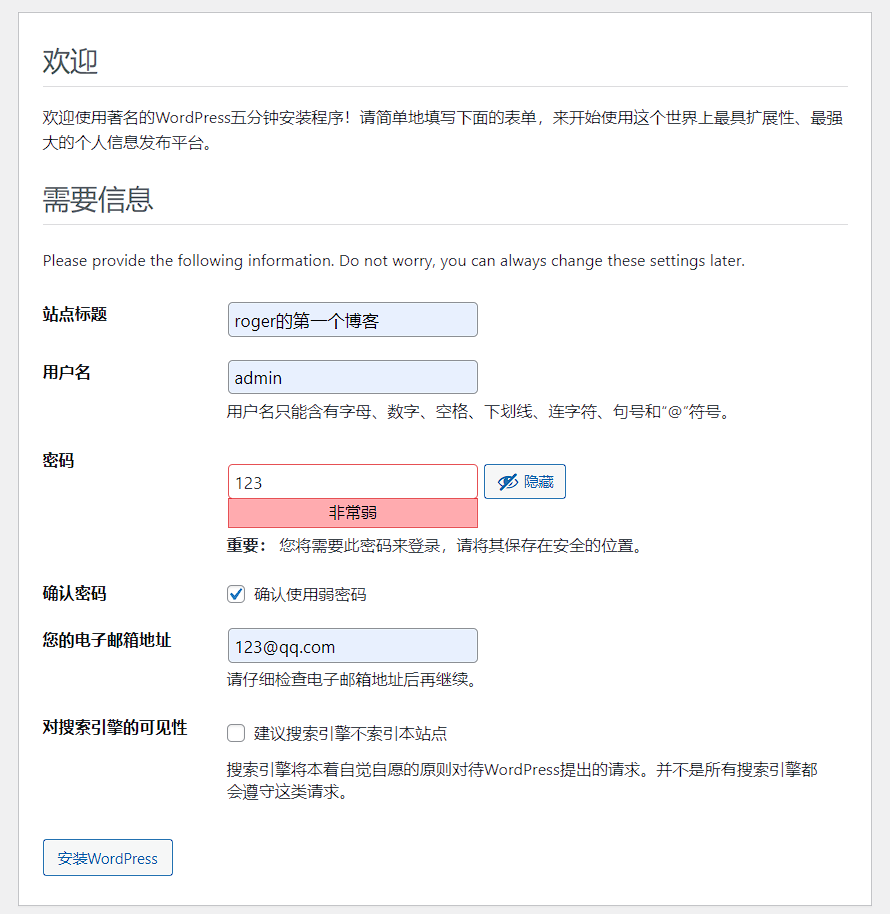
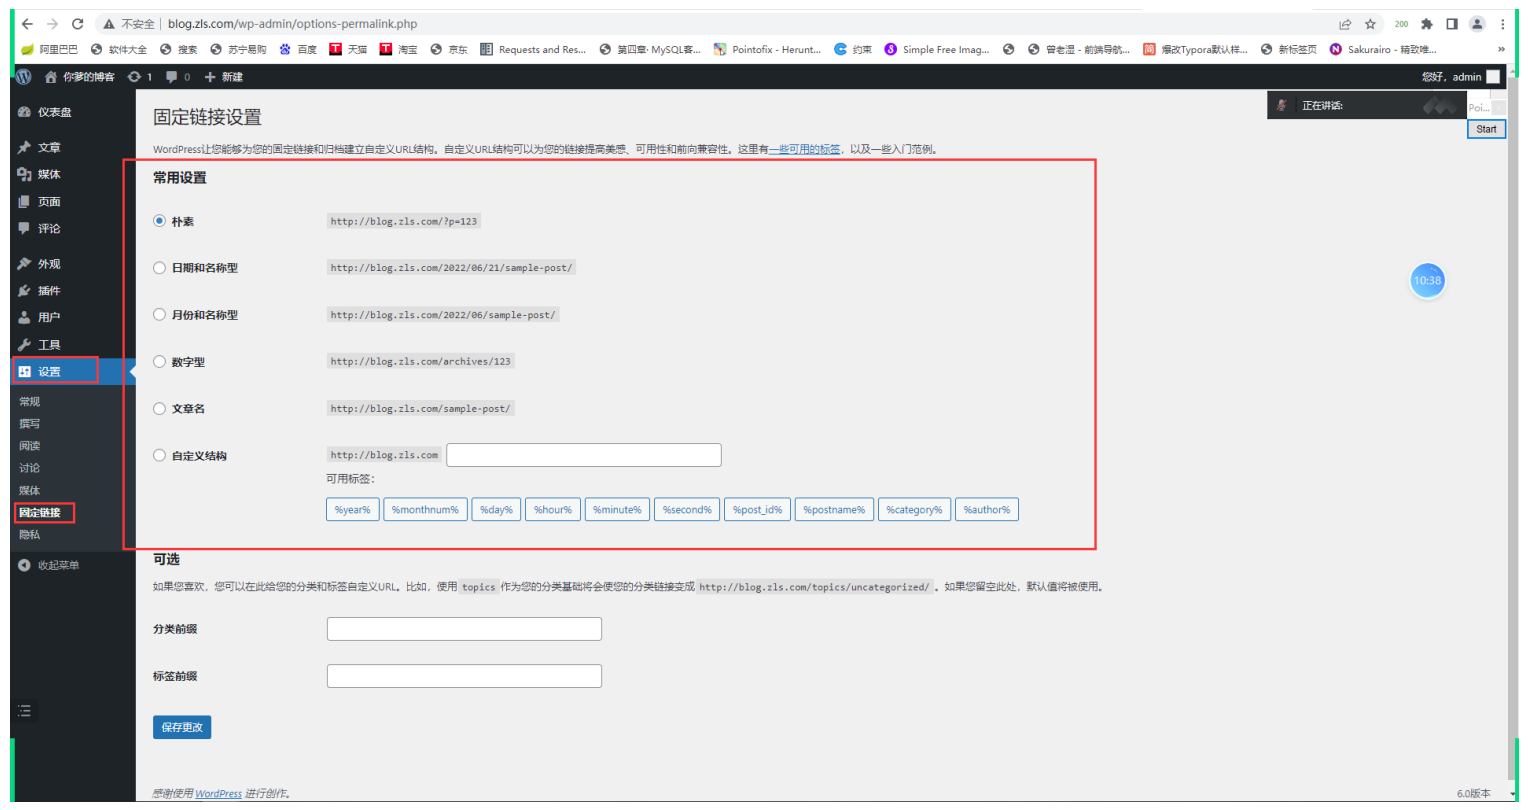
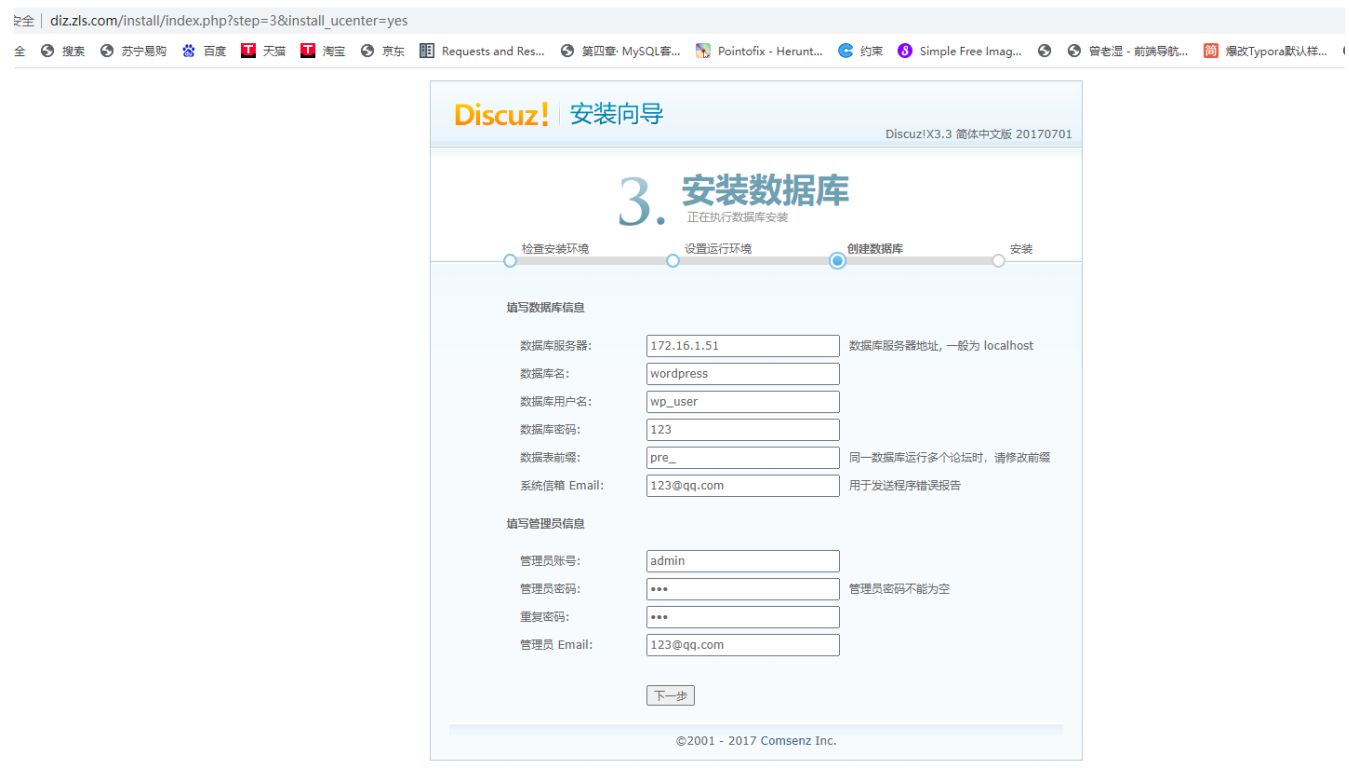
部署wordpress 1 2 3 4 5 6 7 8 9 10 11 12 13 14 15 16 17 18 19 20 21 22 23 24 25 26 27 28 29 30 31 32 33 34 35 36 37 38 39 40 41 42 43 44 45 46 47 48 49 50 51 52 53 54 55 56 57 58 59 60 61 62 63 64 65 66 67 68 69 70 71 72 73 [root@web01 ~] server{ listen 80; server_name blog.roger.com; location / { root /blog; index index.php index.html; } location ~ \.php$ { root /blog; fastcgi_pass 127.0.0.1:9000; fastcgi_param SCRIPT_FILENAME $document_root $fastcgi_script_name ; include /etc/nginx/fastcgi_params; } } [root@web01 conf.d] nginx: the configuration file /etc/nginx/nginx.conf syntax is ok nginx: configuration file /etc/nginx/nginx.conf test is successful [root@web01 conf.d] [root@web01 ~] [root@web01 ~] [root@web01 ~] <?php phpinfo(); ?> 打开路径:C:\Windows\System32\drivers\etc 编辑hosts文件:10.0.0.7 blog.roger.com http://blog.roger.com/info.php wordpress官网:https://wordpress.org/ [root@web01 blog] [root@web01 blog] [root@web01 blog] server{ listen 80; server_name blog.roger.com; root /blog/wordpress; location / { index index.php index.html; } location ~ \.php$ { fastcgi_pass 127.0.0.1:9000; fastcgi_param SCRIPT_FILENAME $document_root $fastcgi_script_name ; include /etc/nginx/fastcgi_params; } } [root@web01 blog] [root@web01 blog] http://blog.roger.com/
安装mariadb数据库 1 2 3 4 5 6 7 8 9 10 11 12 13 14 15 16 17 18 19 20 21 22 23 24 25 26 27 28 29 30 31 32 33 34 35 36 37 38 39 40 41 42 43 44 45 46 47 48 49 50 51 52 53 54 55 56 57 58 59 60 61 62 63 64 65 66 67 68 69 70 71 72 73 74 75 76 77 78 79 80 81 82 83 [root@web01 ~] [root@web01 ~] [root@web01 ~] [root@web01 ~] MariaDB [(none)]> show databases; +--------------------+ | Database | +--------------------+ | information_schema | | mysql | | performance_schema | | test | +--------------------+ MariaDB [(none)]> use mysql MariaDB [mysql]> show tables; MariaDB [mysql]> create database 库名字; MariaDB [mysql]> create database wordpress; MariaDB [(none)]> grant all on 所有库.所有表 to 用户名@'主机IP' identified by '密码' ; MariaDB [(none)]> grant all on *.* to wp@'localhost' identified by '123' ; MariaDB [(none)]> select user,host from mysql.user; +------+-----------+ | user | host | +------+-----------+ | root | 127.0.0.1 | | root | ::1 | | | localhost | | root | localhost | | wp | localhost | | | web01 | | root | web01 | +------+-----------+ MariaDB [(none)]> exit MariaDB [(none)]> quit 数据库名字:wordpress 连接用户名:wp 连接密码:123 连接IP:localhost [root@web01 ~] Enter password: [root@web01 ~] <?php $servername = "localhost" ; $username = "wp" ; $password = "123" ; //创建连接 $conn = mysqli_connect($servername , $username , $password ); //检测连接 if (!$conn ) { die("Connection failed: " . mysqli_connect_error()); } echo "小哥哥,php可以连接MySQL..." ; ?> <img style='width:100%;height:100%;' src=https://blog.driverzeng.com/zenglaoshi/php_mysql.png> [root@web01 ~]
通过socket文件启动php 1 2 3 4 5 6 7 8 9 10 11 12 13 14 15 16 17 18 19 20 21 22 23 24 25 26 27 28 29 30 31 32 33 34 35 36 37 38 39 40 41 42 listen = /dev/shm/php.sock listen.owner = www listen.group = www [root@web01 ~] [www] user = www group = www ;listen = 0.0.0.0:9000 listen = /dev/shm/php.sock listen.owner = www listen.group = www listen.allowed_clients = 127.0.0.1 pm = dynamic pm.max_children = 50 pm.start_servers = 5 pm.min_spare_servers = 5 pm.max_spare_servers = 35 slowlog = /var/log /php-fpm/www-slow.log php_admin_value[error_log] = /var/log /php-fpm/www-error.log php_admin_flag[log_errors] = on php_value[session.save_handler] = files php_value[session.save_path] = /var/lib/php/session php_value[soap.wsdl_cache_dir] = /var/lib/php/wsdlcache [root@web01 ~] server{ listen 80; server_name blog.roger.com; root /blog; index index.php index.html; location ~ \.php$ { fastcgi_pass unix:/dev/shm/php.sock; fastcgi_param SCRIPT_FILENAME $document_root $fastcgi_script_name ; include fastcgi_params; } }
优化Nginx配置 1 2 3 4 5 6 7 vim /etc/nginx/nginx.conf http { ... client_max_body_size 500m; ... }
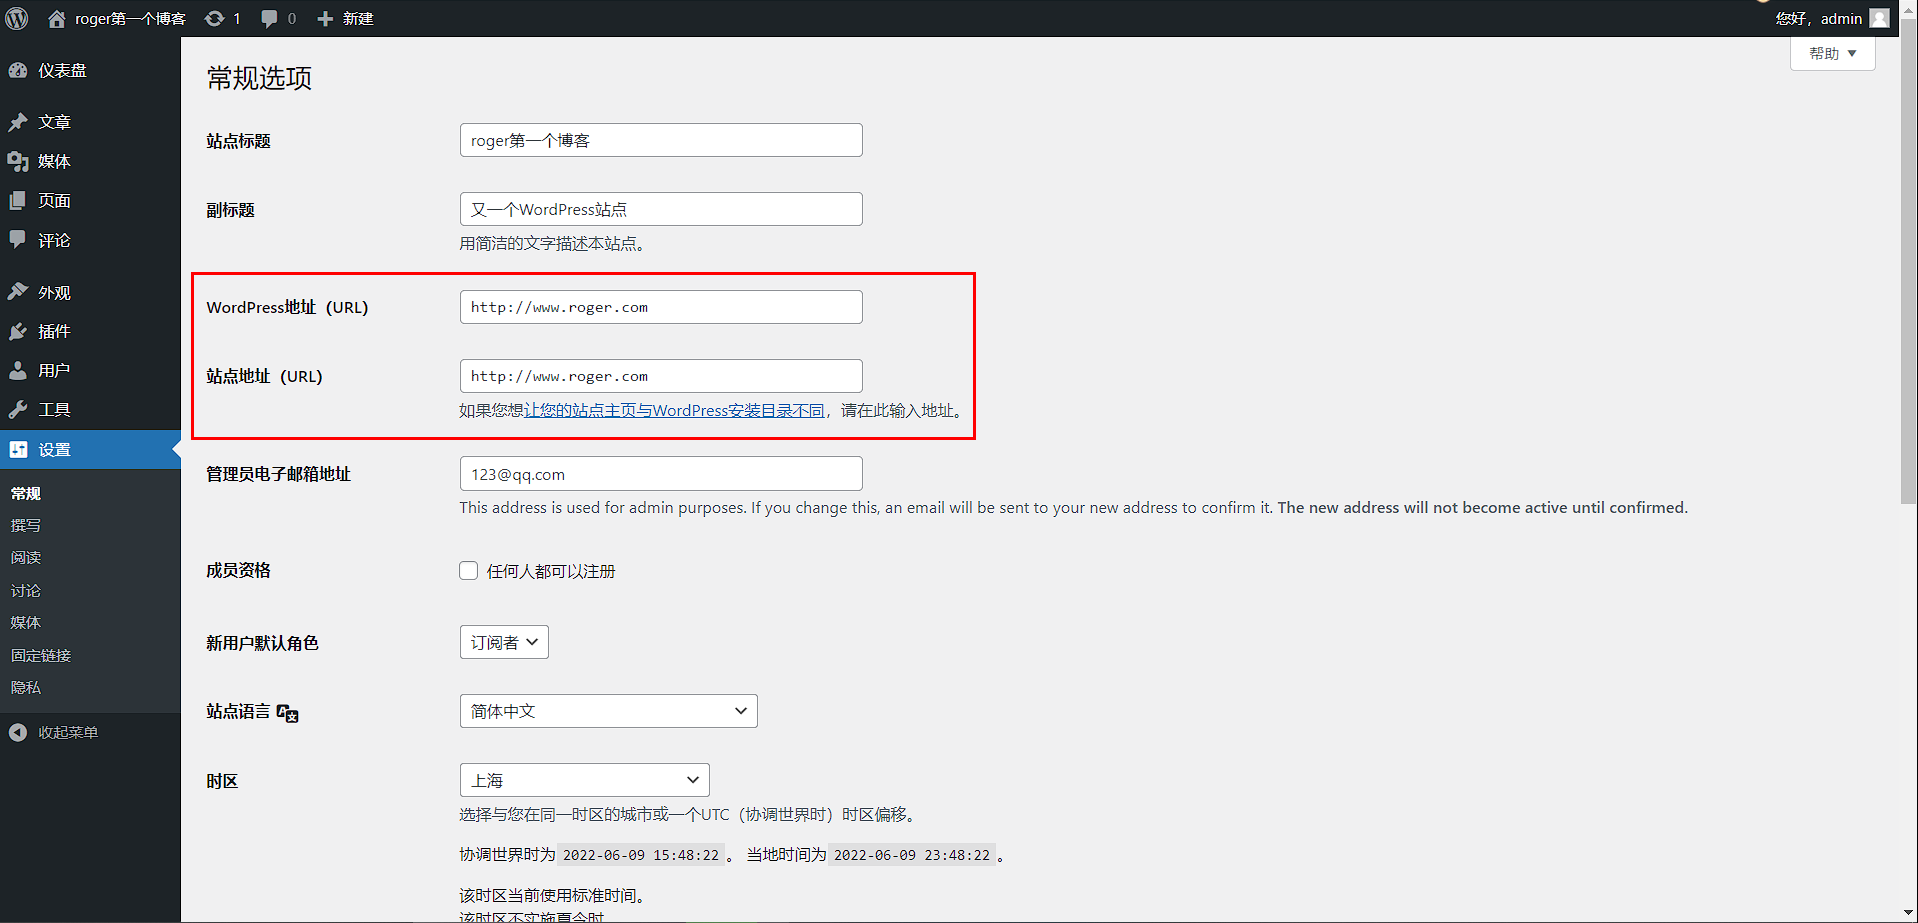
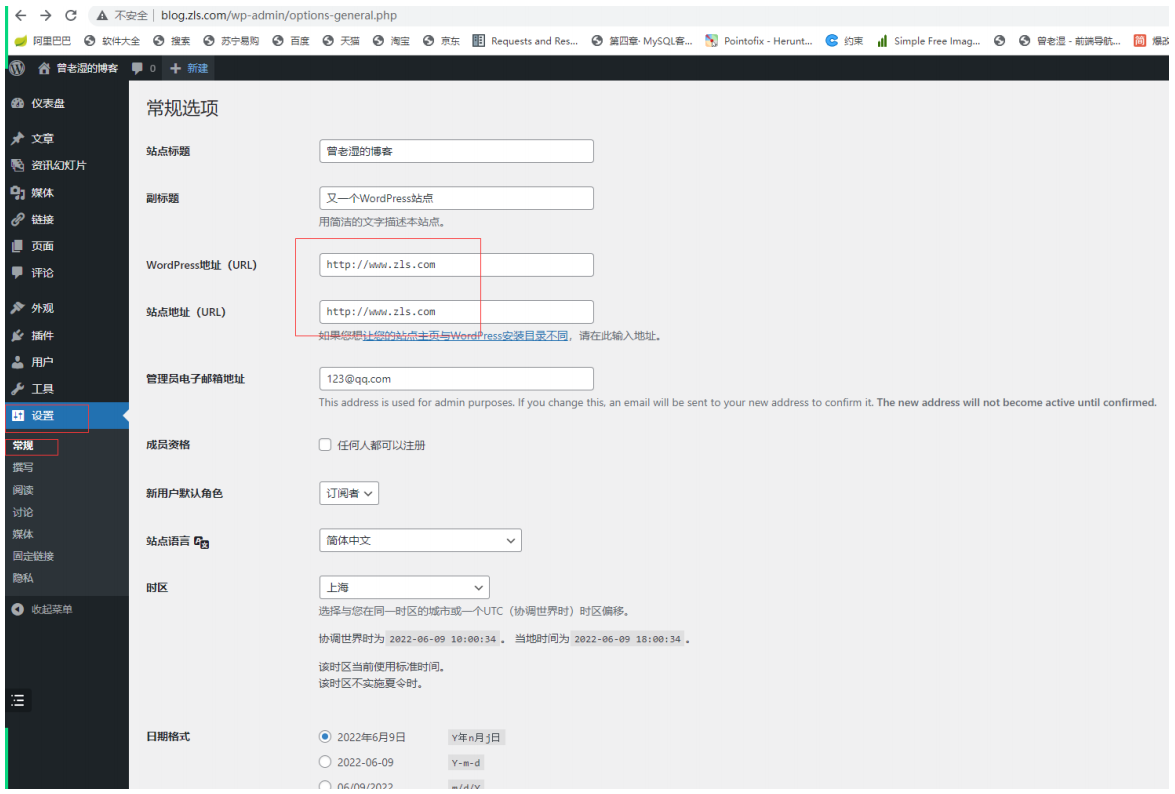
wordpress更换域名排坑
1 2 3 4 5 6 7 8 9 10 11 12 13 14 15 16 17 18 19 20 21 22 23 24 25 26 27 28 29 30 31 32 33 34 35 36 37 38 39 40 41 42 43 44 45 46 47 48 49 50 51 52 53 54 55 56 57 58 59 60 61 62 63 64 65 66 67 68 69 70 71 72 浏览器访问:blog.roger.com/wp-admin 修改wordpress地址和站点地址 [root@web01 conf.d] server { listen 80; server_name www.roger.com; root /blog/wordpress; index index.php index.html; location ~ \.php$ { fastcgi_pass unix:/opt/php.sock; fastcgi_param SCRIPT_FILENAME $document_root $fastcgi_script_name ; include fastcgi_params; } } [root@web01 conf.d] [root@web01 conf.d] [root@web01 conf.d] ./configure \ --prefix=/usr/local /php \ --exec -prefix=/usr/local /php \ --bindir=/usr/local /php/bin \ --sbindir=/usr/local /php/sbin \ --includedir=/usr/local /php/include \ --libdir=/usr/local /php/lib/php \ --mandir=/usr/local /php/php/man \ --with-config-file-path=/usr/local /php/etc \ --with-mysql-sock=/var/lib/mysql/mysql.sock \ --with-mhash \ --with-openssl \ --with-mysqli=shared,mysqlnd \ --with-pdo-mysql=shared,mysqlnd \ --with-gd \ --with-jpeg-dir \ --with-png-dir \ --with-iconv \ --with-zlib \ --enable -zip \ --enable -inline-optimization \ --disable -debug \ --disable -rpath \ --enable -shared \ --enable -xml \ --enable -bcmath \ --enable -shmop \ --enable -sysvsem \ --enable -mbregex \ --enable -mbstring \ --enable -ftp \ --enable -pcntl \ --enable -sockets \ --with-xmlrpc \ --enable -soap \ --without-pear \ --with-gettext \ --enable -session \ --with-curl \ --with-freetype-dir \ --enable -opcache \ --enable -fpm \ --with-fpm-user=www \ --with-fpm-group=www \ --without-gdbm \ --enable -fileinfo \ --disable -fileinfo
LNMP环境搭建 1 2 3 4 5 6 7 8 9 10 11 12 13 14 15 16 17 18 19 20 21 22 23 24 25 26 27 28 29 30 31 32 33 34 35 36 37 38 39 40 41 42 43 44 45 46 47 48 49 50 51 52 53 54 55 56 57 58 59 60 61 62 63 64 65 66 67 68 69 70 71 72 73 74 75 76 77 78 79 80 81 82 83 84 85 86 87 88 89 90 91 92 93 94 95 96 97 98 99 100 101 102 103 104 105 106 107 108 109 110 111 112 113 114 115 116 117 118 119 120 121 122 123 124 125 126 127 128 129 130 131 132 133 134 135 136 137 138 139 140 141 142 143 144 145 146 147 148 149 150 151 152 153 154 155 156 157 158 159 160 161 162 163 164 165 166 167 168 169 170 171 172 173 174 175 176 177 178 179 180 181 182 183 184 185 186 187 188 189 190 191 192 193 194 195 196 197 198 199 200 201 202 203 [root@web01 ~] [root@web01 ~] [root@web01 ~] [root@web01 ~] [root@web01 ~] [nginx] name=nginx repo baseurl=http://nginx.org/packages/centos/7/$basearch / gpgcheck=0 enabled=1 或 [nginx-stable] name=nginx stable repo baseurl=http://nginx.org/packages/centos/$releasever /$basearch / gpgcheck=1 enabled=1 gpgkey=https://nginx.org/keys/nginx_signing.key module_hotfixes=true [root@web01 ~] [php-webtatic] name = PHP Repository baseurl = http://us-east.repo.webtatic.com/yum/el7/x86_64/ gpgcheck = 0 [root@web01 ~] [root@web01 ~] [root@web01 ~] [root@web01 ~] 或 [root@web01 ~] [root@web01 ~] [root@web01 ~] [root@web01 ~] [root@web01 ~] [root@web01 ~] 或 yum -y install epel-release yum-utils rpm -Uvh http://mirror.webtatic.com/yum/el7/latest.rpm rpm -ivh http://rpms.famillecollet.com/enterprise/remi-release-7.rpm yum install -y --enablerepo=remi --enablerepo=remi-php74 mod_php php-gd* php php-opcache php-mbstring php-mysqlnd php-phpunit-PHPUnit php-pecl-xdebug php-pecl-xhprof php-fpm yum install -y --enablerepo=remi --enablerepo=remi-php74 php-cli php-redis php-pecl-mcrypt php-process php-devel php-pear php --version php -m [root@web01 ~] [root@web01 ~] [root@web01 ~] user www; [root@web01 ~] [www] user = www group = www listen = /dev/shm/php.sock listen.owner = www listen.group = www [root@web01 ~] [www] user = www group = www ;listen = 0.0.0.0:9000 listen = /dev/shm/php.sock listen.owner = www listen.group = www listen.allowed_clients = 127.0.0.1 pm = dynamic pm.max_children = 50 pm.start_servers = 5 pm.min_spare_servers = 5 pm.max_spare_servers = 35 slowlog = /var/log /php-fpm/www-slow.log php_admin_value[error_log] = /var/log /php-fpm/www-error.log php_admin_flag[log_errors] = on php_value[session.save_handler] = files php_value[session.save_path] = /var/lib/php/session php_value[soap.wsdl_cache_dir] = /var/lib/php/wsdlcache [root@web01 ~] server { listen 80; server_name blog.roger.com; root /blog; index index.php index.html; location ~ \.php$ { fastcgi_pass unix:/dev/shm/php.sock; fastcgi_param SCRIPT_FILENAME $document_root $fastcgi_script_name ; include fastcgi_params; } } [root@web01 ~] [root@web01 ~] [root@web01 ~] [root@web01 ~] <?php phpinfo(); ?> 10.0.0.7 blog.roger.com [root@web01 ~] [root@web01 ~] [root@web01 ~] [root@web01 ~] [root@web01 ~] MariaDB [(none)]> create database wp; MariaDB [(none)]> grant all on *.* to wp_user@'localhost' identified by '111' ; MariaDB [(none)]> show databases; +--------------------+ | Database | +--------------------+ | information_schema | | mysql | | performance_schema | | test | | wp | +--------------------+ MariaDB [(none)]> select user,host from mysql.user; +---------+-----------+ | user | host | +---------+-----------+ | root | 127.0.0.1 | | root | ::1 | | | localhost | | root | localhost | | wp_user | localhost | | | web01 | | root | web01 | +---------+-----------+ wordpress库:wp wordpress用户:wp_user wordpress用户密码:111 wordpres用户IP:localhost [root@web01 ~] <?php $servername = "localhost" ; $username = "wp_user" ; $password = "123" ; // 创建连接 $conn = mysqli_connect($servername , $username , $password ); // 检测连接 if (!$conn ) { die("Connection failed: " . mysqli_connect_error()); } echo "小哥哥,php可以连接MySQL..." ; ?> <img style='width:100%;height:100%;' src=https://blog.driverzeng.com/zenglaoshi/php_mysql.png>
部署wordpress代码 1 2 3 4 5 6 7 8 9 10 11 12 13 14 15 16 17 18 19 20 21 22 23 24 25 26 27 28 29 30 31 32 33 https://cn.wordpress.org/download/ [root@web01 ~] [root@web01 blog] 或 [root@web01 blog] [root@web01 blog] [root@web01 blog] server { listen 80; server_name blog.roger.com; root /blog/wordpress; index index.php index.html; location ~ \.php$ { fastcgi_pass unix:/dev/shm/php.sock; fastcgi_param SCRIPT_FILENAME $document_root $fastcgi_script_name ; include fastcgi_params; } } [root@web01 blog] [root@web01 blog]
1 2 3 4 5 6 http { ... client_max_body_size 500m; ... }
wordpress更换域名排坑
1 2 3 4 5 6 7 8 9 10 11 12 13 14 15 16 17 18 [root@web01 conf.d] server { listen 80; server_name www.roger.com; root /blog/wordpress; index index.php index.html; location ~ \.php$ { fastcgi_pass unix:/dev/shm/php.sock; fastcgi_param SCRIPT_FILENAME $document_root $fastcgi_script_name ; include fastcgi_params; } } [root@web01 conf.d]
Web集群数据拆分及共享存储 数据库拆分 环境准备
主机名
WanIP
LanIP
角色
安装应用
web01
10.0.0.7
172.16.1.7
web网站
nginx php
db01
10.0.0.51
172.16.1.51
数据库
MySQL(mariadb)
旧数据库操作 1 2 3 4 5 6 7 8 9 [root@web01 ~] [root@web01 ~] [root@web01 ~] [root@web01 ~]
新数据库操作 1 2 3 4 5 6 7 8 9 10 11 12 13 14 15 16 17 18 19 20 21 22 23 24 25 26 27 28 29 30 31 32 33 34 35 36 37 38 39 40 41 42 43 44 45 46 [root@db01 ~] [root@db01 ~] [root@db01 ~] [root@db01 ~] Enter password: [root@db01 ~] [root@db01 ~] MariaDB [(none)]> show databases; +--------------------+ | Database | +--------------------+ | information_schema | | mysql | | performance_schema | | test | | wordpress | +--------------------+ MariaDB [(none)]> grant all on *.* to wp@'%' identified by '123' ; [root@web01 ~] [root@web01 wordpress] define( 'DB_NAME' , 'wordpress' ); /** Database username */ define( 'DB_USER' , 'wp' ); /** Database password */ define( 'DB_PASSWORD' , '123' ); /** Database hostname */ define( 'DB_HOST' , '10.0.0.51' );
多台web部署 环境准备
主机名
WanIP
LanIP
角色
安装应用
web01
10.0.0.7
172.16.1.7
web网站
nginx php
web02
10.0.0.8
172.16.1.8
web网站
nginx php
db01
10.0.0.51
172.16.1.51
数据库
MySQL(mariadb)
部署web02 1 2 3 4 5 6 7 8 9 10 11 12 13 14 15 16 17 18 19 20 21 22 23 24 25 26 27 28 29 30 31 32 33 34 35 36 37 38 39 40 41 42 43 44 45 46 47 48 49 50 51 52 53 54 55 56 57 58 59 60 61 62 63 [root@web01 yum.repos.d] [root@web02 ~] [root@web02 ~] [root@web02 ~] [root@web02 ~] server { listen 80; server_name blog.roger.com; root /blog/wordpress; index index.php index.html; location ~ \.php$ { fastcgi_pass unix:/opt/php.sock; fastcgi_param SCRIPT_FILENAME $document_root $fastcgi_script_name ; include fastcgi_params; } } [root@web02 ~] user www; [root@web02 ~] [www] user = www group = www ;listen = 127.0.0.1:9000 listen = /dev/shm/php.sock listen.owner = www listen.group = www [root@web02 ~] [root@web02 ~] [root@web02 blog] [root@web02 blog] [root@web02 blog] [root@web01 php] [root@web02 blog] [root@web02 blog] 10.0.0.8 www.roger.com
解决用户数据不一致问题 环境准备
主机名
WanIP
LanIP
角色
安装应用
web01
10.0.0.7
172.16.1.7
web网站、共享存储客户端
nginx php nfs
web02
10.0.0.8
172.16.1.8
web网站、共享存储客户端
nginx php nfs
db01
10.0.0.51
172.16.1.51
数据库
MySQL(mariadb)
nfs
10.0.0.31
172.16.1.31
共享存储服务端
nfs
部署nfs服务端 1 2 3 4 5 6 7 8 9 10 11 12 13 14 15 16 17 18 19 20 21 22 23 [root@nfs ~] [root@nfs ~] /data 172.16.1.0/24(rw,sync,anonuid=666,anongid=666,all_squash) [root@nfs ~] [root@nfs ~] [root@nfs ~] [root@nfs ~] [root@nfs ~] [root@nfs ~] [root@nfs ~]
nfs客户端操作 1 2 3 4 5 6 7 8 9 10 11 12 13 14 15 16 17 18 [root@web01 ~] [root@web02 ~] [root@web01 ~] [root@web02 ~] [root@web01 ~] [root@web02 ~] [root@nfs ~] [root@web01 ~] [root@web02 ~]
LNMP架构搭建WeCenter 作业需求 1.实现LNMP架构
2.独立的数据库
3.共享存储
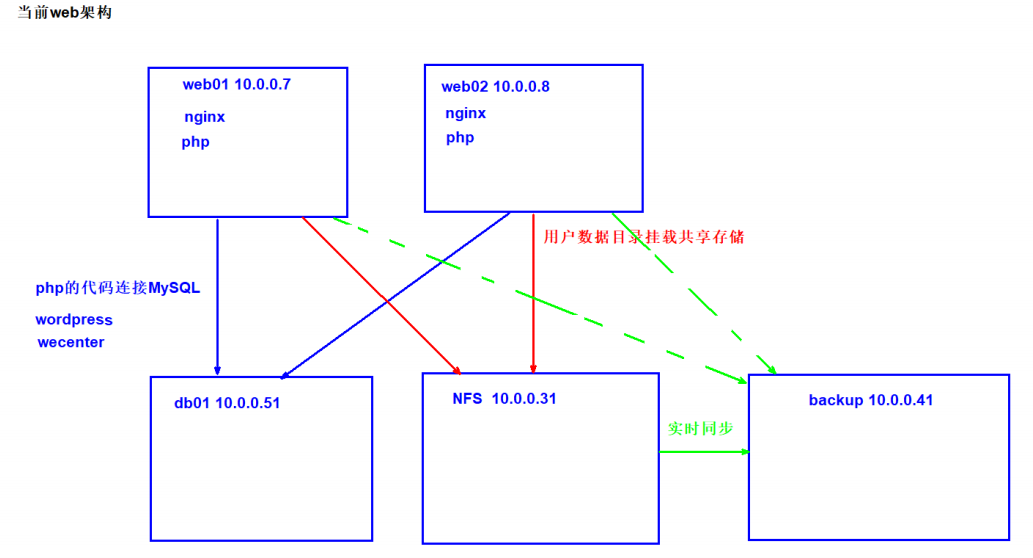
4.实现用户数据的实时同步(nfs /data目录数据实时同步到 backup服务器上)
5.不使用wordpress,使用wecenter
环境准备
主机名
WanIP
LanIP
角色
安装应用
web01
10.0.0.7
172.16.1.7
wordpress、wecenter网站
nginx
web02
10.0.0.8
172.16.1.8
wordpress、wecenter网站nfs客户端
nginx
nfs
10.0.0.31
172.16.1.31
nfs服务端
nfs-utils
backup
10.0.0.41
172.16.1.41
rsync服务端(备份数据、实时同步数据)
rsync
db01
10.0.0.51
172.16.1.51
数据库(博客内容、点赞数量、评论…文字数据)
MySQL(MariaDB)
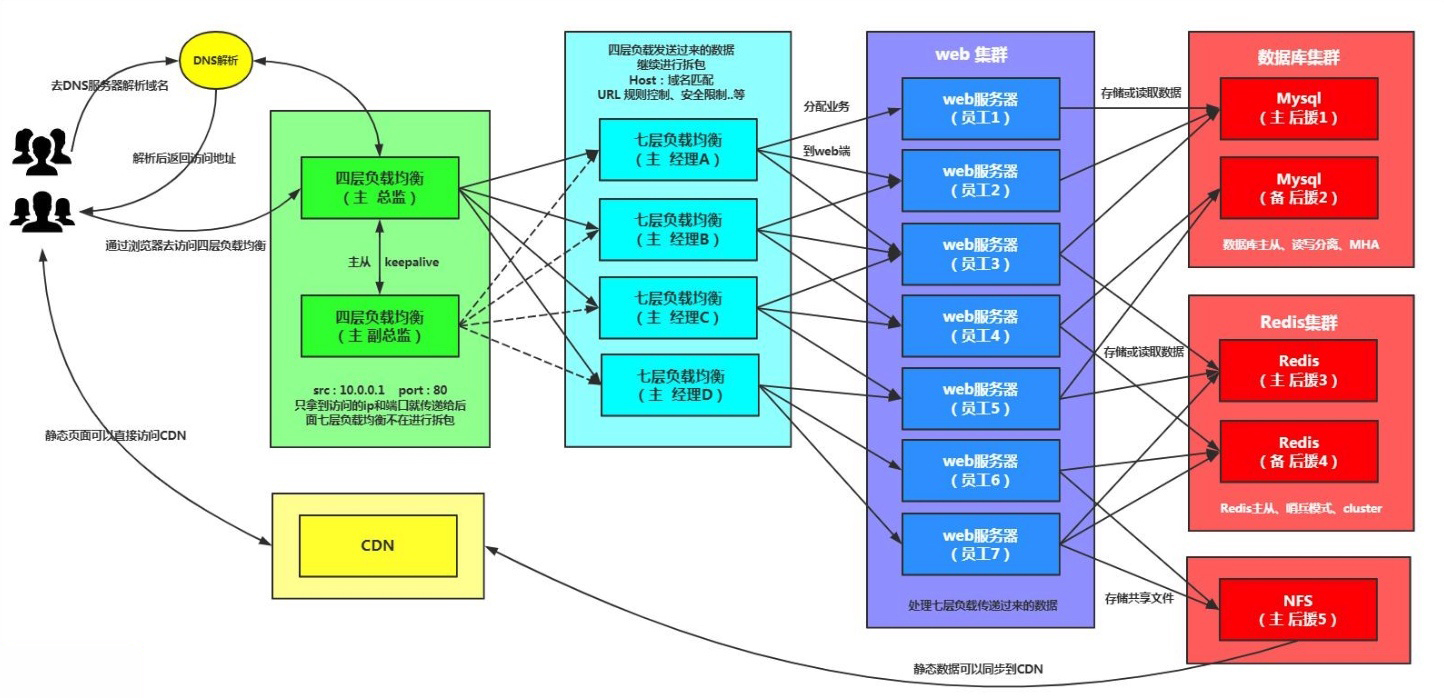
架构图
rsync服务端部署 1 2 3 4 5 6 7 8 9 10 11 12 13 14 15 16 17 18 19 20 21 22 23 24 25 26 27 28 29 30 31 32 33 34 35 36 37 38 39 40 41 42 43 44 45 46 47 48 49 50 [root@backup ~] [root@backup ~] uid = www gid = www port = 873 fake super = yes use chroot = no max connections = 200 timeout = 600 ignore errors read only = false list = false auth users = rsync_backup secrets file = /etc/rsync.passwd log file = /var/log /rsyncd.log[wp_data] comment = welcome to oldboyedu backup! path = /wp_data [zh_data] comment = welcome to oldboyedu backup! path = /zh_data [root@backup ~] [root@backup ~] [root@backup ~] [root@backup ~] [root@backup ~] [root@backup ~] [root@backup ~] [root@backup ~] [root@nfs ~] [root@nfs ~]
NFS服务端部署 1 2 3 4 5 6 7 8 9 10 11 12 13 14 15 16 17 18 19 20 21 22 23 24 25 26 27 28 29 30 31 32 [root@nfs ~] [root@backup ~] [root@nfs ~] /wp_data 172.16.1.0/24(rw,sync,anonuid=666,anongid=666,all_squash) /zh_data 172.16.1.0/24(rw,sync,anonuid=666,anongid=666,all_squash) [root@backup ~] /wp_data 172.16.1.0/24(rw,sync,anonuid=666,anongid=666,all_squash) /zh_data 172.16.1.0/24(rw,sync,anonuid=666,anongid=666,all_squash) [root@nfs ~] [root@nfs ~] [root@backup ~] [root@backup ~] [root@nfs ~] [root@nfs ~] [root@nfs ~] [root@nfs ~] [root@backup ~] [root@backup ~]
部署web服务器 1 2 3 4 5 6 7 8 9 10 11 12 13 14 15 16 17 18 19 20 21 22 23 24 25 26 27 28 29 30 31 32 33 34 35 36 37 38 39 40 41 42 43 44 45 46 47 48 49 50 51 52 53 54 55 56 57 58 59 60 61 62 63 64 65 66 67 68 69 70 71 72 73 74 75 76 77 78 79 80 81 82 83 84 85 86 87 88 89 90 91 92 93 94 95 96 97 98 99 100 101 102 103 104 105 106 107 108 109 110 111 112 113 114 115 116 117 118 119 120 121 122 123 124 125 126 127 128 129 130 131 132 133 134 135 136 137 138 139 140 141 142 143 144 145 146 147 148 [root@web01 ~] [nginx] name=nginx repo baseurl=http://nginx.org/packages/centos/7/$basearch / gpgcheck=0 enabled=1 [root@web02 ~] [nginx] name=nginx repo baseurl=http://nginx.org/packages/centos/7/$basearch / gpgcheck=0 enabled=1 [root@web01 ~] [php-webtatic] name = PHP Repository baseurl = http://us-east.repo.webtatic.com/yum/el7/x86_64/ gpgcheck = 0 [root@web02 ~] [php-webtatic] name = PHP Repository baseurl = http://us-east.repo.webtatic.com/yum/el7/x86_64/ gpgcheck = 0 [root@web01 ~] keepcache=1 [root@web02 ~] keepcache=1 [root@web01 ~] [root@web02 ~] [root@web01 ~] [root@web02 ~] [root@web01 ~] [root@web02 ~] [root@web01 ~] [root@web01 ~] [root@web02 ~] [root@web02 ~] [root@web01 ~] user www; [root@web02 ~] user www; [root@web01 ~] [www] user = www group = www [root@web02 ~] [www] user = www group = www [root@web01 ~] server { listen 80; server_name blog.roger.com; root /code/wordpress; index index.php index.html; location ~ \.php$ { fastcgi_pass 127.0.0.1:9000; fastcgi_param SCRIPT_FILENAME $document_root $fastcgi_script_name ; include fastcgi_params; } } [root@web02 ~] server { listen 80; server_name blog.roger.com; root /code/wordpress; index index.php index.html; location ~ \.php$ { fastcgi_pass 127.0.0.1:9000; fastcgi_param SCRIPT_FILENAME $document_root $fastcgi_script_name ; include fastcgi_params; } } [root@web01 ~] server { listen 80; server_name zh.roger.com; root /code/wecenter; index index.php index.html; location ~ \.php$ { fastcgi_pass 127.0.0.1:9000; fastcgi_param SCRIPT_FILENAME $document_root $fastcgi_script_name ; include fastcgi_params; } } [root@web02 ~] server { listen 80; server_name zh.roger.com; root /code/wecenter; index index.php index.html; location ~ \.php$ { fastcgi_pass 127.0.0.1:9000; fastcgi_param SCRIPT_FILENAME $document_root $fastcgi_script_name ; include fastcgi_params; } } [root@web01 ~] [root@web01 ~] [root@web02 ~] [root@web02 ~] [root@web01 ~] [root@web02 ~] [root@web01 code] [root@web01 code] [root@web01 code] [root@web01 code]
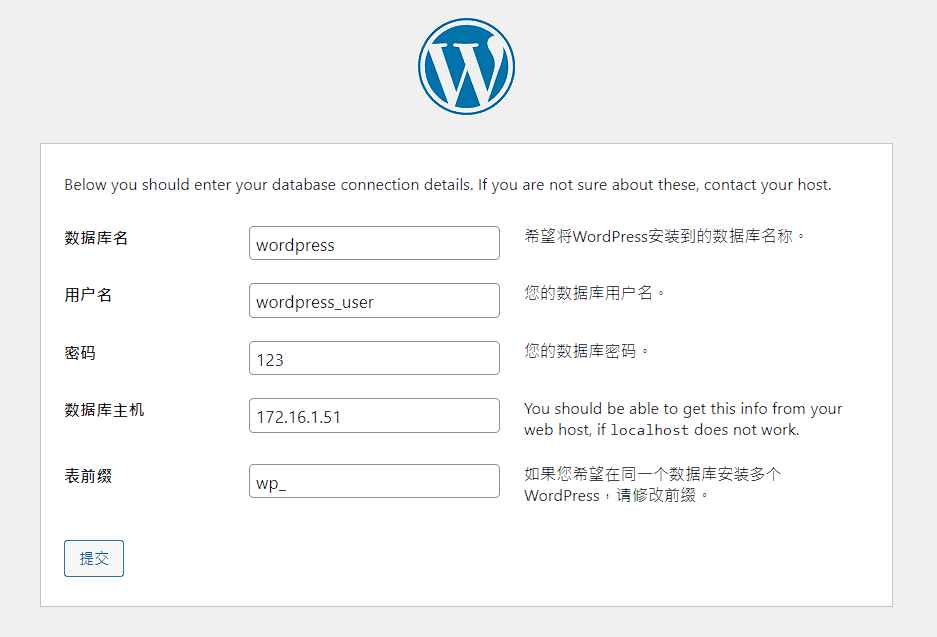
数据库部署 1 2 3 4 5 6 7 8 9 10 11 12 13 14 15 16 17 18 19 20 21 22 23 24 25 26 27 28 29 30 31 32 33 [root@db01 ~] [root@db01 ~] [root@db01 ~] [root@db01 ~] Enter password: [root@db01 ~] MariaDB [(none)]> create database wordpress; Query OK, 1 row affected (0.00 sec) MariaDB [(none)]> create database wecenter; Query OK, 1 row affected (0.00 sec) 创建一个用户: 用户名:wordpress_user 密码:123 允许该用户连接的IP地址:172.16.1.0/24网段 针对wordpress库下面的所有表,有所有权限 MariaDB [(none)]> grant all on wordpress.* to wordpress_user@'172.16.1.%' identified by '123' ; MariaDB [(none)]> grant all on wecenter.* to wecenter_user@'172.16.1.%' identified by '123' ;
windows域名解析 1 2 10.0.0.7 blog.roger.com zh.roger.com
浏览器配置
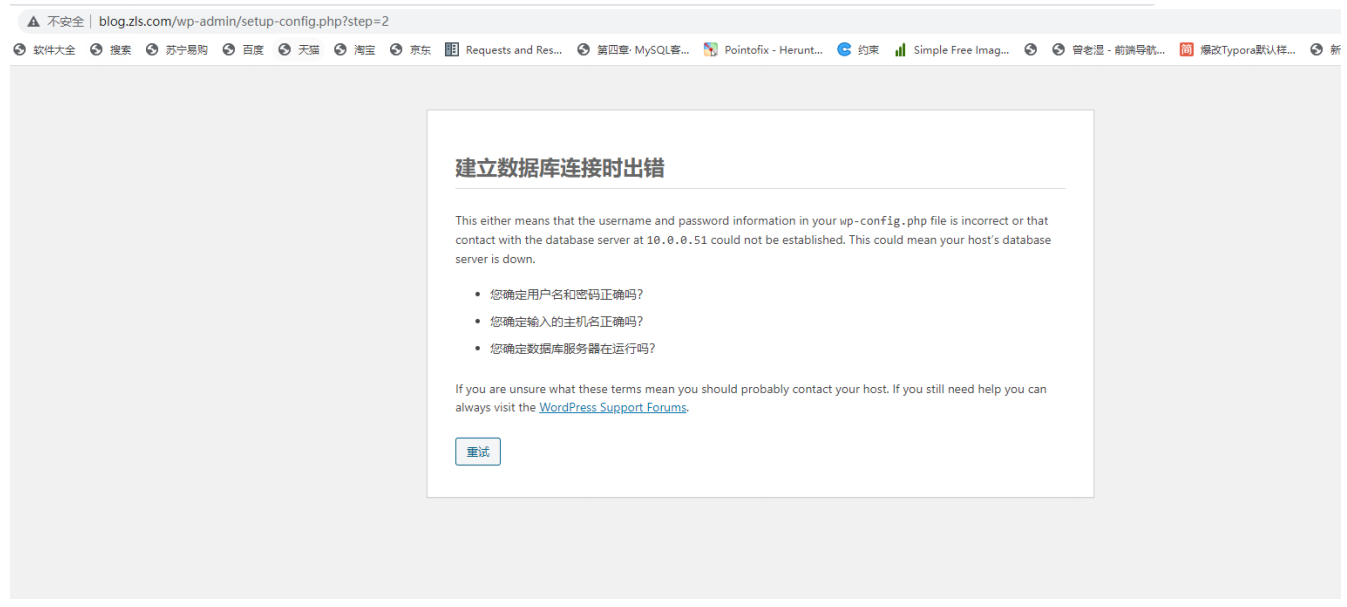
报错
1 2 3 4 5 6 7 8 9 10 11 12 13 14 15 16 17 18 19 20 1)在代码所在的服务器上,安装MySQL客户端命令:mysql [root@web01 code] 2)测试连接 [root@web01 code] ERROR 1130 (HY000): Host '10.0.0.7' is not allowed to connect to this MariaDB server [root@web01 code] MariaDB [(none)]> show databases; +--------------------+ | Database | +--------------------+ | information_schema | | test | | wordpress | +--------------------+
web02部署wordpress 1 2 3 4 5 [root@web01 code] [root@web02 code]
web01部署wecenter代码 1 2 3 4 5 6 7 8 [root@web01 code] [root@web01 code] [root@web01 code]
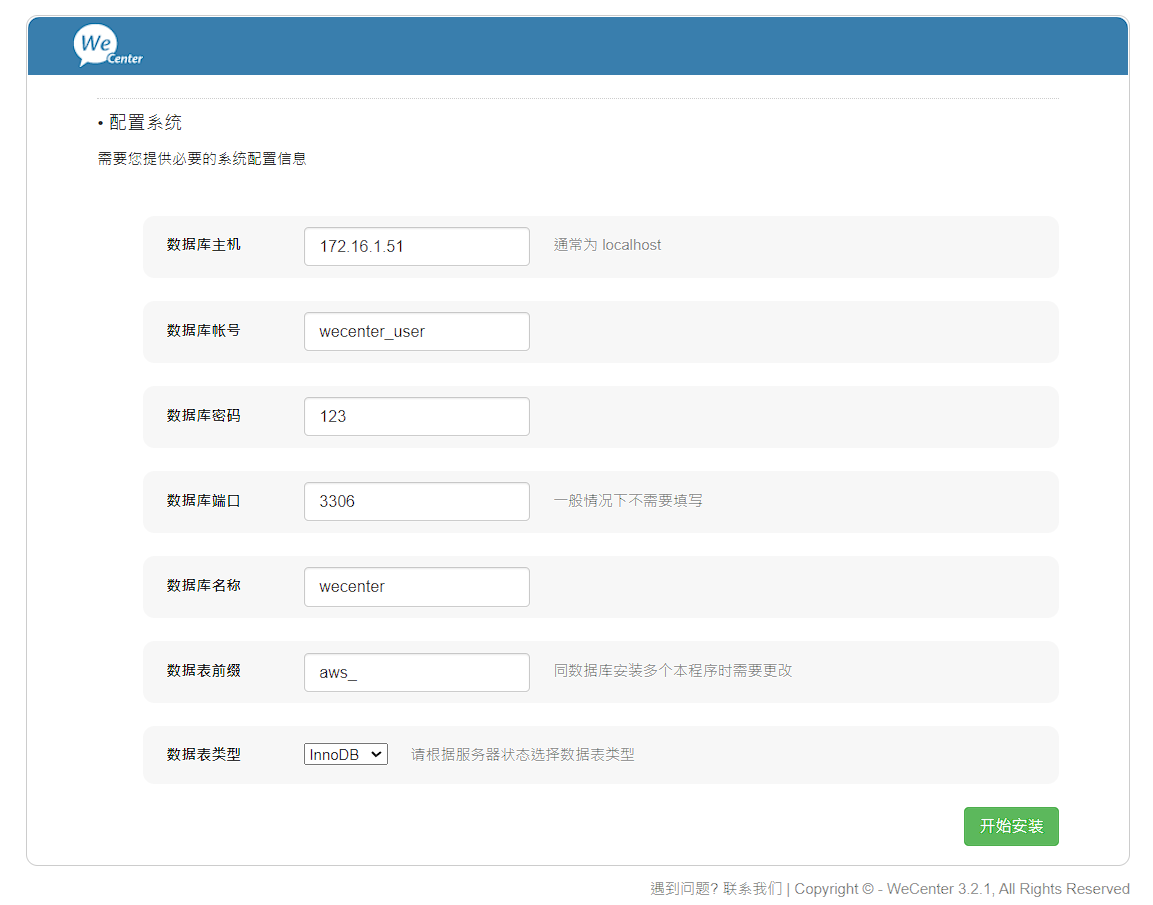
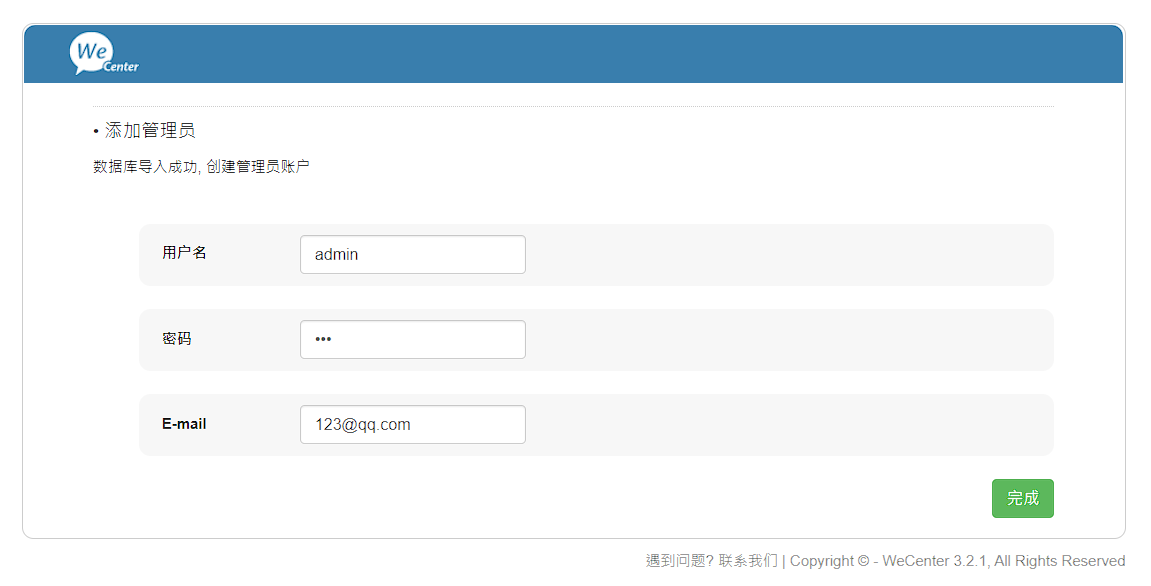
wecenter页面配置
web02部署wecenter 1 2 3 4 5 [root@web01 code] [root@web02 code]
nfs客户端(共享存储) 1 2 3 4 5 6 7 8 9 10 11 12 13 14 15 16 17 18 19 [root@web01 ~] [root@web02 ~] [root@web01 ~] [root@web02 ~] [root@web01 ~] [root@web02 ~] [root@web01 ~] [root@web02 ~] [root@web01 ~] [root@web02 ~]
rsync客户端部署(sersync实时同步) 1 2 3 4 5 6 7 8 9 10 11 12 13 14 15 16 17 18 19 20 21 22 23 24 25 26 27 28 29 30 31 32 33 34 35 36 37 38 39 40 41 42 43 44 45 46 47 48 49 50 51 52 53 54 55 56 57 58 59 60 61 62 63 64 65 66 67 68 69 70 71 72 73 74 75 76 77 78 79 80 81 82 83 84 85 86 87 88 89 90 91 92 93 94 95 96 97 98 99 100 101 102 103 104 105 106 107 108 109 110 111 112 113 114 115 116 117 118 119 120 121 122 123 124 125 126 127 128 129 130 131 132 133 134 135 136 137 138 139 140 141 142 143 144 145 146 147 148 149 150 151 152 153 154 155 156 157 158 159 160 161 162 #1.下载sersync [root@nfs ~]# wget http://test.driverzeng.com/other/sersync2.5.4_64bit_binary_stable_final.tar.gz #2.安装sersync依赖(inotify rsync) [root@nfs ~]# yum install -y rsync inotify-tools #3.创建sersync安装目录 [root@nfs ~]# mkdir /app #4.解压sersync [root@nfs ~]# tar xf sersync2.5.4_64bit_binary_stable_final.tar.gz -C /app #5.改名 [root@nfs app]# mv /app/GNU-Linux-x86 /app/sersync #6.修改配置文件 [root@nfs app]# vim /app/sersync/zh_data.xml <?xml version="1.0" encoding="ISO-8859-1"?> <head version ="2.5" > <host hostip ="localhost" port ="8008" > </host > <debug start ="false" /> <fileSystem xfs ="false" /> <filter start ="false" > <exclude expression ="(.*)\.svn" > </exclude > <exclude expression ="(.*)\.gz" > </exclude > <exclude expression ="^info/*" > </exclude > <exclude expression ="^static/*" > </exclude > </filter > <inotify > <delete start ="true" /> <createFolder start ="true" /> <createFile start ="true" /> <closeWrite start ="true" /> <moveFrom start ="true" /> <moveTo start ="true" /> <attrib start ="true" /> <modify start ="true" /> </inotify > <sersync > <localpath watch ="/zh_data" > <remote ip ="172.16.1.41" name ="zh_data" /> </localpath > <rsync > <commonParams params ="-az" /> <auth start ="true" users ="rsync_backup" passwordfile ="/etc/rsync.passwd" /> <userDefinedPort start ="false" port ="874" /> <timeout start ="false" time ="100" /> <ssh start ="false" /> </rsync > <failLog path ="/tmp/rsync_fail_log.sh" timeToExecute ="60" /> <crontab start ="false" schedule ="600" > <crontabfilter start ="false" > <exclude expression ="*.php" > </exclude > <exclude expression ="info/*" > </exclude > </crontabfilter > </crontab > <plugin start ="false" name ="command" /> </sersync > <plugin name ="command" > <param prefix ="/bin/sh" suffix ="" ignoreError ="true" /> <filter start ="false" > <include expression ="(.*)\.php" /> <include expression ="(.*)\.sh" /> </filter > </plugin > <plugin name ="socket" > <localpath watch ="/opt/tongbu" > <deshost ip ="192.168.138.20" port ="8009" /> </localpath > </plugin > <plugin name ="refreshCDN" > <localpath watch ="/data0/htdocs/cms.xoyo.com/site/" > <cdninfo domainname ="ccms.chinacache.com" port ="80" username ="xxxx" passwd ="xxxx" /> <sendurl base ="http://pic.xoyo.com/cms" /> <regexurl regex ="false" match ="cms.xoyo.com/site([/a-zA-Z0-9]*).xoyo.com/images" /> </localpath > </plugin > </head > [root@nfs app]# vim /app/sersync/wp_data.xml <?xml version="1.0" encoding="ISO-8859-1"?> <head version ="2.5" > <host hostip ="localhost" port ="8008" > </host > <debug start ="false" /> <fileSystem xfs ="false" /> <filter start ="false" > <exclude expression ="(.*)\.svn" > </exclude > <exclude expression ="(.*)\.gz" > </exclude > <exclude expression ="^info/*" > </exclude > <exclude expression ="^static/*" > </exclude > </filter > <inotify > <delete start ="true" /> <createFolder start ="true" /> <createFile start ="true" /> <closeWrite start ="true" /> <moveFrom start ="true" /> <moveTo start ="true" /> <attrib start ="true" /> <modify start ="true" /> </inotify > <sersync > <localpath watch ="/wp_data" > <remote ip ="172.16.1.41" name ="wp_data" /> </localpath > <rsync > <commonParams params ="-az" /> <auth start ="true" users ="rsync_backup" passwordfile ="/etc/rsync.passwd" /> <userDefinedPort start ="false" port ="874" /> <timeout start ="false" time ="100" /> <ssh start ="false" /> </rsync > <failLog path ="/tmp/rsync_fail_log.sh" timeToExecute ="60" /> <crontab start ="false" schedule ="600" > <crontabfilter start ="false" > <exclude expression ="*.php" > </exclude > <exclude expression ="info/*" > </exclude > </crontabfilter > </crontab > <plugin start ="false" name ="command" /> </sersync > <plugin name ="command" > <param prefix ="/bin/sh" suffix ="" ignoreError ="true" /> <filter start ="false" > <include expression ="(.*)\.php" /> <include expression ="(.*)\.sh" /> </filter > </plugin > <plugin name ="socket" > <localpath watch ="/opt/tongbu" > <deshost ip ="192.168.138.20" port ="8009" /> </localpath > </plugin > <plugin name ="refreshCDN" > <localpath watch ="/data0/htdocs/cms.xoyo.com/site/" > <cdninfo domainname ="ccms.chinacache.com" port ="80" username ="xxxx" passwd ="xxxx" /> <sendurl base ="http://pic.xoyo.com/cms" /> <regexurl regex ="false" match ="cms.xoyo.com/site([/a-zA-Z0-9]*).xoyo.com/images" /> </localpath > </plugin > </head > #7.创建密码文件 [root@nfs app]# echo '123' > /etc/rsync.passwd #8.授权密码文件 [root@nfs app]# chmod 600 /etc/rsync.passwd #9.启动sersync [root@nfs ~]# /app/sersync/sersync2 -rdo /app/sersync/zh_data.xml [root@nfs ~]# /app/sersync/sersync2 -rdo /app/sersync/wp_data.xml
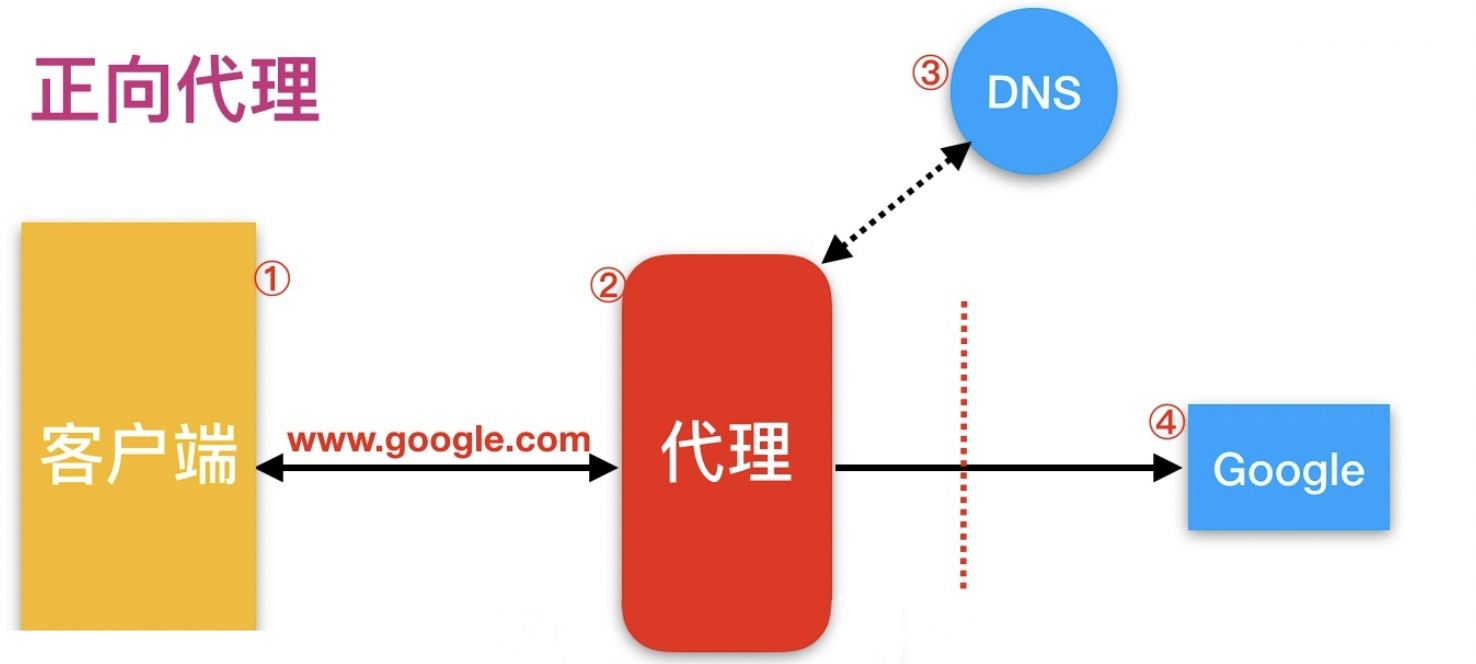
Nginx反向代理 什么是代理 正向代理:网络代理(代理客户端访问外网)
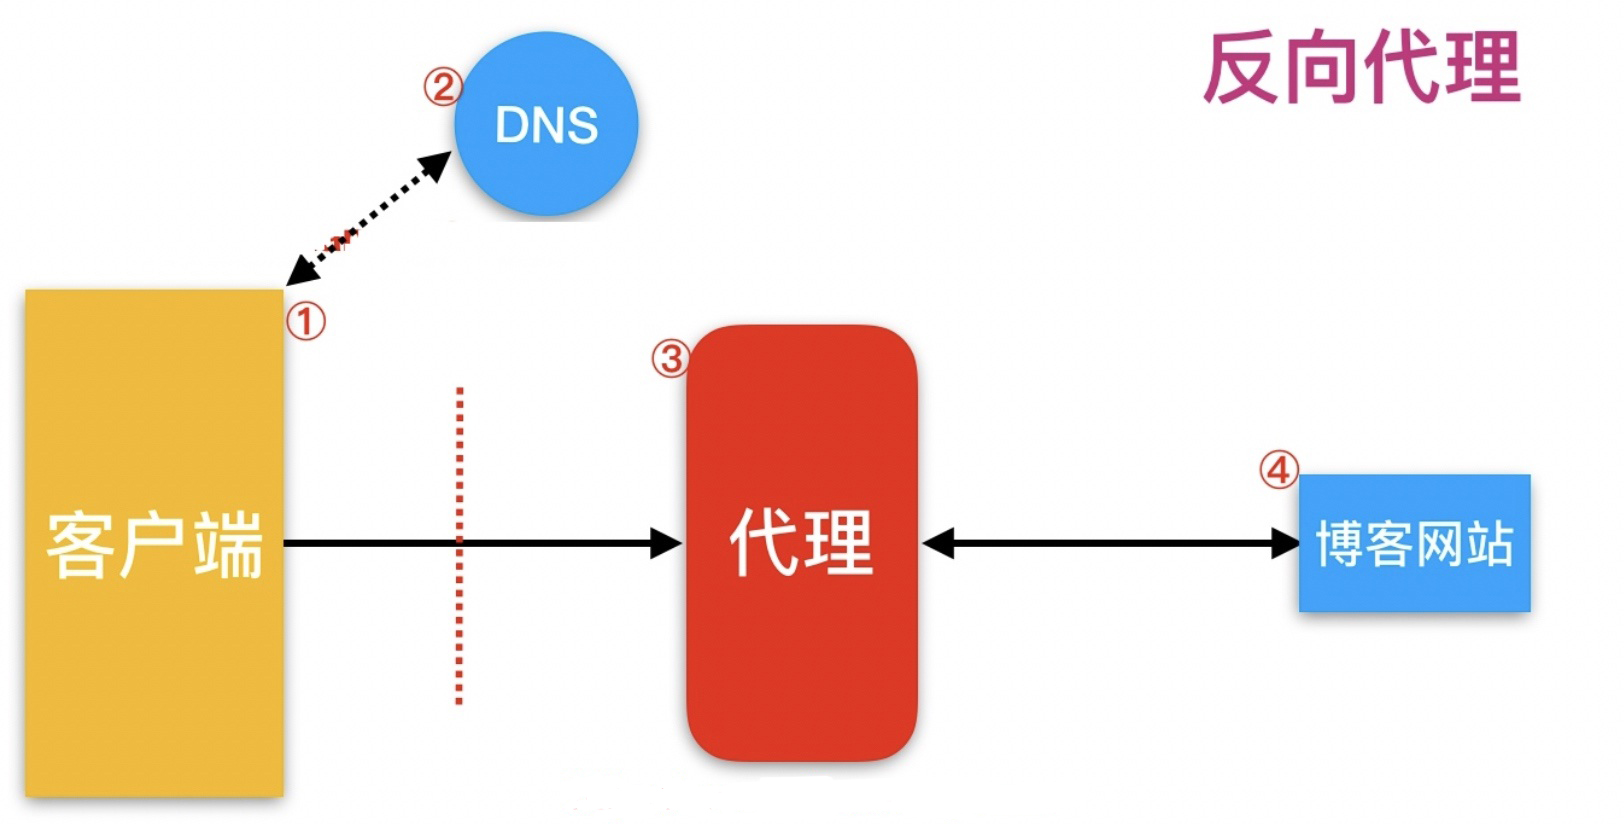
反向代理:用于公司集群架构,代理服务端
正向代理和反向代理的区别 1.区别在于形式上服务的”对象”不一样
2.正向代理代理的对象是客户端,为客户端服务
3.反向代理代理的对象是服务端,为服务端服务
为什么学代理 nginx代理PHP服务(fastcgi_pass:127.0.0.1:9000)
1.代理后端语言的服务(PHP、JAVA、Python…)
2.国外服务器代理国内服务器,方便国外用户上网
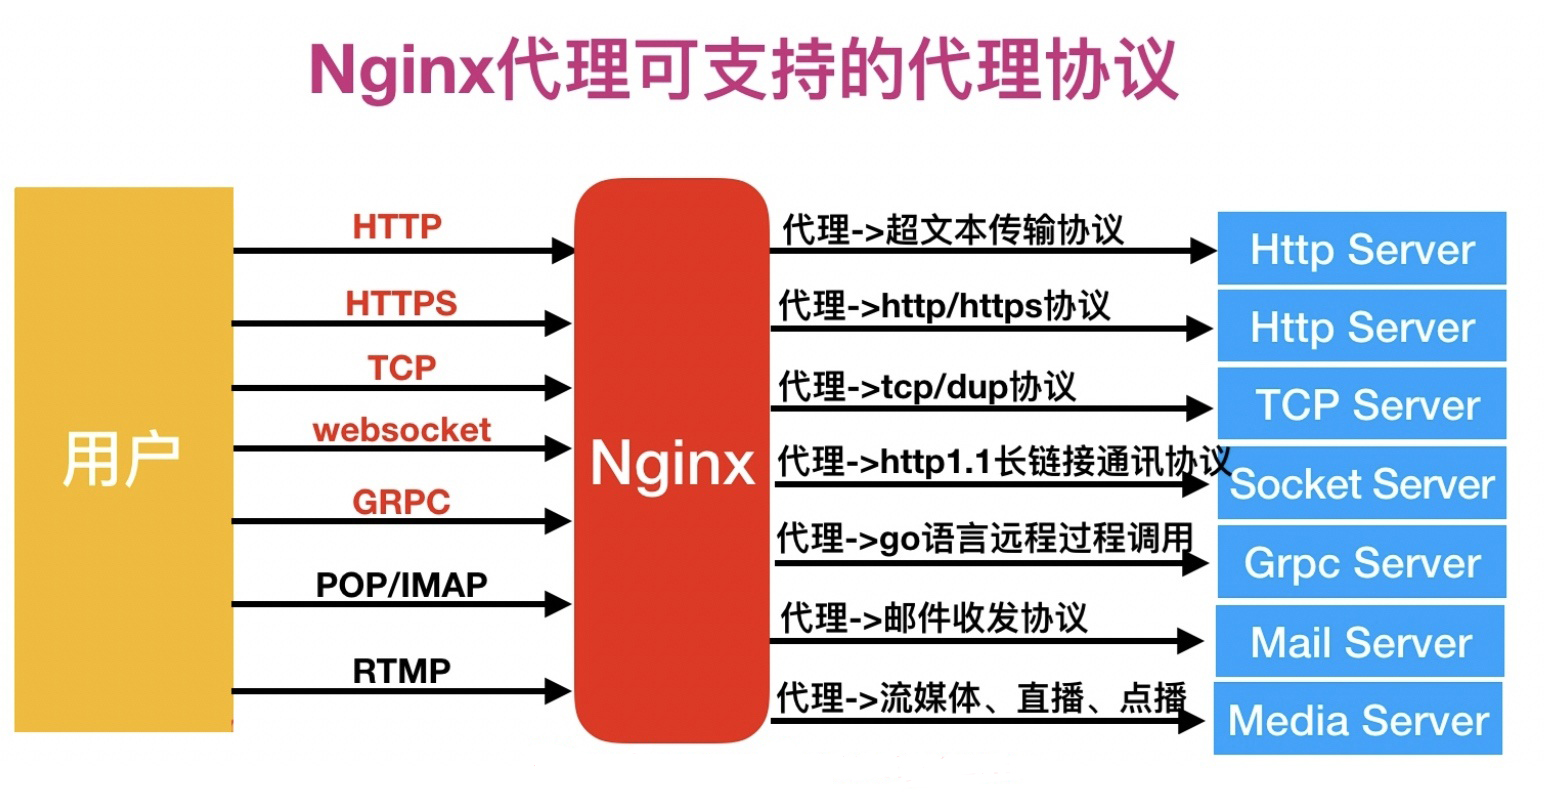
正向代理使用的模块
反向代理使用的模块
反向代理模块总结 反向代理模式与Nginx代理模块总结如表格所示
反向代理模式 Nginx 配置模块
http、websocket、https
ngx_http_proxy_module
fastcgi
ngx_http_fastcgi_module
uwsgi
ngx_http_uwsgi_module
grpc
ngx_http_v2_module
Nginx反向代理配置 环境准备
主机名
WanIP
LanIP
角色
应用
web01
10.0.0.7
172.16.1.7
web网站
nginx、php、wordpress
lb01
10.0.0.5
172.1.6.1.5
反向代理服务器
nginx
db01
10.0.0.51
172.16.1.51
数据库
MariaDB
安装LNMP环境 1 2 3 4 5 6 7 8 9 10 11 12 13 14 15 16 17 18 19 20 21 22 23 24 25 26 27 28 29 30 31 32 33 34 35 36 37 38 39 40 41 42 43 44 45 46 47 48 [root@web01 ~] [root@web01 ~] [main] keepcache=1 [root@web01 ~] [nginx] name=nginx repo baseurl=http://nginx.org/packages/centos/7/$basearch / gpgcheck=0 enabled=1 [root@web01 ~] [php-webtatic] name = PHP Repository baseurl = http://us-east.repo.webtatic.com/yum/el7/x86_64/ gpgcheck = 0 [root@web01 ~] [root@web01 ~] [root@web01 ~] [root@web01 opt] yum install libevent-2.0.21-4.el7 yum install libmemcached-1.0.16-5.el7 [root@web02 nginx_php] 或者 [root@web02 nginx_php] [root@db01 ~] 用户名:admin 密码:OKaQ@LGQ4qkF7WtRu0
Nginx做代理服务器(lb01) 1 2 3 4 5 6 7 8 9 10 11 12 13 14 15 16 17 18 19 20 [root@lb01 ~] [root@lb01 ~] server { listen 80; server_name blog.roger.com; location / { proxy_pass http://172.16.1.7:80; } } [root@lb01 ~] [root@lb01 ~] 10.0.0.5 blog.roger.com
1 2 3 4 5 6 7 8 9 10 11 12 13 14 15 16 17 18 19 20 21 22 23 24 25 26 27 28 29 30 31 32 33 34 35 36 37 38 39 40 41 42 43 44 45 46 47 48 49 50 51 52 53 54 55 56 57 58 59 60 61 62 63 64 65 66 67 68 69 70 71 72 73 74 75 76 77 78 79 80 81 82 83 84 85 86 87 88 89 90 91 92 93 94 95 96 97 98 99 lb01 通过 172.16.1.7 80端口访问后端的web01 因为是通过IP访问,所以,配置文件谁在上面,则访问哪个页面 解决方案:将域名加入到,lb01请求web01的请求头中 [root@lb01 ~] server { listen 80; server_name blog.roger.com; location / { proxy_pass http://172.16.1.7:80; proxy_set_header Host $host ; } } 10.0.0.1 - - [14/Jun/2022:20:01:54 +0800] "GET /favicon.ico HTTP/1.1" 404 555 "http://blog.roger.com/" "Mozilla/5.0 (Windows NT 10.0; Win64; x64) AppleWebKit/537.36 (KHTML, like Gecko) Chrome/102.0.0.0 Safari/537.36" "-" 172.16.1.5 - - [14/Jun/2022:20:01:54 +0800] "GET /favicon.ico HTTP/1.0" 404 555 "http://blog.roger.com/" "Mozilla/5.0 (Windows NT 10.0; Win64; x64) AppleWebKit/537.36 (KHTML, like Gecko) Chrome/102.0.0.0 Safari/537.36" "-" web01上的nginx日志,只显示lb01的服务器IP地址,无法显示用户的真实IP地址 解决方案:在lb01的请求头中,加上用户真实IP去访问web01 server { listen 80; server_name blog.roger.com; location / { proxy_pass http://172.16.1.7:80; proxy_set_header Host $host ; proxy_set_header X-Forwarded-For $proxy_add_x_forwarded_for ; } } server { listen 80; server_name blog.roger.com; location / { proxy_pass http://172.16.1.7:80; proxy_set_header Host $host ; proxy_set_header X-Forwarded-For $proxy_add_x_forwarded_for ; proxy_connect_timeout 60s; proxy_read_timeout 60s; proxy_send_timeout 60s; proxy_buffering on; proxy_buffer_size 32k; proxy_buffers 4 128k; } } [root@lb01 ~] server { listen 80; server_name blog.roger.com; location /{ proxy_pass http://172.16.1.7:80; include proxy_params; } } [root@lb01 ~] proxy_set_header Host $host ; proxy_set_header X-Forwarded-For $proxy_add_x_forwarded_for ; proxy_connect_timeout 60s; proxy_read_timeout 60s; proxy_send_timeout 60s; proxy_buffering on; proxy_buffer_size 32k; proxy_buffers 4 128k;
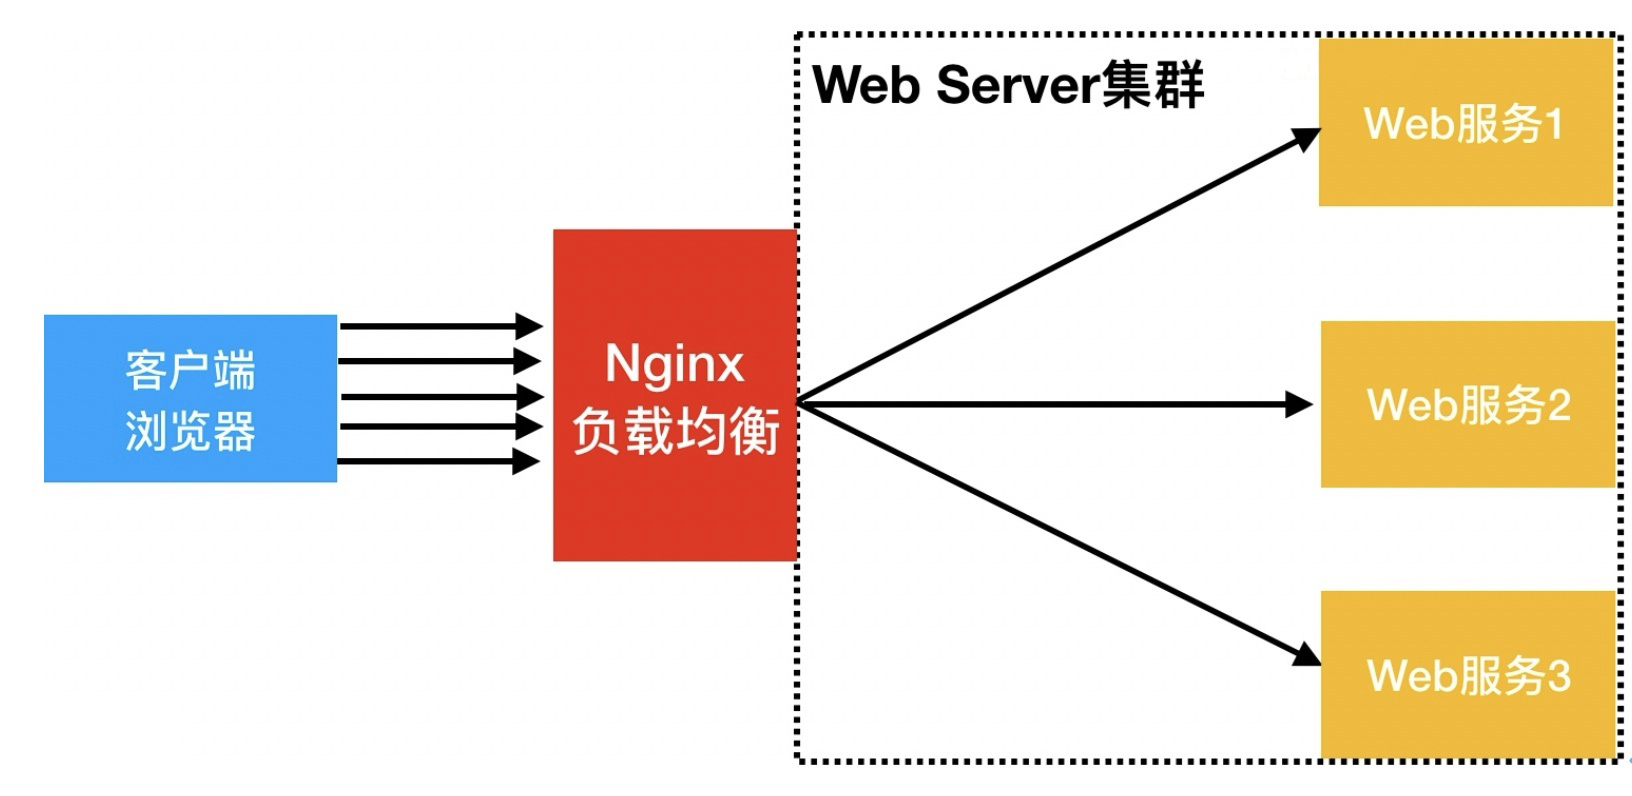
Nginx实现七层负载均衡 为什么要使用负载均衡 1.解决web服务器的单点故障,让web服务器做成一个集群
2.将请求平均下发给后端的web服务器
负载均衡的叫法 LB:Load Balance
SLB:Server Load Balance
公有云中的叫法 阿里云:SLB
腾讯云:CLB
青云:QLB(LB)
ucloud:ULB
AWS:ELB
负载均衡产品
四层负载均衡和七层负载均衡的区别 1.一个是四层:传输层,一个是七层:应用层
2.四层传输速度要比七层快
3.四层无法识别域名,七层可以识别域名
负载均衡实现场景 Nginx要实现负载均衡需要用到proxy_pass代理模块配置.
Nginx负载均衡与Nginx 代理不同地方在于,Nginx 的一个location仅能代理一台服务器,而Nginx 负载均衡则是将客户端请求代理转发至一组upstream 虚拟服务池
负载均衡配置语法 1 2 3 4 5 6 7 8 Syntax: upstream name { ... } Default: — Context: http upstream name { server xxx; server xxx; }
官方案例配置 1 2 3 4 5 6 7 8 9 10 11 12 13 14 15 16 17 18 19 20 21 22 23 24 25 26 27 模块名 后端主机池:名字(根据网站域名来起名) upstream backend { server backend1.example.com weight=5; server backend2.example.com:8080; server unix:/tmp/backend3; server backup1.example.com:8080 backup; server backup2.example.com:8080 backup; } server { location / { proxy_pass http://backend; } } upstream blog.zls.com { server 172.16.1.7:8888; server 172.16.1.8; } server { location / { proxy_pass http://blog.zls.com; } }
配置负载均衡 环境准备
主机名
WanIP
LanIP
角色
应用
lb01
10.0.0.5
172.16.1.5
负载均衡
nginx
web01
10.0.0.7
172.16.1.7
web网站
nginx、php
web02
10.0.0.8
172.16.1.8
web网站
nginx、php
编辑nginx配置文件 1 2 3 4 5 6 7 8 9 10 11 12 13 14 15 16 17 18 19 20 21 22 23 24 25 26 27 28 29 30 31 32 33 34 35 36 37 38 39 40 41 42 43 44 45 46 47 48 49 50 51 52 53 [root@web01 conf.d] server{ listen 9999; server_name lb.roger.com; root /code/lb; index index.html; } [root@web02 conf.d] server{ listen 9999; server_name lb.roger.com; root /code/lb; index index.html; } [root@web01 conf.d] [root@web02 conf.d] [root@web01 conf.d] [root@web02 conf.d] [root@web01 conf.d] nginx: the configuration file /etc/nginx/nginx.conf syntax is ok nginx: configuration file /etc/nginx/nginx.conf test is successful [root@web01 conf.d] [root@web02 conf.d] nginx: the configuration file /etc/nginx/nginx.conf syntax is ok nginx: configuration file /etc/nginx/nginx.conf test is successful [root@web02 conf.d] 10.0.0.7 lb.zls.com [root@lb01 ~] upstream lb.roger.com { server 172.16.1.7:9999; server 172.16.1.8:9999; } server { listen 80; server_name lb.roger.com; location /{ proxy_pass http://lb.roger.com; include proxy_params; } }
负载均衡常见典型故障 如果后台服务连接超时,Nginx是本身是有机制的,如果出现一个节点down掉的时候,Nginx会更据你具体负载均衡的设置,将请求转移到其他的节点上,但是,如果后台服务连接没有down掉,但是返回错误异常码了如:504、502、500,这个时候你需要加一个负载均衡的设置,如下:proxy_next_upstream http_500 | http_502 | http_503 | http_504 |http_404;意思是,当其中一台返回错误码404,500…等错误时,可以分配到下一台服务器程序继续处理,提高平台访问成功率。
1 2 3 4 5 6 7 8 9 10 11 12 13 14 15 16 17 18 19 20 proxy_next_upstream error timeout http_500 http_502 http_503 http_504; upstream lb.roger.com { server 172.16.1.7:9999; server 172.16.1.8:9999; server 172.16.1.9:9999; } server { listen 80; server_name lb.roger.com; location / { proxy_pass http://lb.roger.com; proxy_next_upstream error timeout http_500 http_502 http_503 http_504; include proxy_params; } }
负载均衡调度算法
调度算法
概述
轮询(rr) nginx做负载均衡默认使用轮询的调度算法:将请求平均下发到后端的web服务器
加权轮询(wrr) 增加权重,根据服务器的配置,给轮询加上权重
源IP(ip_hash)
根据用户的IP,将同一IP地址的请求,下发到同一台服务器上
源url(url_hash)
根据用户访问的URL,将同一URL的请求,下发到同一台服务器上
最小连接数(least_conn)
哪台服务器的连接数最少,就将请求下发到该服务器上
调度算法配置 1 2 3 4 5 6 7 8 9 10 11 12 13 14 15 16 17 18 19 20 21 22 23 24 25 26 27 28 29 30 31 32 33 34 upstream lb.roger.com { server 172.16.1.7:9999 weight=5; server 172.16.1.8:9999; server 172.16.1.9:9999; } server { listen 80; server_name lb.roger.com; location / { proxy_pass http://lb.roger.com; include proxy_params; } } upstream lb.roger.com { ip_hash; server 172.16.1.7:9999; server 172.16.1.8:9999; server 172.16.1.9:9999; } server { listen 80; server_name lb.roger.com; location / { proxy_pass http://lb.roger.com; include proxy_params; } }
负载均衡后端状态 1 2 3 4 5 6 7 8 9 10 11 12 13 14 15 16 17 18 19 20 21 22 23 24 25 26 27 28 29 30 31 32 33 34 35 36 37 38 39 40 41 42 43 44 45 46 47 48 49 50 51 52 53 54 55 56 57 58 59 60 61 62 63 64 65 66 67 68 69 70 upstream lb.roger.com { server 172.16.1.7:9999; server 172.16.1.8:9999 down; server 172.16.1.9:9999; } server { listen 80; server_name lb.roger.com; location / { proxy_pass http://lb.roger.com; include proxy_params; } } upstream lb.roger.com { server 172.16.1.7:9999; server 172.16.1.8:9999 backup; server 172.16.1.9:9999; } server { listen 80; server_name lb.roger.com; location / { proxy_pass http://lb.roger.com; include proxy_params; } } max_fails:负载均衡访问后端,最大错误次数,到该指定次数后,不给该服务器发送请求 fail_timeout:配合max_fails使用,规定不发请求的时间段 [root@lb01 ~] upstream lb.roger.com { server 172.16.1.7:9999 max_fails=3 fail_timeout=10s; server 172.16.1.8:9999 max_fails=3 fail_timeout=10s; server 172.16.1.9:9999 max_fails=3 fail_timeout=10s; } server { listen 80; server_name lb.roger.com; location / { proxy_pass http://lb.roger.com; include proxy_params; } } upstream lb.roger.com { server 172.16.1.7:9999 max_fails=3 fail_timeout=10s; server 172.16.1.8:9999 max_fails=3 fail_timeout=10s; server 172.16.1.9:9999 max_fails=3 fail_timeout=10s max_conns=1024; } server { listen 80; server_name lb.roger.com; location / { proxy_pass http://lb.roger.com; include proxy_params; } }
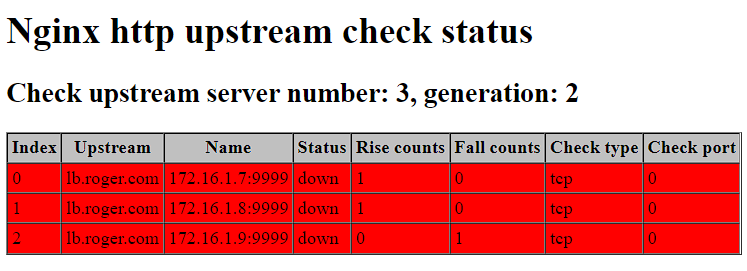
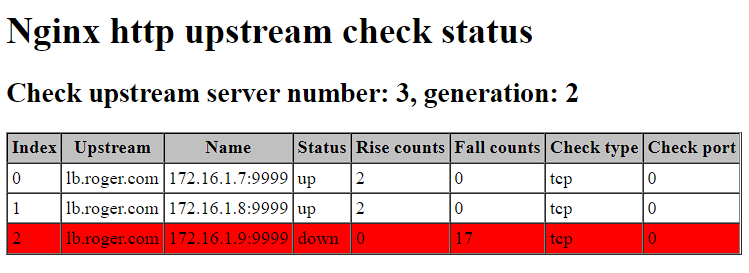
Nginx负载均衡健康检查模块 作用:为了检测后端web的健康状态
项目地址:https://github.com/yaoweibin/nginx_upstream_check_module
1 2 3 4 5 6 7 8 9 10 11 12 13 14 15 16 17 18 19 20 21 22 23 24 25 26 27 28 29 30 31 32 33 34 35 36 37 38 39 40 41 42 43 44 45 46 47 48 49 50 51 52 53 54 55 56 57 58 59 60 61 62 63 64 65 66 67 68 69 70 71 72 73 74 75 76 77 78 79 80 81 82 83 84 85 86 87 88 89 90 91 92 93 94 95 96 97 98 99 100 101 102 103 104 105 106 107 108 109 110 111 112 113 114 115 116 117 118 119 120 121 122 123 124 [root@lb01 nginx-1.22.0] [root@lb01 ~] [root@lb01 ~] [root@lb01 ~] [root@lb01 ~] [root@lb01 ~] [root@lb01 ~] [root@lb01 ~] [root@lb01 nginx-1.22.0] [root@lb01 nginx-1.22.0] [root@lb01 nginx-1.22.0] --with-compat \ --with-file-aio \ --with-threads \ --with-http_addition_module \ --with-http_auth_request_module \ --with-http_dav_module \ --with-http_flv_module \ --with-http_gunzip_module \ --with-http_gzip_static_module \ --with-http_mp4_module \ --with-http_random_index_module \ --with-http_realip_module --with-http_secure_link_module --with-http_slice_module \ --with-http_ssl_module \ --with-http_stub_status_module \ --with-http_sub_module \ --with-http_v2_module \ --with-mail \ --with-mail_ssl_module --with-stream \ --with-stream_realip_module \ --with-stream_ssl_module \ --with-stream_ssl_preread_module \ --with-cc-opt='-O2 -g -pipe -Wall -Wp,-D_FORTIFY_SOURCE=2 -fexceptions -fstack-protector-strong --param=ssp-buffer-size=4 -grecord-gcc-switches -fPIC' \ --with-ld-opt='-Wl,-z,relro -Wl,-z,now -pie' \ --add-module=/root/nginx_upstream_check_module-master [root@lb01 nginx-1.22.0] [root@lb01 conf] worker_processes 1; events { worker_connections 1024; } http { include mime.types; default_type application/octet-stream; sendfile on; keepalive_timeout 65; include /app/nginx-1.22.0/conf/conf.d/*.conf; } [root@lb01 conf] [root@lb01 conf] upstream lb.roger.com { server 172.16.1.7:9999 max_fails=3 fail_timeout=10s; server 172.16.1.8:9999 max_fails=3 fail_timeout=10s; server 172.16.1.9:9999 max_fails=3 fail_timeout=10s max_conns=1024; check interval=3000 rise=2 fall=3 timeout=1000 type =tcp; } server { listen 80; server_name lb.roger.com; location / { proxy_pass http://lb.roger.com; include proxy_params; } location /check_health { check_status; } } [root@lb01 conf] [root@lb01 conf]
刚启动需要等一下
Nginx七层负载-会话共享 会话保持相关信息存储
cookie
前端开发人员将用户登录的信息,保存到浏览器中(开发者工具->Application->Cookies)
如果仅将用户的登录信息记录在Cookie中,随时可以在浏览器中篡改
session
后端开发人员,将用户登录信息记录在 服务器上(共享存储,某一个文件夹下的某个文件、数据库中、缓存数据库中….)session是对cookie做的加密,保存在服务器上
部署phpMyadmin 环境准备
主机名
WanIP
LanIP
角色
应用
lb01
10.0.0.5
172.16.1.5
负载均衡
nginx
web01
10.0.0.7
172.16.1.7
phpmyadmin网站
nginx、php
web02
10.0.0.8
172.16.1.8
phpmyadmin网站
nginx、php
db01
10.0.0.51
172.16.1.51
数据库
MariaDB
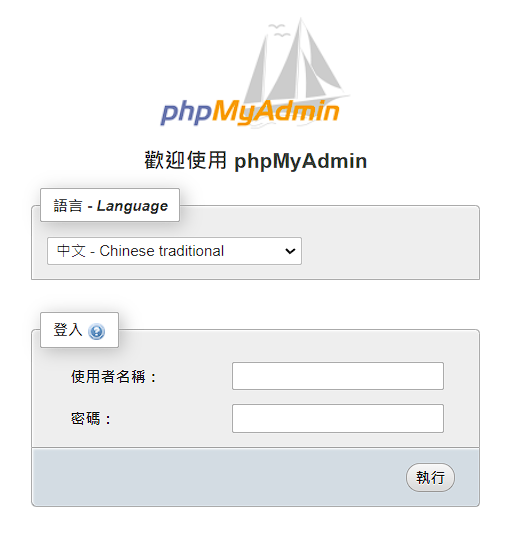
部署 1 2 3 4 5 6 7 8 9 10 11 12 13 14 15 16 17 18 19 20 21 22 23 24 25 26 27 28 29 30 31 32 33 34 35 36 37 38 39 40 41 42 43 44 45 46 47 48 49 [root@web01 code] [root@web01 code] [root@web01 code] [root@web01 code] server{ listen 80; server_name php.roger.com; root /code/phpmyadmin; index index.php index.html; location ~ \.php$ { fastcgi_pass unix:/dev/shm/php.sock; fastcgi_param SCRIPT_FILENAME $document_root $fastcgi_script_name ; include fastcgi_params; } } [root@web02 code] server{ listen 80; server_name php.roger.com; root /code/phpmyadmin; index index.php index.html; location ~ \.php$ { fastcgi_pass unix:/dev/shm/php.sock; fastcgi_param SCRIPT_FILENAME $document_root $fastcgi_script_name ; include fastcgi_params; } } 将站点目录下的案例配置文件改名 [root@web01 phpmyadmin] [root@web01 phpmyadmin] 将第31行的localhost改成自己数据库的ip地址 $cfg ['Servers' ][$i ]['host' ] = '172.16.1.51' ;[root@web01 phpmyadmin] [root@web01 phpmyadmin] [root@web02 phpmyadmin]
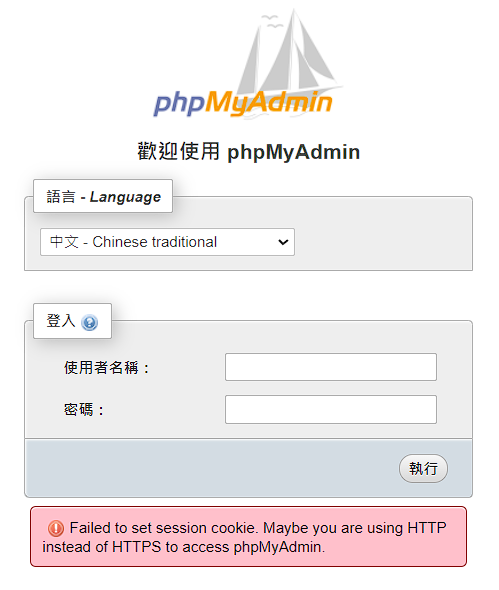
报错:
存放session的目录没有权限
1 2 [root@web01 phpmyadmin] [root@web02 phpmyadmin]
使用数据库的用户名和密码登录:之前的wordpress用户名和密码就可以使用
1 2 3 4 5 6 7 8 [root@db01 ~] MariaDB [(none)]> grant all on *.* to phpadmin@'%' identified by '123' ; 登录的用户名:phpadmin 登录的密码:123
添加phpmyadmin的负载均衡 1 2 3 4 5 6 7 8 9 10 11 12 13 14 15 16 17 18 19 [root@lb01 conf.d] upstream php.roger.com { server 172.16.1.7; server 172.16.1.8; } server { listen 80; server_name php.roger.com; location / { proxy_pass http://php.roger.com; include proxy_params; } } 10.0.0.5 php.roger.com
报错
用户的登录信息,session没有做共享
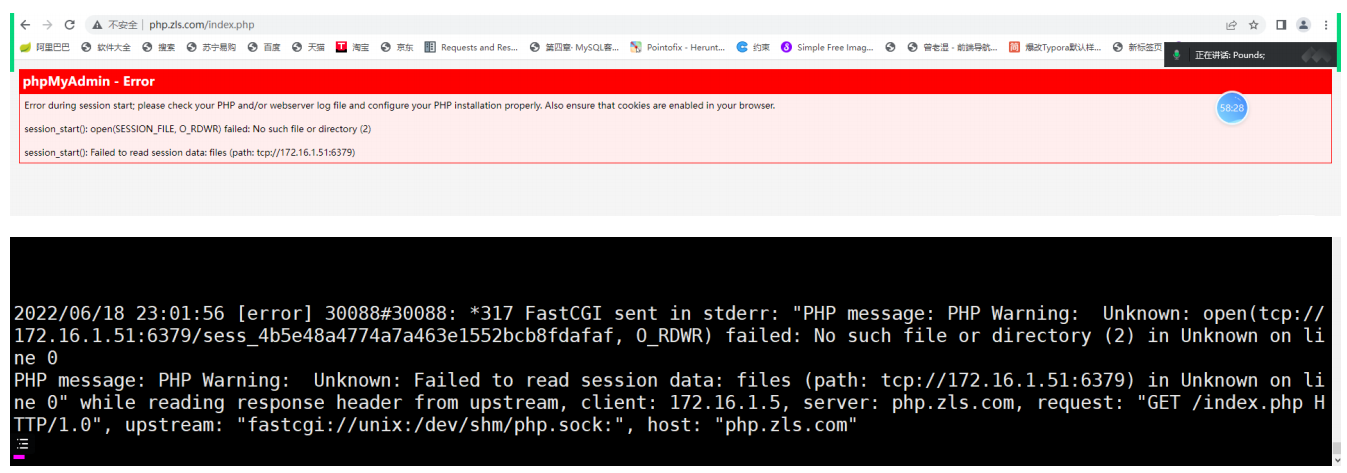
制作session共享 1 2 3 4 5 6 7 8 9 10 11 12 13 14 15 16 17 18 19 20 21 22 23 24 25 26 27 28 29 30 31 32 33 34 35 36 37 38 39 40 41 42 43 44 45 46 [root@db01 ~] [root@db01 ~] 将第61行的bind 后面IP地址改为 0.0.0.0 bind 0.0.0.0[root@db01 ~] [root@web01 phpmyadmin] 1231 session.save_handler = files 将以上内容改为以下内容 session.save_handler = redis 1265 ;session.save_path = "/tmp" 将以上内容改为以下内容 session.save_path = "tcp://172.16.1.51:6379" 1295 session.auto_start = 0 将以上内容改为以下内容 session.auto_start = 1 [root@web01 phpmyadmin] 源配置 398 php_value[session.save_handler] = files 399 php_value[session.save_path] = /var/lib/php/session 将以上两行内容使用';' 注释 ;php_value[session.save_handler] = files ;php_value[session.save_path] = /var/lib/php/session [root@web01 phpmyadmin] [root@web01 phpmyadmin] [root@web01 phpmyadmin] [root@web02 phpmyadmin]
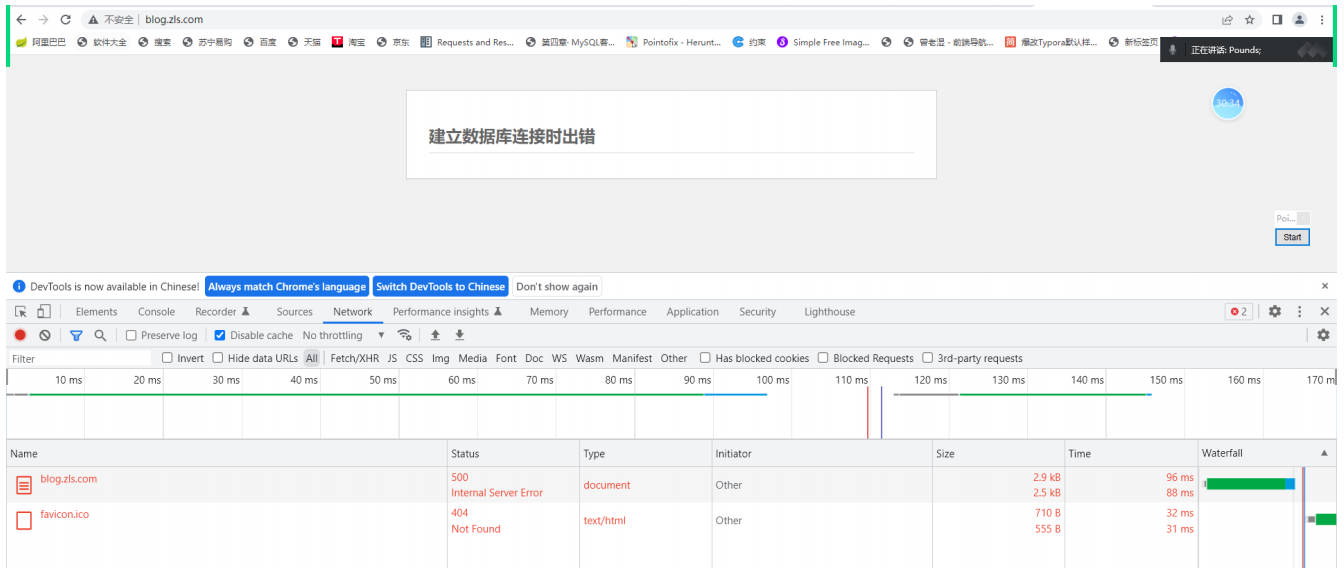
报错502 后端的服务无法建立连接
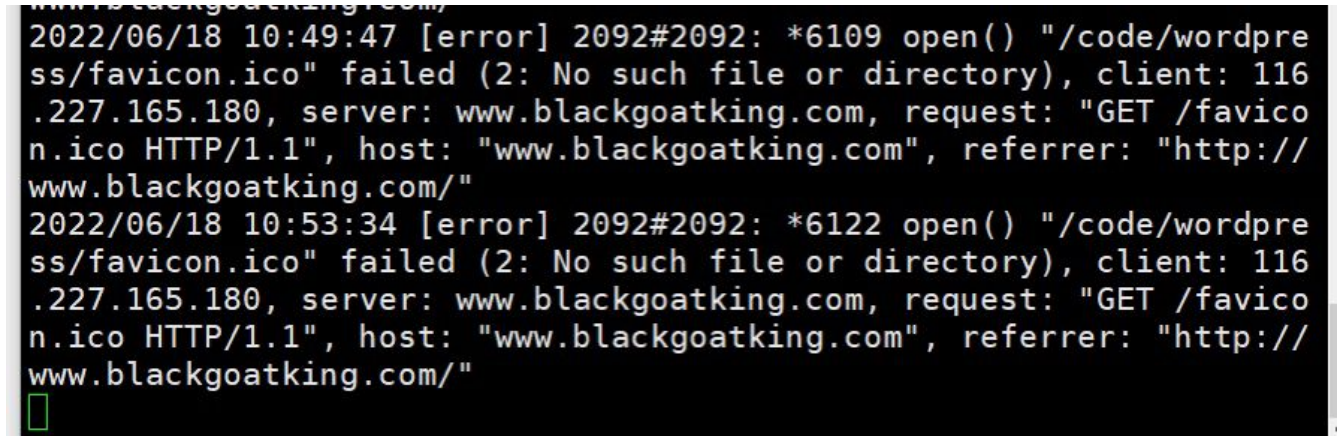
找不到网站标签上的图标文件
1 2 3 4 5 6 7 8 9 10 11 12 13 14 15 16 17 18 19 20 21 22 23 24 25 26 27 连接后端upstream被拒绝 172.16.1.7 和 172.16.1.8 的80端口拒绝 [root@lb01 ~] ping icmp协议 [root@lb01 ~] Trying 172.16.1.7... telnet: connect to address 172.16.1.7: Connection refused 1)upstream配置的端口和后端的nginx启动的端口不一致 upstream php.roger.com { server 172.16.1.7; server 172.16.1.8; } listen 80; 2)nginx服务没有启动(没起80端口) [root@web01 ~] root 30074 21443 0 22:27 pts/2 00:00:00 grep --color=auto nginx [root@web01 ~] [root@web01 ~]
1 2 3 4 5 6 7 8 9 10 11 12 13 14 15 16 17 18 19 20 21 22 23 24 25 26 27 28 29 30 31 32 33 34 35 36 37 数据库的IP地址:172.16.1.51 数据库的用户名:wp_user 数据库的密码:123 ----- 数据库的库名:wordpress 哪个服务要连接数据库,该服务装在哪,确认该服务使用哪个IP地址连接数据库 php的代码服务(wordpress)要连接数据库,装在web上,查看对应程序的连接数据库配置文件找到IP 1)检查IP [root@web01 wordpress] 2)检查端口 [root@web01 wordpress] Trying 172.16.1.51... telnet: connect to address 172.16.1.51: Connection refused 配置的端口和后端数据库启动的端口不一致 数据库服务没有启动 [root@db01 ~] 3)检查数据库的用户名和密码 - 检查用户的权限,允不允许web的ip连接 MariaDB [(none)]> select user,host from mysql.user; +----------+-------------+ | user | host | +----------+-------------+ | wp_user | 172.16.1.% | 允许 | wp_user | 172.16.1.5% | +----------+-------------+ - 检查密码 在web服务器上,安装数据库客户端命令:mysql [root@web01 ~] [root@web01 ~]
1 2 3 4 5 6 7 8 9 10 11 12 13 14 15 16 17 18 19 20 redis的IP地址:172.16.1.51 1)检查IP [root@web01 ~] 2)检查端口 [root@web01 ~] Trying 172.16.1.51... telnet: connect to address 172.16.1.51: Connection refused 3)服务启动,再检查该端都让哪些IP连接 [root@db01 ~] redis 29523 1 0 22:52 ? 00:00:00 /usr/bin/redis-server 127.0.0.1:6379 root 29527 25636 0 22:52 pts/0 00:00:00 grep --color=auto redis [root@db01 ~] tcp 0 0 127.0.0.1:6379 0.0.0.0:* LISTEN 29523/redis-server [root@db01 ~] 48:bind 0.0.0.0 61:bind 127.0.0.1
1 2 3 4 问题:读取不到redis中的session信息 解决:检查php的配置 [root@web01 ~] [root@web01 ~]
Nginx四层负载 什么是四层负载均衡 OSI七层模型中,四层是传输层,传输层使用端口到端口的通信方式
四层负载均衡,就是在传输层做端口的转发(端口映射)
注意:四层负载不识别域名
四层负载应用场景 1.四层+七层来做负载均衡,四层可以保证七层的负载均衡的高可用性;如:nginx就无法保证自己的服务高可用,需要依赖LVS或者keepalive
2.如:tcp协议的负载均衡,有些请求是TCP协议的(mysql、ssh),或者说这些请求只需要使用四层进行端口的转发就可以了,所以使用四层负载均衡
Nginx四层负载 负载均衡软件:
Nginx
四层负载(nginx 1.9版本以后有stream模块,才可以做四层负载)
七层负载
LVS
HAproxy
四层负载均衡配置 环境准备
主机名
WANIP
LANIP
角色
应用
lb01
10.0.0.5
172.16.1.5
七层负载
nginx
lb02
10.0.0.6
172.16.1.6
四层负载
nginx
web01
10.0.0.7
172.16.1.7
web网站
nginx、php
web02
10.0.0.8
172.16.1.8
web网站
nginx、php
db01
10.0.0.51
172.16.1.51
数据库
MariaDB
部署四层负载 1 2 3 4 5 6 7 8 9 10 11 12 13 14 15 16 17 18 19 20 21 22 23 24 25 26 27 28 [root@lb02 ~] [nginx-stable] name=nginx stable repo baseurl=http://nginx.org/packages/centos/$releasever /$basearch / gpgcheck=1 enabled=1 gpgkey=https://nginx.org/keys/nginx_signing.key module_hotfixes=true [root@lb02 ~] stream { upstream backend { server 172.16.1.5:80; } server { listen 90; proxy_pass backend; } } http { ... }
使用stream做端口转发 实现22端口转发 1 2 3 4 5 6 7 8 9 10 11 12 13 14 15 16 17 18 19 20 21 22 23 24 25 26 27 28 29 30 31 32 33 34 35 36 37 38 39 40 41 42 ssh 10.0.0.6 -p 456 user nginx; worker_processes auto; error_log /var/log /nginx/error.log notice; pid /var/run/nginx.pid; events { ... } include /etc/nginx/stream.d/*.conf; http { ... } [root@lb02 nginx] stream { upstream web02_ssh { server 172.16.1.8:22; } server { listen 456; proxy_pass web02_ssh; } upstream backend { server 172.16.1.5:80; } server { listen 90; proxy_pass backend; } }
映射数据库端口 1 2 3 4 5 6 7 8 9 10 11 12 13 14 15 16 17 18 19 20 21 22 23 24 25 stream { upstream web02_ssh { server 172.16.1.8:22; } server { listen 456; proxy_pass web02_ssh; } upstream backend { sercer 172.16.1.5:80 } server { listen 90; proxy_pass backend; } upstream db01_mysql { server 172.16.1.51:3306; } server { listen 3307; proxy_pass db01_mysql; } }
Nginx动静分离和资源分离 动静分离
Q:什么是静态资源?
类似于 .jpg、.png、.css、.js….不需要访问数据库的资源,属于静态资源
Q:什么是动态资源?
需要访问数据库的代码文件,.php、.jsp、.py….
Q:什么是静态请求?
用户发起的请求只访问前端资源,不访问数据库
Q:什么是动态请求?
用户发起的请求访问后端资源,访问数据库
注意:不是页面会动,就一定是动态请求
Q:什么是动静分离?
又叫做前后端分离,将前端代码和后端代码区分开,前端代码,前端开发人员来写,后端代码,后端的开发人员来写
前端和后端建立连接使用AJAX
实践动静分离
主机名
WanIP
LanIP
角色
应用
web01
10.0.0.7
172.16.1.7
代理
nginx
web02
10.0.0.8
172.16.1.8
静态服务器
nginx
web03
10.0.0.9
172.16.1.9
动态服务器
tomcat
部署前端(静态页面) 1 2 3 4 5 6 7 8 9 10 11 12 13 14 15 16 17 18 19 20 21 22 23 24 25 26 27 28 29 30 31 32 33 34 35 36 37 38 39 40 41 42 43 44 45 46 47 48 49 50 51 52 53 54 55 56 57 58 [root@web01 ~] [nginx-stable] name=nginx stable repo baseurl=http://nginx.org/packages/centos/$releasever /$basearch / gpgcheck=1 enabled=1 gpgkey=https://nginx.org/keys/nginx_signing.key module_hotfixes=true [root@web01 ~] [root@web02 ~] [nginx-stable] name=nginx stable repo baseurl=http://nginx.org/packages/centos/$releasever /$basearch / gpgcheck=1 enabled=1 gpgkey=https://nginx.org/keys/nginx_signing.key module_hotfixes=true [root@web02 ~] [root@web02 ~] server { listen 80; server_name pic.roger.com; root /code; index index.html; charset utf-8; location ~* .*\.(jpg|png|gif)$ { root /code/images; } } [root@web02 ~] [root@web02 ~] 10.0.0.8 pic.drz.com [root@web02 ~] [root@web02 ~] [root@web02 images] total 224 -rw-r--r-- 1 root root 228072 Jun 8 11:41 1.jpg [root@web02 images] /code/images
部署后端(动态页面) 1 2 3 4 5 6 7 8 9 10 11 12 13 14 15 16 17 18 19 20 21 22 23 24 25 26 27 28 29 30 31 32 33 34 [root@web03 ~] [root@web03 ~] [root@web03 ~] tcp6 0 0 :::8009 :::* LISTEN 12611/java tcp6 0 0 :::8080 :::* LISTEN 12611/java tcp6 0 0 127.0.0.1:8005 :::* LISTEN 12611/java [root@web03 ~] /usr/share/tomcat/webapps [root@web03 webapps] [root@web03 webapps] <%@ page language="java" import="java.util.*" pageEncoding="utf-8" %> <HTML> <HEAD> <TITLE>曾老湿JSP Page</TITLE> </HEAD> <BODY> <% Random rand = new Random(); out.println("<h1>曾老湿随机数:<h1>" ); out.println(rand.nextInt(99)+100); %> </BODY> </HTML>
在代理上整合资源 1 2 3 4 5 6 7 8 9 10 11 12 13 14 15 16 17 18 19 20 21 22 23 24 25 26 27 28 29 30 31 32 [root@web01 ~] upstream static { server 172.16.1.8:80; } upstream java { server 172.16.1.9:8080; } server { listen 80; server_name pic.roger.com; location ~* \.(jpg|png|gif)$ { proxy_pass http://static; proxy_set_header Host $http_host ; } location ~ \.jsp { proxy_pass http://java; proxy_set_header Host $http_host ; } } [root@web01 ~] 10.0.0.7 pic.roger.com
1 2 3 4 5 6 7 8 9 10 11 12 13 14 15 16 17 18 19 20 21 22 23 24 25 26 27 28 29 30 31 32 33 34 35 36 37 38 39 40 41 42 43 44 45 46 47 48 49 50 51 52 53 54 55 56 57 58 59 60 61 62 63 64 65 66 67 [root@web01 ~] upstream static { server 172.16.1.8:80; } upstream java { server 172.16.1.9:8080; } server { listen 80; server_name pic.roger.com; location / { root /code; index index.html; } location ~* \.(jpg|png|gif)$ { proxy_pass http://static; proxy_set_header Host $http_host ; } location ~ \.jsp { proxy_pass http://java; proxy_set_header Host $http_host ; } } [root@web01 ~] [root@web01 ~] <html lang="en" > <head> <meta charset="UTF-8" /> <title>Roger测试ajax和跨域访问</title> <script src="http://libs.baidu.com/jquery/2.1.4/jquery.min.js" ></script> </head> <script type ="text/javascript" > $(document).ready(function $.ajax({ type : "GET" , url: "http://pic.roger.com/test.jsp" , success: function (data){ $("#get_data" ).html(data) }, error: function alert("哎呦喂,失败了,回去检查你服务去~" ); } }); }); </script> <body> <h1>Roger带你测试动静分离</h1> <img src="http://pic.roger.com/33_cc.jpg" > <div id="get_data" ></div> </body> </html> [root@web01 ~] [root@web01 ~]
Nginx实现资源分离 环境准备
主机名
WanIP
LanIP
角色
应用
lb01
10.0.0.5
172.16.1.5
代理
nginx
web01
10.0.0.7
172.16.1.7
PC端页面
nginx、PC端的代码
web02
10.0.0.8
172.16.1.8
安卓端页面
nginx、安卓端的代码
web03
10.0.0.9
172.16.1.9
IOS端页面
nginx、IOS端的代码
部署PC端 1 2 3 4 5 6 7 8 9 10 11 12 13 14 15 16 17 18 19 20 21 22 23 24 25 26 27 28 29 [root@web01 ~] server { listen 9090; server_name pc.roger.com; charset utf-8; location / { root /code/pc; index index.html; } } [root@web01 ~] [root@web01 ~] [root@web01 ~] nginx: the configuration file /etc/nginx/nginx.conf syntax is ok nginx: configuration file /etc/nginx/nginx.conf test is successful [root@web01 ~] 10.0.0.7 pc.roger.com
部署安卓端代码 1 2 3 4 5 6 7 8 9 10 11 12 13 14 15 16 17 18 19 20 21 22 23 24 25 26 27 28 29 [root@web02 ~] server { listen 9091; server_name andorid.zls.com; charset utf-8; location / { root /code/andorid; index index.html; } } [root@web02 ~] [root@web02 ~] [root@web02 ~] nginx: the configuration file /etc/nginx/nginx.conf syntax is ok nginx: configuration file /etc/nginx/nginx.conf test is successful [root@web02 ~] 10.0.0.8 andorid.zls.com
部署IOS页面 1 2 3 4 5 6 7 8 9 10 11 12 13 14 15 16 17 18 19 20 21 22 23 24 25 26 27 28 29 [root@web03 ~] server { listen 9092; server_name ios.zls.com; charset utf-8; location / { root /code/ios; index index.html; } } [root@web03 ~] [root@web03 ~] [root@web03 ~] nginx: the configuration file /etc/nginx/nginx.conf syntax is ok nginx: configuration file /etc/nginx/nginx.conf test is successful [root@web03 ~] 10.0.0.9 ios.zls.com
资源分离配置 1 2 3 4 5 6 7 8 9 10 11 12 13 14 15 16 17 18 19 20 21 22 23 24 25 26 27 28 29 30 31 32 33 34 35 36 37 38 [root@lb01 ~] upstream pc { server 172.16.1.7:9090; } upstream android { server 172.16.1.8:9091; } upstream ios { server 172.16.1.9:9092; } server { listen 80; server_name www.roger.com; charset 'utf-8' ; location / { if ($http_user_agent ~* "Android" ) { proxy_pass http://android; } if ($http_user_agent ~* "Iphone" ) { proxy_pass http://ios; } if ($http_user_agent ~* "(MSIE|WOW64)" ) { return 403; } proxy_pass http://pc; } }
Nginx实现Rewrite重写
Q:什么是rewrite?
Rewrite主要实现url地址重写,以及重定向,就是把传入web的请求重定向到其他url的过程
做伪静态,将动态页面url转换成静态的页面url
Rewrite使用场景
地址跳转
协议跳转
伪静态
将动态页面显示为静态页面方式的一种技术,便于搜索引擎的录入,同时建上动态URL地址对外暴露过多的参数,提升更高的安全性
搜索引擎,SEO优化依赖于url路径,好记的url便于智齿搜索引擎录入
伪静态的配置 1 2 3 4 5 6 7 8 9 10 11 12 13 14 句法:Syntax: rewrite regex replacement [flag] 默认:Default: -- 语境:Context: server,location,if rewrite:模块 regex:正则表达式(匹配当前的url) replacement:要替换成的url rewrite http://blackgoatking.com http://www.blackgoatking.com; 如果懂shell脚本的,这两个就类似于脚本中的,break 和continue
rewrite的flag
概述
flag
匹配到last的规则后可以继续匹配后面的location
last
匹配到break的规则后,无法再匹配后面的location
break
302临时重定向
redirect
301永久重定向
permanent
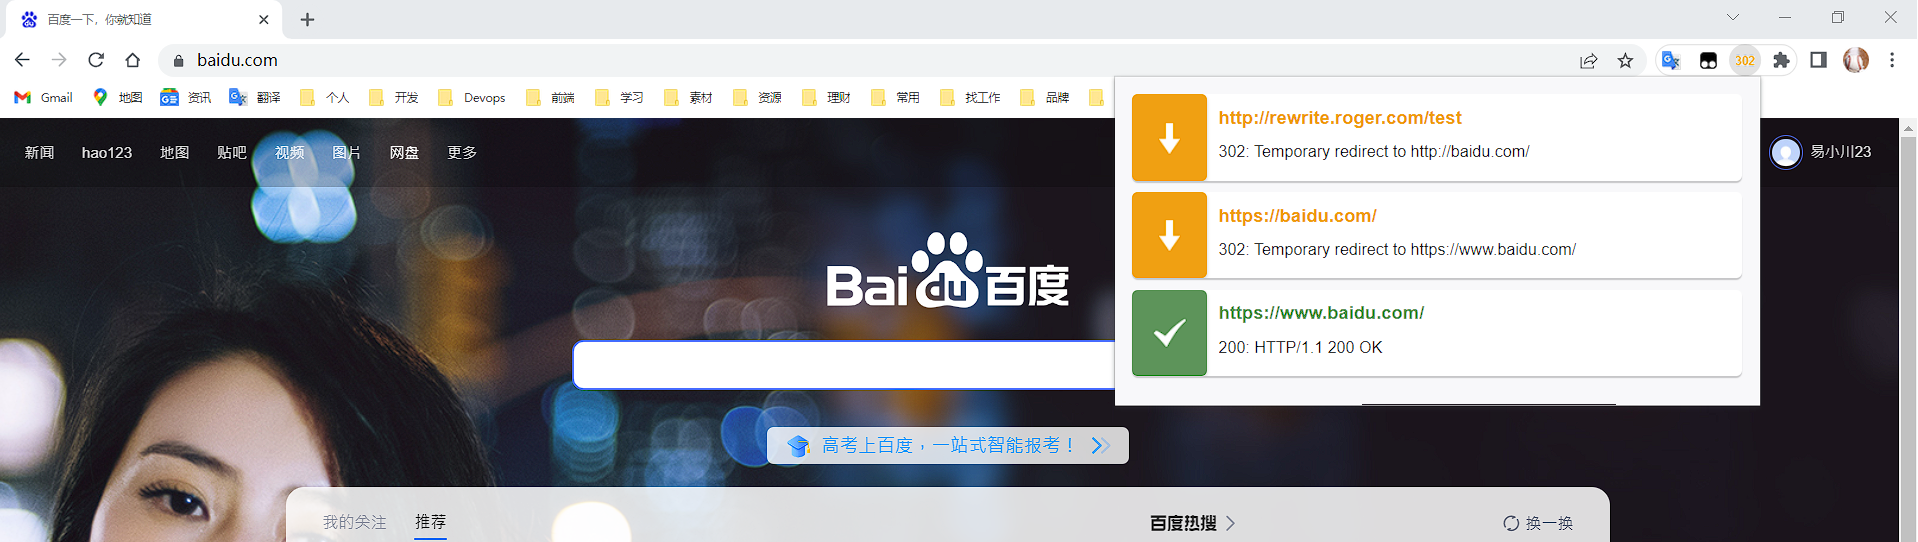
1 2 3 4 5 6 7 8 9 10 11 12 13 14 15 16 17 18 19 20 21 22 23 24 25 26 27 28 29 30 [root@web01 ~] server { listen 80; server_name rewrite.roger.com; root /code; index index.html; location /test { rewrite ^(.*)$ https://www.baidu.com redirect; } } server { listen 80; server_name rewrite.roger.com; root /code; index index.html; location /test { return 302 http://baidu.com; } } [root@web01 ~] 10.0.0.7 rewrite.roger.com
1 2 3 4 5 6 7 8 9 10 11 12 13 14 15 16 17 18 19 20 21 22 23 24 [root@web01 ~] server { listen 80; server_name rewrite.roger.com; root /code; index index.html; location /test { rewrite ^(.*)$ https://www.baidu.com permanent; } } server { listen 80; server_name rewrite.roger.com; root /code; index index.html; location /test { return 301 https://www.baidu.com; } }
rewrite实践 开启rewrite日志 1 2 3 4 5 6 7 8 9 10 11 [root@web01 code] /var/log /nginx/error.log notice; http{ rewrite_log on; ... } [root@web01 nginx]
案例一 用户访问 /abc/1.html 实际上真实访问的是 /ccc/bbb/2.html
1 2 3 4 5 6 7 8 9 10 server { listen 80; server_name rewrite.roger.com; root /code; index index.html; location /abc/1.html { rewrite ^(.*)$ /ccc/bbb/2.html redirect; } }
案例二 用户访问/2018/ccc/2.html实际上真实访问的是/2014/ccc/bbb/2.html
1 2 3 4 5 6 7 8 9 10 11 12 13 14 15 16 17 18 19 20 21 22 23 24 server { listen 80; server_name rewrite.roger.com; root /code; index index.html; location /2018/ccc { rewrite ^(.*)$ /2014/ccc/bbb/2.html redirect; } } [root@web01 nginx] server { listen 80; server_name rewrite.roger.com; root /code; index index.html; location /2018 { rewrite ^/2018/(.*) /2014/$1 redirect; } }
案例三 用户访问course-11-22-33.html实际上真实访问的是/course/11/22/33/course_33.html
1 2 3 4 5 6 7 8 9 10 11 [root@web01 nginx] server { listen 80; server_name rewrite.roger.com; root /code; index index.html; location /course { rewrite course-(.*)-(.*)-(.*).html /course/$1 /$2 /$3 /course_$3 .html redirect; } }
案例四(☆☆☆☆☆) 80端口强制跳转443端口
1 2 3 4 5 6 server { listen 80; server_name www.dirverzeng.com; rewrite ^(.*) https://$server_name redirect; }
rewrite做wordpress伪静态 1 2 3 4 5 6 7 8 9 if ( -f $request_filename /index.html ){ rewrite (.*) $1 /index.html break ; } if ( -f $request_filename /index.php ){ rewrite (.*) $1 /index.php; } if ( !-f $request_filename ){ rewrite (.*) /index.php; }
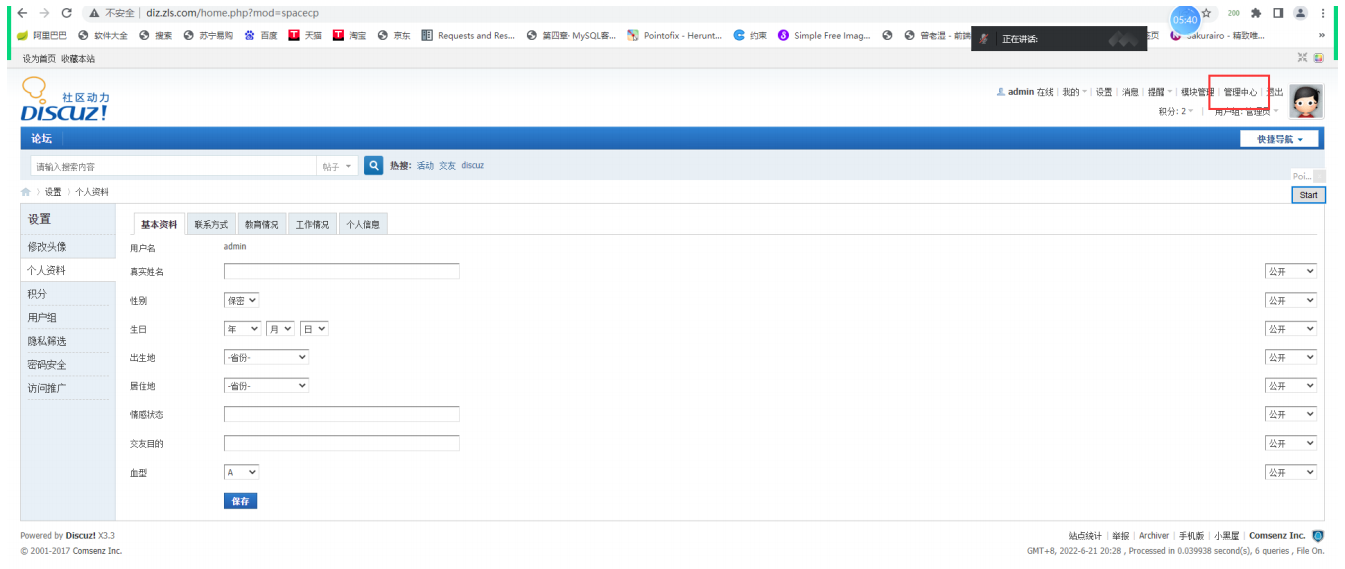
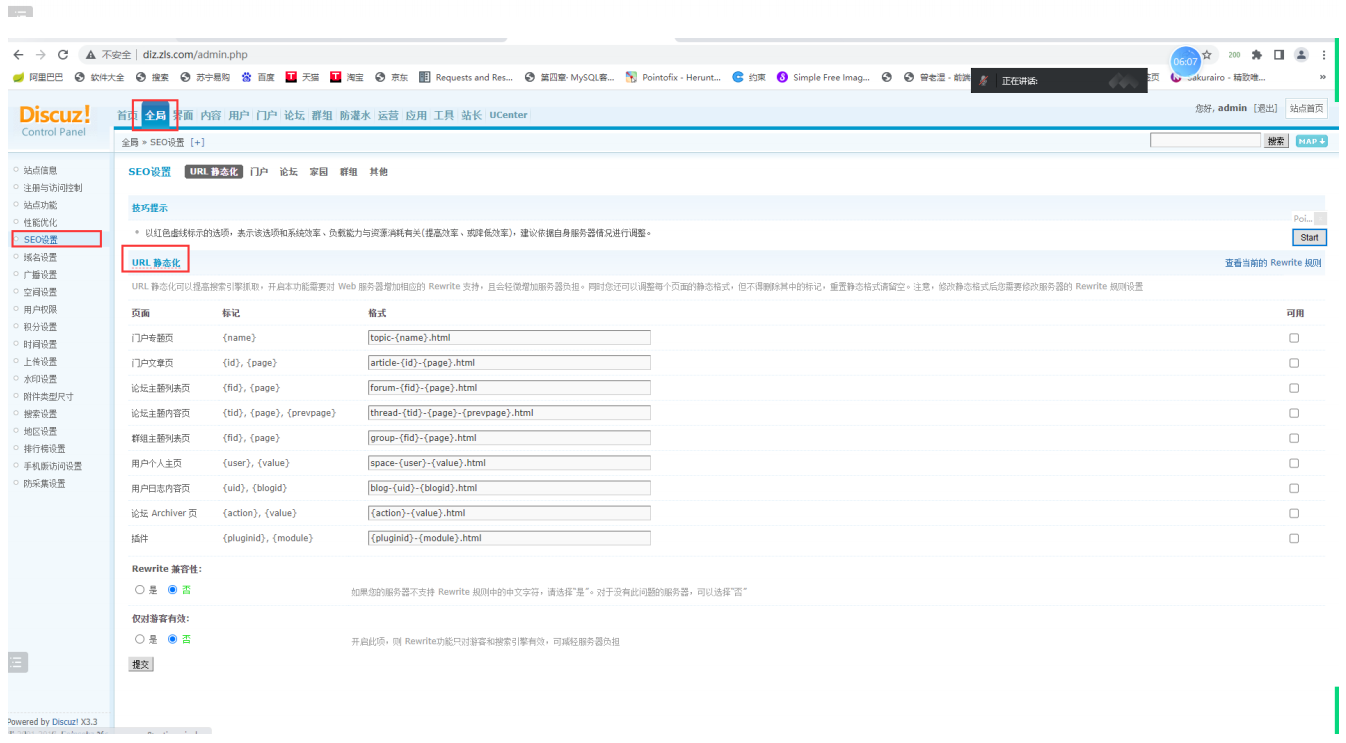
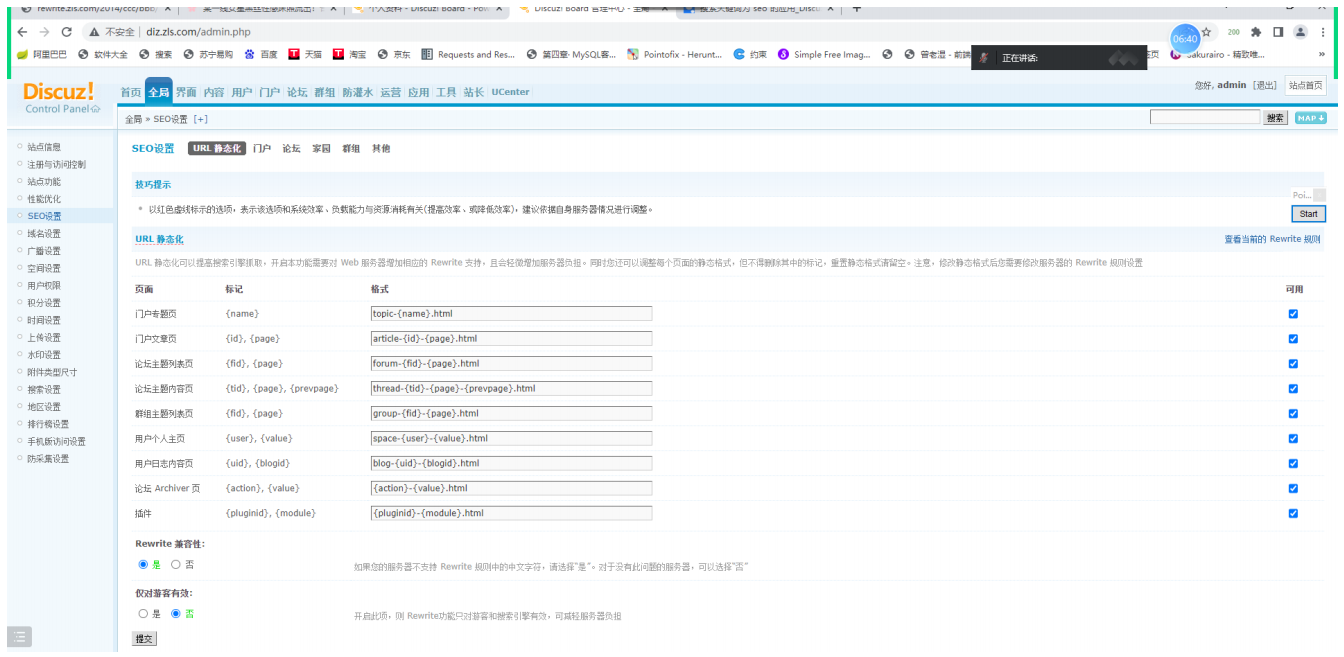
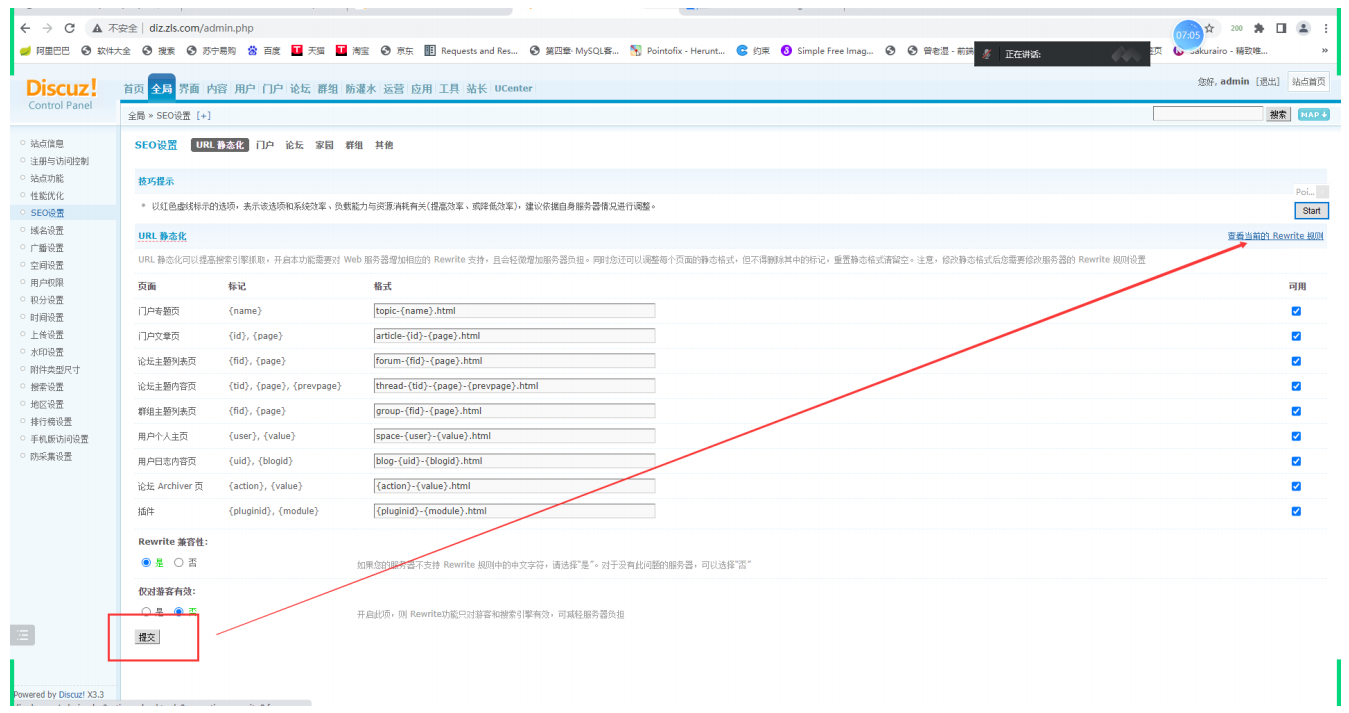
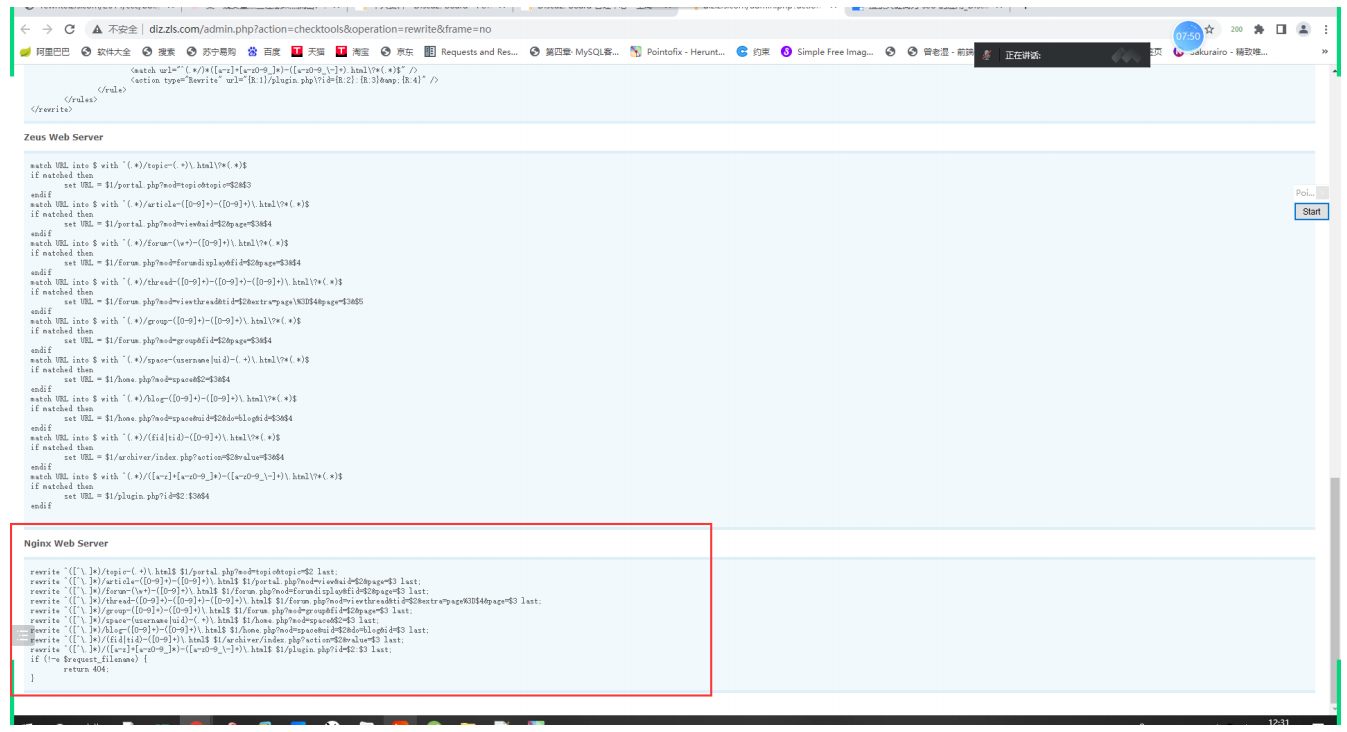
rewrite做Discuz伪静态
1 2 3 4 5 6 7 8 9 10 11 12 rewrite ^([^\.]*)/topic-(.+)\.html$ $1 /portal.php?mod=topic&topic=$2 last; rewrite ^([^\.]*)/article-([0-9]+)-([0-9]+)\.html$ $1 /portal.php?mod=view&aid=$2 &page=$3 last; rewrite ^([^\.]*)/forum-(\w+)-([0-9]+)\.html$ $1 /forum.php?mod=forumdisplay&fid=$2 &page=$3 last; rewrite ^([^\.]*)/thread-([0-9]+)-([0-9]+)-([0-9]+)\.html$ $1 /forum.php?mod=viewthread&tid=$2 &extra=page%3D$4 &page=$3 last; rewrite ^([^\.]*)/group-([0-9]+)-([0-9]+)\.html$ $1 /forum.php?mod=group&fid=$2 &page=$3 last; rewrite ^([^\.]*)/space-(username|uid)-(.+)\.html$ $1 /home.php?mod=space&$2 =$3 last; rewrite ^([^\.]*)/blog-([0-9]+)-([0-9]+)\.html$ $1 /home.php?mod=space&uid=$2 &do =blog&id=$3 last; rewrite ^([^\.]*)/(fid|tid)-([0-9]+)\.html$ $1 /archiver/index.php?action=$2 &value=$3 last; rewrite ^([^\.]*)/([a-z]+[a-z0-9_]*)-([a-z0-9_\-]+)\.html$ $1 /plugin.php?id=$2 :$3 last; if (!-e $request_filename ) { return 404; }
Keepalived负载均衡高可用 Keepalived概述 Keepalived是一个高可用软件,可以和任何应用配合使用
Q:什么是高可用?
一般是指2台机器启动着完全相同的业务系统,当有一台机器down机了,另外一台服务器就能快速的接管,对于访问的用户是无感知的
高可用软件
硬件
软件
keepalived
heartbeat
MySQL
MGR
MHA
Redis
Redis-Cluster
Sentine
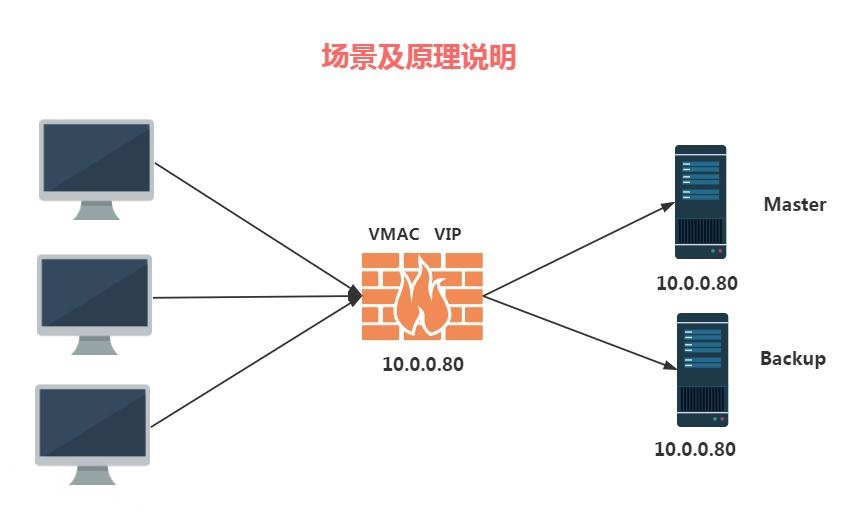
keepalived实现原理 keepalived底层协议:VRRP(虚拟路由冗余协议)
高可用keepalived使用场景 通常业务系统需要保证7×24小时不DOWN机,比如公司内部的OA系统,每天公司人员都需要使用,则不允许Down机,作为业务系统来说随时都可用
keepalived核心概念
通过选举投票,决定谁是主节点谁是备节点(选举)
如果Master故障,Backup自动接管,那么Master恢复后会夺权吗(抢占试、非抢占式)
两台服务器都认为自己是master,那么会出现一个故障(脑裂)
keepalived安装配置 环境准备
主机名
WanIP
LanIP
角色
应用
lb01
10.0.0.5
172.16.1.5
Master keepalived主节点
keepalived
lb02
10.0.0.6
172.16.1.6
Backup keepalived备节点
keepalived
部署keepalived 1 2 3 4 5 6 7 8 9 10 11 12 13 14 15 16 17 18 19 20 21 22 23 24 25 26 27 28 29 30 31 32 33 34 35 36 37 38 39 40 41 42 43 44 45 46 47 48 [root@lb01 ~] [root@lb02 ~] [root@lb01 ~] [root@lb01 ~] global_defs { router_id lb01 } vrrp_instance VI_1 { state MASTER interface eth0 virtual_router_id 50 priority 150 advert_int 1 authentication { auth_type PASS auth_pass 1111 } virtual_ipaddress { 10.0.0.3 } } [root@lb02 ~] global_defs { router_id lb02 } vrrp_instance VI_1 { state BACKUP interface eth0 virtual_router_id 50 priority 100 advert_int 1 authentication { auth_type PASS auth_pass 1111 } virtual_ipaddress { 10.0.0.3 } }
Keepalived配置区别
Master节点配置
Backup节点配置
router_id
lb01
lb02
state
MASTER
BACKUP
priority
150
100
1 2 3 4 5 6 7 [root@lb01 ~] [root@lb01 ~] [root@lb02 ~] [root@lb02 ~]
注意:只要停止掉Keepalived,VIP会漂移到另外一个节点
非抢占式配置 1 2 3 4 5 6 7 8 9 10 11 12 13 14 15 16 17 18 19 20 21 22 23 24 25 26 27 28 29 30 31 32 33 34 35 36 37 38 39 40 41 42 43 44 45 46 47 48 1、两个节点的state都必须配置为BACKUP 2、两个节点都必须加上配置 nopreempt 3、其中一个节点的优先级必须要高于另外一个节点的优先级 [root@lb01 ~] global_defs { router_id lb01 } vrrp_instance VI_1 { state BACKUP interface eth0 nopreempt virtual_router_id 50 priority 150 advert_int 1 authentication { auth_type PASS auth_pass 1111 } virtual_ipaddress { 10.0.0.3 } } [root@lb02 ~] global_defs { router_id lb02 } vrrp_instance VI_1 { state BACKUP interface eth0 nopreempt virtual_router_id 50 priority 100 advert_int 1 authentication { auth_type PASS auth_pass 1111 } virtual_ipaddress { 10.0.0.3 } }
脑裂的原因
服务器网线松动等网络故障
服务器硬件故障发生损坏现象而崩溃
主备都开启Firewalld防火墙
1 2 3 4 5 6 7 8 9 10 11 12 13 14 15 [root@lb02 ~] #!/bin/sh vip=10.0.0.3 lb01_ip=10.0.0.5 while true ;do ping -c 2 $lb01_ip &>/dev/null if [ $? -eq 0 -a `ip add|grep "$vip " |wc -l` -eq 1 ];then echo "ha is split brain.warning." else echo "ha is ok" fi sleep 5 done
keepalive结合nginx做高可用 环境准备
主机名
WanIP
LanIP
角色
应用
lb01
10.0.0.5
172.16.1.5
Master keepalived主节点、nginx负载均衡
keepalived、nginx
lb02
10.0.0.6
172.16.1.6
Backup keepalived备节点、nginx负载均衡
keepalived、nginx
web01
10.0.0.7
172.16.1.7
web网站
nginx、php
web02
10.0.0.8
172.16.1.8
web网站
nginx、php
关联nginx 1 2 3 4 5 6 7 8 9 10 11 12 13 14 15 16 17 18 19 20 21 22 23 24 25 [root@lb01 ~] #!/bin/sh nginx_count=$(ps -ef|grep [n]ginx|wc -l) if [ $nginx_count -eq 0 ];then systemctl start nginx sleep 3 nginx_count=$(ps -ef|grep [n]ginx|wc -l) if [ $nginx_count -eq 0 ];then systemctl stop keepalived fi fi [root@lb01 ~] #!/bin/sh nginx_count=$(ps -ef|grep [n]ginx|wc -l) if [ $nginx_count -eq 0 ];then systemctl stop keepalived fi
先配置两台负载均衡 1 2 3 4 5 6 7 8 9 10 11 12 13 14 15 16 17 18 19 20 21 22 23 24 25 26 27 28 29 30 31 32 33 34 35 36 37 38 39 40 41 42 43 44 45 46 47 48 49 50 upstream blog_roger_com { server 172.16.1.7; server 172.16.1.8; } server { listen 80; server_name blog.roger.com; rewrite (.*) https://blog.roger.com; } server{ listen 443 ssl; server_name blog.roger.com; ssl_certificate ssl/20220623_blog.roger.com.pem; ssl_certificate_key ssl/20220623_blog.roger.com.key; location / { proxy_pass http://blog_roger_com; proxy_set_header Host $host ; } } upstream blog_roger_com { server 172.16.1.7; server 172.16.1.8; } server { listen 80; server_name blog.roger.com; rewrite (.*) https://blog.roger.com; } server{ listen 443 ssl; server_name blog.roger.com; ssl_certificate ssl/20220623_blog.roger.com.pem; ssl_certificate_key ssl/20220623_blog.roger.com.key; location / { proxy_pass http://blog_roger_com; proxy_set_header Host $host ; } } [root@lb02 ~] [root@lb01 ~]
keepalived关联nginx 1 2 3 4 5 6 7 8 9 10 11 12 13 14 15 16 17 18 19 20 21 [root@lb01 ~] vrrp_script check_web_roger { script "/root/check_web.sh" interval 5 } vrrp_instance VI_1 { ... track_script { check_web_roger } } [root@lb01 ~] 10.0.0.3 blog.roger.com 注意:在Master的keepalived中调用脚本,抢占式,仅需在master配置即可,如果配置为非抢占式,那么需要两台服务器都使用该脚本
Nginx常见问题 nginx多server优先级 1 2 3 4 5 6 7 8 9 10 11 12 13 14 15 16 17 18 19 20 21 22 23 24 25 26 27 28 1.首先选择所有的字符串完全匹配(精确匹配)的server_name。(完全匹配) 2.选择通配符在前面的server_name 3.选择通配符在后面的server_name 4.正则表达式的server_name 5.所有匹配规则相同时,哪个配置文件listen...后面加了default_server哪个优先级就最高 6.按照配置文件的顺序访问第一个配置文件 [root@web01 conf.d] server { listen 80; server_name (blog|www).zls.com; root /code/1; index index.html; } [root@web01 conf.d] server { listen 80; server_name www.zls.com; root /code/2; index index.html; } [root@web01 conf.d] server { listen 80; server_name *.zls.com; root /code/3; index index.html; }
禁止IP访问 1 2 3 4 5 6 7 8 9 10 11 12 13 14 15 16 17 18 19 20 21 22 23 24 25 26 27 28 29 30 server { listen 80 default_server; server_name _; charset utf-8; default_type text/json; return 500 "页面500 ,给爷爬~" ; } server { listen 80; server_name www.zls.com; root /code/2; index index.html; } server { listen 80 default_server; server_name _; charset utf-8; rewrite (.*) http://www.zls.com$1 redirect; } server { listen 80; server_name www.zls.com; root /code/2; index index.html; }
nginx包含其他子配置文件include 1 2 3 4 5 6 7 8 include /etc/ngxinx/stream.d/*.conf include /etc/nginx/fastcgi_params include /etc/nginx/proxy_parmas [root@web01 conf.d] [root@web01 conf.d] include /etc/nginx/conf.d/online/*.conf;
站点目录路径root和alias区别 1 2 3 4 5 6 7 8 9 10 11 12 13 14 15 16 17 18 19 20 21 22 23 24 25 26 27 28 29 30 31 32 33 34 35 36 37 38 39 40 41 42 43 44 45 46 47 48 49 50 51 vim /etc/nginx/conf.d/online/2.conf server { listen 80 default_server; server_name _; charset utf-8; rewrite (.*) http://www.zls.com$1 redirect; } server { listen 80; server_name www.zls.com; location / { root /code/2; index index.html; } location ~ /images { root /code/images; } } vim /etc/nginx/conf.d/online/2.conf server { listen 80 default_server; server_name _; charset utf-8; rewrite (.*) http://www.zls.com$1 redirect; } server { listen 80; server_name www.zls.com; root /code/2; index index.html; location /images { alias /images; } } location /images { alias /code/images; } location /images { root /code/images; }
nginx try_file路径匹配 1 2 3 4 5 6 7 8 9 10 11 12 13 14 15 16 17 18 19 20 21 22 [root@web01 code] server { listen 80 default_server; server_name _; charset utf-8; rewrite (.*) http://www.zls.com$1 redirect; } server { listen 80; server_name www.zls.com; root /code; index index.html; location / { try_files $uri $uri / @zls; } location @zls { proxy_pass http://172.16.1.8:8080; } }
nginx调整上传文件的大小 1 2 3 Syntax: client_max_body_size size; Default: client_max_body_size 1m; Context: http, server, location
nginx优雅的显示404错误页面 1 2 3 4 5 6 7 8 9 10 11 12 13 14 15 16 17 18 19 20 21 22 23 24 25 26 27 28 29 30 31 32 33 34 35 36 37 38 39 40 41 42 43 44 45 46 47 48 49 50 51 52 53 54 55 56 vim /etc/nginx/conf.d/online/2.conf server { listen 80 default_server; server_name _; charset utf-8; rewrite (.*) http://www.zls.com$1 redirect; } server { listen 80; server_name www.zls.com; location / { root /code; index index.html; error_page 404 http://blog.driverzeng.com; } } [root@web01 code] server { listen 80 default_server; server_name _; charset utf-8; rewrite (.*) http://www.zls.com$1 redirect; } server { listen 80; server_name www.zls.com; location / { root /code; index index.html; error_page 404 /404.html; } } [root@web01 code] <img style='width:100%;height:100%;' src=https://blog.driverzeng.com/zenglaoshi/404_page.png> [root@web01 code] <html> <head> <meta charset="utf-8" > <title>xxxx错误页面</title> </head> <body> <center> <h1 style='background-color:red' >给爷爬~ 瞎访问,没有这个页面</h1> </center> <img style='width:100%;height:100%;' src=https://blog.driverzeng.com/zenglaoshi/404_page.png> </body> </html>
隐藏nginx版本号 1 2 3 4 http { server_tokens off; ... }
图片防盗链 服务器上配置防盗链
1 2 3 4 5 6 7 8 9 10 11 12 13 14 15 16 17 18 19 20 21 22 23 24 25 26 27 28 29 30 31 32 33 34 35 36 37 38 39 40 41 42 43 44 45 46 47 48 49 50 51 52 53 54 55 56 57 58 59 60 61 62 63 64 65 66 67 68 69 70 71 72 73 74 75 76 77 78 79 80 81 82 83 84 85 86 87 88 89 90 91 92 93 94 95 96 97 98 99 100 101 102 103 104 105 106 location ~ .*\.(jpg|png|gif) { root /var/www/wordpress/wp-content/extra/; valid_referers none blocked *.driverzeng.com; if ( $invalid_referer ) { return 403; } } location ~ .*\.(jpg|png|gif) { root /var/www/wordpress/wp-content/extra/; valid_referers none blocked *.driverzeng.com; if ( $invalid_referer ) { rewrite ^(.*)$ /Picture/daolian1.gif break ; } } location ~ .*\.(jpg|png|gif) { root /data; valid_referers none blocked *.driverzeng.com server_name ~\.google\. ~\.baidu\.; if ( $invalid_referer ) { return 403; } } [root@web01 code] HTTP/1.1 403 Forbidden Server: nginx Date: Thu, 10 Oct 2019 09:01:05 GMT Content-Type: text/html; charset=utf-8,gbk Content-Length: 162 Connection: keep-alive [root@web01 code] HTTP/1.1 200 OK Server: nginx Date: Thu, 10 Oct 2019 09:01:35 GMT Content-Type: image/jpeg Content-Length: 556417 Last-Modified: Thu, 10 Oct 2019 07:14:19 GMT Connection: keep-alive ETag: "5d9eda4b-87d81" Accept-Ranges: bytes 10.0.0.8 static.drz.com [root@web02 conf.d] server { listen 80; server_name static.drz.com; root /code; location / { index index.html; } } 一张是可以被盗链的图片 一张是广告位的图片 [root@web02 code] 10.0.0.7 dl.drz.com [root@web01 conf.d] server { server_name dl.drz.com; listen 80; root /code; location / { index index.html; } } [root@web01 code] <html> <head> <meta charset="utf-8" > <title>drzedu.com</title> </head> <body style="background-color:pink;" > <img src="http://static.drz.com/daolian.jpg" /> </body> </html> location ~* \.(gif|jpg|png|bmp)$ { valid_referers none blocked *.drz.com; if ($invalid_referer ) { return 403; rewrite ^(.*)$ /daolian.png break ; }
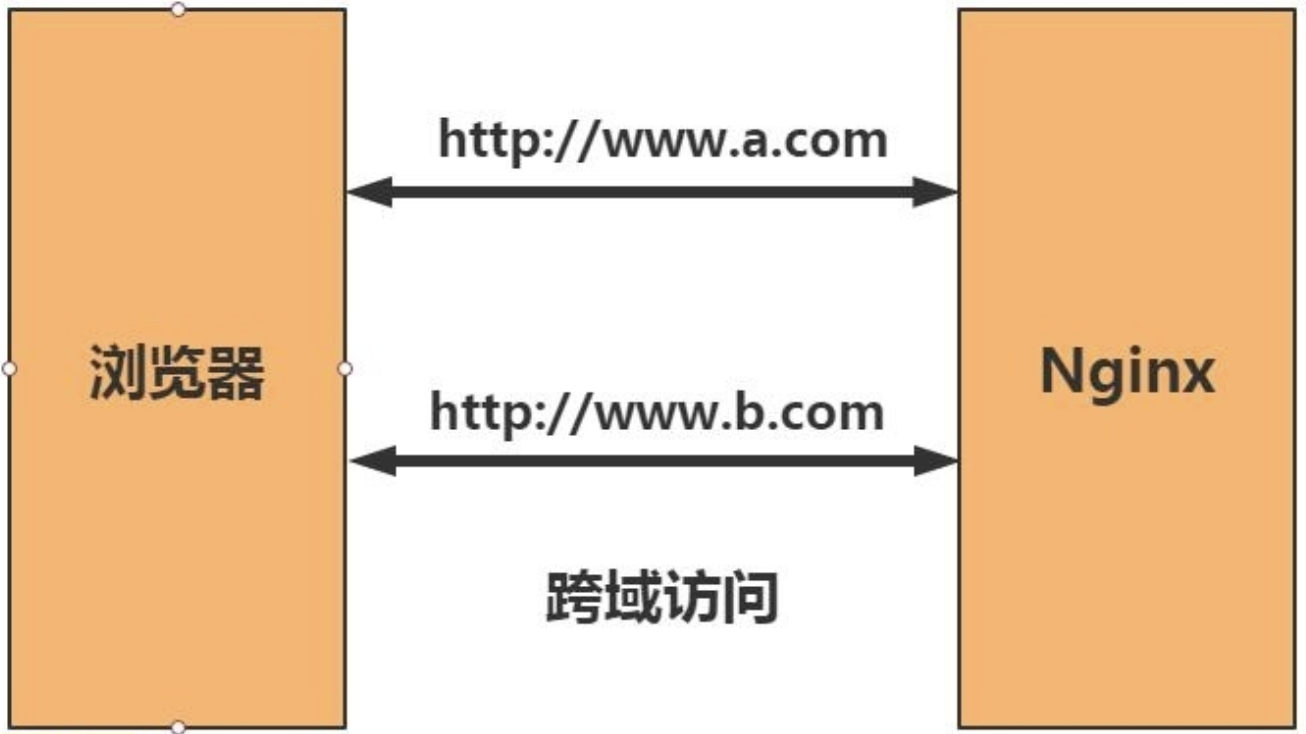
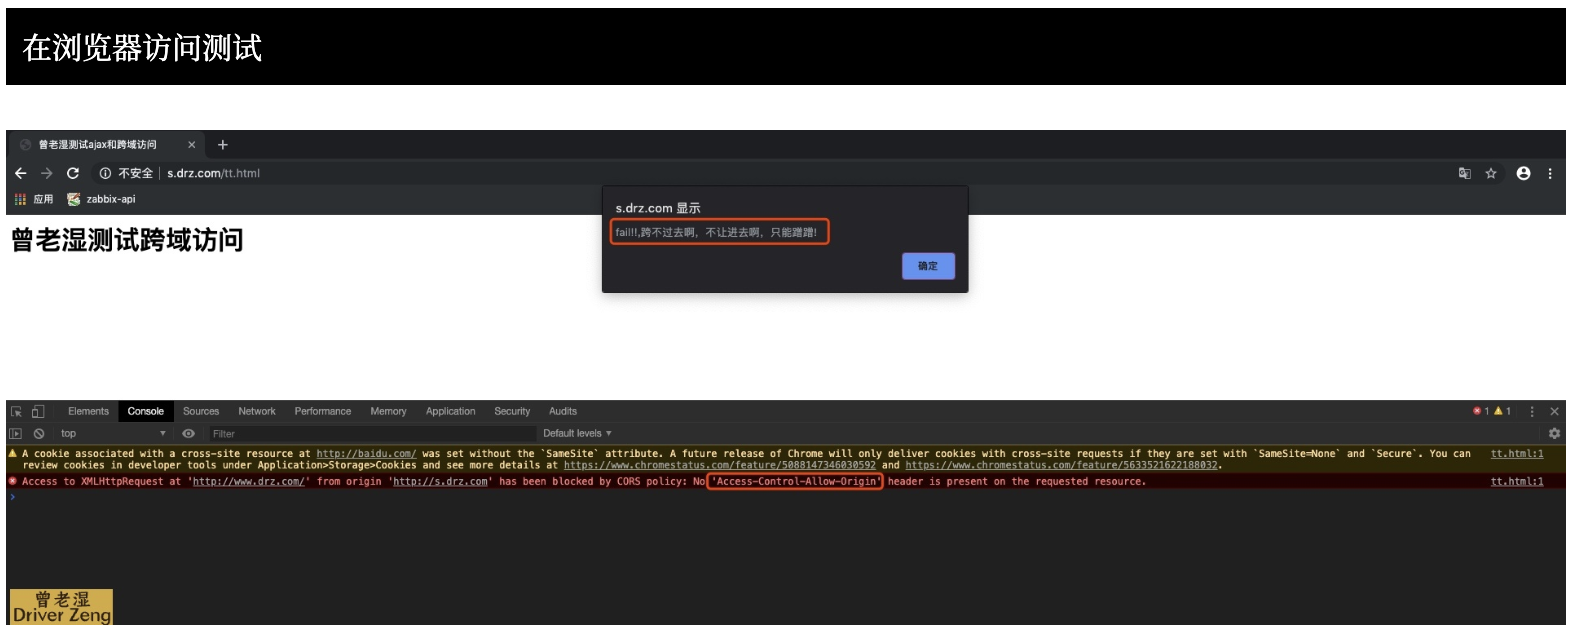
允许跨域访问 什么是跨域访问,当我们通过浏览器访问a网站时,同事会利用到ajax或其他方式,同时也请求b网站,这样的话就出现了请求一个页面,使用了两个域名,这种方式对浏览器来说默认是禁止的。
1 2 3 4 5 6 7 8 9 10 11 12 13 14 15 16 17 18 19 20 21 22 23 24 25 26 27 28 29 30 31 32 33 34 35 36 37 38 39 40 41 42 43 44 Syntax: add_header name value [always]; Default: -; Context: http, server, location, if in location [root@web02 code] server { listen 80; server_name s.drz.com; location / { root /code; index index.html; } } [root@Nginx ~] <html lang="en" > <head> <meta charset="UTF-8" /> <title>曾老湿测试ajax和跨域访问</title> <script src="http://libs.baidu.com/jquery/2.1.4/jquery.min.js" ></script> </head> <script type ="text/javascript" > $(document).ready(function $.ajax({ type : "GET" , url: "http://www.drz.com" , success: function (data) { alert("sucess 卧槽 卧槽 卧槽 成功了!!!" ); }, error: function alert("fail!!,跨不过去啊,不让进去啊,只能蹭蹭!" ); } }); }); </script> <body> <h1>曾老湿测试跨域访问</h1> </body> </html>
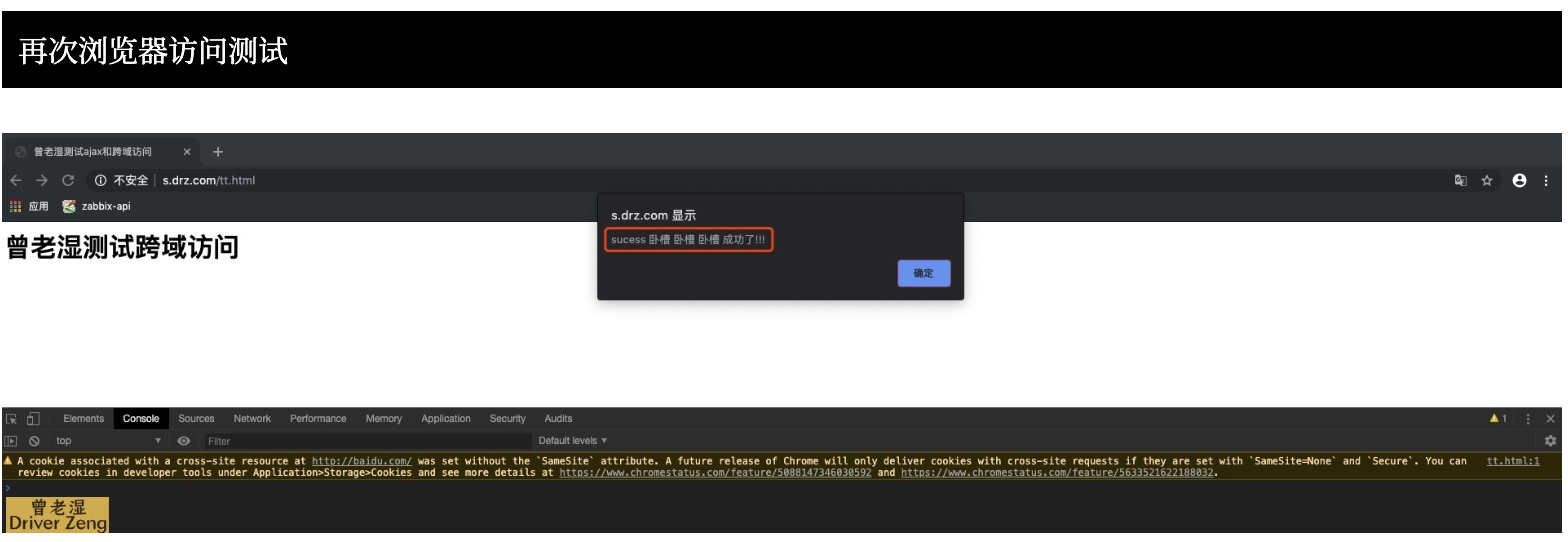
1 2 3 4 5 6 7 8 9 10 11 12 13 server { listen 80; server_name www.drz.com; root /code; index index.html; charset utf-8; location ~ .*\.(html|htm)$ { add_header Access-Control-Allow-Origin *; add_header Access-Control-Allow-Methods GET,POST,PUT,DELETE,OPTIONS; } }
PHP服务优化 php程序配置管理文件/etc/php.ini,主要调整日志、文件上传、禁止危险函数、关闭版本号显示等
1 2 3 4 5 6 7 8 9 10 11 12 13 14 15 16 17 18 19 20 21 22 23 24 25 expose_php = Off display_error = Off error_reporting = E_ALL log_errors = On error_log = /var/log /php_error.log date.timezone = Asia/Shanghai file_uploads = On upload_max_filesize = 300M post_max_size = 300M max_file_uploads = 20 memory_limit = 128M [Session] session.save_handler = redis session.save_path = "tcp://172.16.1.51:6379" disable_functions = chown,chmod,pfsockopen,phpinfo
禁用php的危险函数
1 2 3 4 5 6 7 8 9 10 11 12 13 14 15 16 17 18 19 20 21 22 23 24 25 26 27 28 29 30 31 32 33 34 35 36 37 38 39 40 41 42 43 44 45 46 47 48 49 50 51 52 53 54 55 56 57 58 59 60 61 62 63 64 65 66 67 68 69 70 71 72 73 74 75 76 77 78 79 80 81 82 83 84 85 86 87 88 89 90 91 92 93 94 95 96 97 98 99 100 101 phpinfo() 功能描述:输出 PHP 环境信息以及相关的模块、WEB 环境等信息。 危险等级:中 passthru() 功能描述:允许执行一个外部程序并回显输出,类似于 exec ()。 危险等级:高 exec () 功能描述:允许执行一个外部程序(如 UNIX Shell 或 CMD 命令等)。 危险等级:高 system() 功能描述:允许执行一个外部程序并回显输出,类似于 passthru()。 危险等级:高 chroot() 功能描述:可改变当前 PHP 进程的工作根目录,仅当系统支持 CLI 模式 PHP 时才能工作,且该函数不适用于 Windows 系统。 危险等级:高 scandir() 功能描述:列出指定路径中的文件和目录。 危险等级:中 chgrp() 功能描述:改变文件或目录所属的用户组。 危险等级:高 chown() 功能描述:改变文件或目录的所有者。 危险等级:高 shell_exec() 功能描述:通过 Shell 执行命令,并将执行结果作为字符串返回。 危险等级:高 proc_open() 功能描述:执行一个命令并打开文件指针用于读取以及写入。 危险等级:高 proc_get_status() 功能描述:获取使用 proc_open() 所打开进程的信息。 危险等级:高 error_log() 功能描述:将错误信息发送到指定位置(文件)。 安全备注:在某些版本的 PHP 中,可使用 error_log() 绕过 PHP safe mode, 执行任意命令。 危险等级:低 ini_alter() 功能描述:是 ini_set() 函数的一个别名函数,功能与 ini_set() 相同。 具体参见 ini_set()。 危险等级:高 ini_set() 功能描述:可用于修改、设置 PHP 环境配置参数。 危险等级:高 ini_restore() 功能描述:可用于恢复 PHP 环境配置参数到其初始值。 危险等级:高 dl() 功能描述:在 PHP 进行运行过程当中(而非启动时)加载一个 PHP 外部模块。 危险等级:高 pfsockopen() 功能描述:建立一个 Internet 或 UNIX 域的 socket 持久连接。 危险等级:高 syslog() 功能描述:可调用 UNIX 系统的系统层 syslog() 函数。 危险等级:中 readlink() 功能描述:返回符号连接指向的目标文件内容。 危险等级:中 symlink() 功能描述:在 UNIX 系统中建立一个符号链接。 危险等级:高 popen() 功能描述:可通过 popen() 的参数传递一条命令,并对 popen() 所打开的文件进行执行。 危险等级:高 stream_socket_server() 功能描述:建立一个 Internet 或 UNIX 服务器连接。 危险等级:中 putenv() 功能描述:用于在 PHP 运行时改变系统字符集环境。在低于 5.2.6 版本的 PHP 中,可利用该函数 修改系统字符集环境后,利用 sendmail 指令发送特殊参数执行系统 SHELL 命令。 危险等级:高 禁用方法如下: 打开/etc/php.ini文件, 查找到 disable_functions ,添加需禁用的函数名,如下: phpinfo,eval ,passthru,exec ,system,chroot,scandir,chgrp,chown,shell_exec,proc_open,proc_get_status,ini_alter,ini_alter,ini_restore,dl,pfsockopen,openlog,syslog,readlink,symlink,popepassthru,stream_socket_server,fsocket,fsockopen
编写配置文件测试优化参数
1 2 3 4 5 6 7 8 9 10 11 12 13 14 15 16 17 18 19 20 [root@web01 conf.d] server { listen 80; server_name php.drz.com; root /code; location / { index index.php index.html; } location ~ \.php$ { fastcgi_pass 127.0.0.1:9000; fastcgi_param SCRIPT_FILENAME $document_root $fastcgi_script_name ; include fastcgi_params; } } [root@web01 conf.d] <?php phpinfo(); ?>
php-fpm进程管理配置文件/etc/php-fpm.conf
1 2 3 4 5 6 7 8 9 10 11 12 13 14 15 16 17 18 19 20 21 22 23 24 25 26 27 28 29 30 31 32 33 34 35 36 37 38 39 40 41 ;include=etc/fpm.d/*.conf [global] ;pid = /var/log /php-fpm/php-fpm.pid ;error_log = /var/log /php-fpm/php-fpm.log ;log_level = error rlimit_files = 65535 ;events.mechanism = epoll [www] user = www group = www ;listen = /dev/shm/php-fpm.sock listen = 127.0.0.1:9000 ;listen.allowed_clients = 127.0.0.1 pm = dynamic pm.max_children = 512 pm.start_servers = 32 pm.min_spare_servers = 32 pm.max_spare_servers = 64 pm.max_requests = 1500 pm.process_idle_timeout = 15s; pm.status_path = /phpfpm_status php_flag[display_errors] = off php_admin_value[error_log] = /var/log /phpfpm_error.log php_admin_flag[log_errors] = on request_slowlog_timeout = 5s slowlog = /var/log /php_slow.log [21-Nov-2013 14:30:38] [pool www] pid 11877 script_filename = /usr/local /lnmp/nginx/html/www.quancha.cn/www/fyzb.php [0xb70fb88c] file_get_contents() /usr/local /lnmp/nginx/html/www.quancha.cn/www/fyzb.php:2