Lupinus

Re:从零开始的go学习生活(`・ω・´)

0%

[ssh远程连接]

ssh远程管理

远程连接

1
2
3
4
5
Linux:
- ssh 端口:22 加密传输数据
- telnet 端口:23 明文传输数据
Windows:
- rdp 端口:3389 remote desktop protocol

ssh相关命令及选项

1
2
3
4
5
6
7
8
9
10
11
12
13
14
15
16
17
18
19
20
注意:不加用户@,默认使用当前登录的用户

ssh:远程连接Linux服务器
-p:port指定端口

#不连接上服务器,直接执行命令
ssh root@10.0.0.41 'ls /'

scp:远程拷贝数据(写在前面的是源文件)
-r:递归(远程拷贝目录)
-p:拷贝的时候保持属性
-P:大写p指定port

推:scp sersync2.5.4 root@172.16.1.7:/root
拉:scp root@172.16.1.7:/root/sersync2.5.4 /opt

#总结:
1.scp通过ssh协议加密方式进行文件或目录拷贝
2.scp连接时的用户作为为拷贝文件或目录的权限。(-p保持文件属性,-a)
3.scp支持数据推送和拉取,每次都是全量拷贝,效率较低

ssh免密连接

验证方式:

  • 用户名密码验证

  • 密钥对验证方式

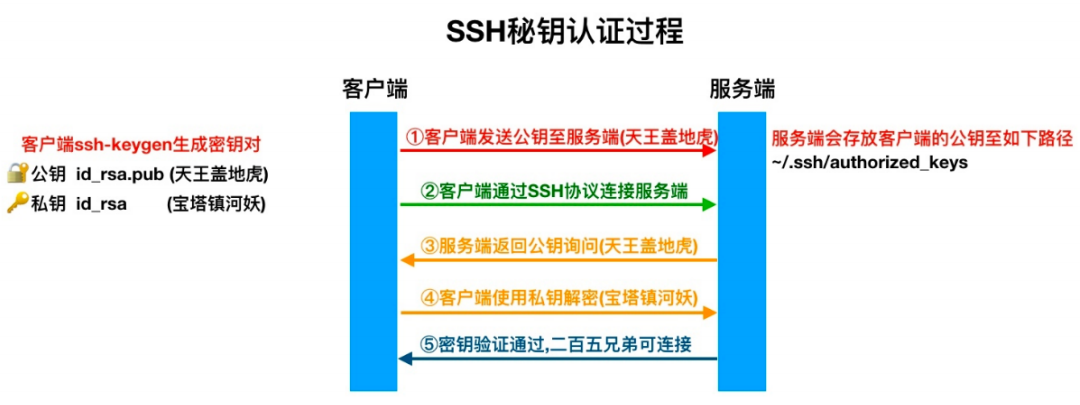
ssh密钥对认证流程

image-20220524001806812

1
2
3
4
5
6
7
8
9
10
11
12
13
14
15
16
17
18
19
20
21
22
23
24
25
26
27
28
29
30
31
32
33
34
35
36
37
38
39
40
41
42
43
44
45
46
47
48
49
50
51
52
53
54
55
56
57
58
59
60
61
62
#ssh-keygen:生成密钥对 
[root@m01 ~]# ssh-keygen
Generating public/private rsa key pair.
#将秘钥保存到文件中,可以指定其他路径(直接回车)
Enter file in which to save the key (/root/.ssh/id_rsa):
Created directory '/root/.ssh'.
#给密钥对设置密码,不需要设置(直接回车)
Enter passphrase (empty for no passphrase):
#重复输入设置的密码(直接回车)
Enter same passphrase again:
Your identification has been saved in /root/.ssh/id_rsa.
Your public key has been saved in /root/.ssh/id_rsa.pub.
The key fingerprint is:
SHA256:porTOTgmfhwGF1eJeesKte03G0ZbLlPh6C3kJX0qRDw root@manage01
The key's randomart image is:
+---[RSA 2048]----+
| +.. |
| . + o. |
| o . .E . |
| . . . .. = . |
| o . + S* * . |
| + . =* O o |
| ooo.+ @ + |
|. =++o ..o* |
|.+oo.. ..o |
+----[SHA256]-----+

#生成后的密钥对
[root@m01 ~]# ll /root/.ssh/
total 8
-rw------- 1 root root 1679 May 24 08:21 id_rsa
-rw-r--r-- 1 root root 395 May 24 08:21 id_rsa.pub

#ssh-copy-id:发送公钥
-i:指定公钥位置
[root@m01 ~]# ssh-copy-id -i ~/.ssh/id_rsa.pub root@172.16.1.7
[root@m01 ~]# ssh-copy-id -i ~/.ssh/id_rsa.pub root@172.16.1.8
[root@m01 ~]# ssh-copy-id -i ~/.ssh/id_rsa.pub root@172.16.1.31
[root@m01 ~]# ssh-copy-id -i ~/.ssh/id_rsa.pub root@172.16.1.41

#.ssh目录中的know_host作用
[root@m01 ~]# cat ~/.ssh/known_hosts
记录连接过的服务器,如果没有连接过(第一次连接),需要输入yes

#生成密钥对命令:ssh-keygen
mkdir -m 700 ~/.ssh
1.在当前用户的家目录下创建了一个隐藏目录 .ssh mkdir ~/.ssh
2.将密钥对存放目录 .ssh 授权为 700 chmod 700 ~/.ssh
3.将公钥内容写入 ~/.ssh/id_rsa.pub 文件中
4.将私钥内容写入 ~/.ssh/id_rsa 文件中
5.将私钥文件授权为 600 chmod 600 ~/.ssh/id_rsa

#发送公钥:ssh-copy-id
[root@web01 ~]# ssh-copy-id -i ~/.ssh/id_rsa.pub root@172.16.1.5
输入yes
输入密码:1

1.在远端的指定用户的家目录下创建了一个隐藏目录.ssh ssh root@172.16.1.5 'mkdir ~/.ssh'
2.将密钥对存放目录 .ssh 授权为 700 ssh root@172.16.1.5 'chmod 700 ~/.ssh'
3.先在远端~/.ssh目录下创建文件authorized_keys ssh root@172.16.1.5 'touch ~/.ssh/authorized_keys'
4.将authorized_keys文件授权为600 ssh root@172.16.1.5 'chmod 600 ~/.ssh/authorized_keys'
5.将公钥内容,保存到authorized_keys文件中

免密使用场景

  • 批量查看服务器信息
1
2
3
4
5
6
7
#!/bin/bash 
[ $# -ne 1 ] && echo "请输入执行的命令" && exit 1
for i in 5 7 8 31 41
do
echo "#########172.16.1.$i#####"
ssh root@172.16.1.$i "$1"
done
  • 跳板机
1
2
3
4
5
6
7
8
9
10
11
12
13
14
15
16
17
18
19
20
21
22
23
24
25
26
27
28
29
30
31
32
33
34
35
36
37
38
39
40
41
42
43
44
45
46
47
48
49
50
51
52
53
54
55
56
57
58
59
60
61
62
63
64
65
66
67
68
69
70
71
72
73
74
75
76
77
78
79
80
81
82
83
84
85
86
87
88
89
[root@m01 ~]# cat jump.sh
#!/bin/bash
#jumpserver
lb01=172.16.1.5
lb02=172.16.1.6
web01=172.16.1.7
web02=172.16.1.8
web03=172.16.1.9
nfs=172.16.1.31
backup=172.16.1.41
db01=172.16.1.51
m01=172.16.1.61
zabbix=172.16.1.71

menu(){
cat <<-EOF
+-------------------------+
1) lb01
2) lb02
3) web01
4) web02
5) web03
6) nfs
7) backup
8) db01
9) m01
10) zabbix
h) help
+-------------------------+
EOF
}

#菜单函数
menu
#连接函数
connect(){
ping -c 1 -w 1 $1 &>/dev/null
if [ $? -eq 0 ];then
ssh root@$1
else
echo -e "\033[5;4;40;31m 别连了,我的哥,$2:$1机器都没开!!!\033[0m"
fi
}

#控制不让输入ctrl+c,z
trap "" HUP INT TSTP
while true
do
read -p "请输入要连接的主机编号:" num
case $num in
1|lb01)
connect $lb01 lb01
;;
2|lb02)
connect $lb02 lb02
;;
3|web01)
connect $web01 web01
;;
4|web02)
connect $web02 web02
;;
5|web03)
connect $web03 web03
;;
6|nfs)
connect $nfs nfs
;;
7|backup)
connect $backup backup
;;
8|db01)
connect $db01 db01
;;
9|m01)
connect $m01 m01
;;
10|zabbix)
connect $zabbix zabbix
;;
h|help)
clear
menu
;;
close)
break
;;
esac
done

SSH安全优化

1
2
3
4
5
6
7
8
9
10
11
12
13
14
15
16
17
18
19
20
21
#ssh配置文件 
[root@m01 ~]# vim /etc/ssh/sshd_config
17 Port 52022 #修改默认端口
115 UseDNS no #关闭反向解析
38 PermitRootLogin no #禁止root用户登录
65 PasswordAuthentication no #禁止使用密码登录
79 GSSAPIAuthentication no #关闭GSSAPI认证

#将以下内容,直接复制到文件最后一行
Port 6666 #变更SSH服务远程连接端口
PermitRootLogin no #禁止root用户直接远程登录
PasswordAuthentication no #禁止使用密码直接远程登录
UseDNS no #禁止ssh进行dns反向解析,影响ssh连接效率参数
GSSAPIAuthentication no # 禁止GSS认证,减少连接时产生的延迟

#重启服务
[root@m01 ~]# systemctl restart sshd

1)在windows上生成密钥对
- 使用windows的命令行执行 ssh-keygen
- 使用Xshell

解决方案

如果已经优化完ssh,发现服务器上出现以下问题:

  • 没有普通用户 useradd roger(无法创建,进入单用户模式)

  • windows上秘钥没有推送

    • 1)在windows上生成密钥对

      • 使用windows的命令行执行 ssh-keygen
      • 使用Xshell

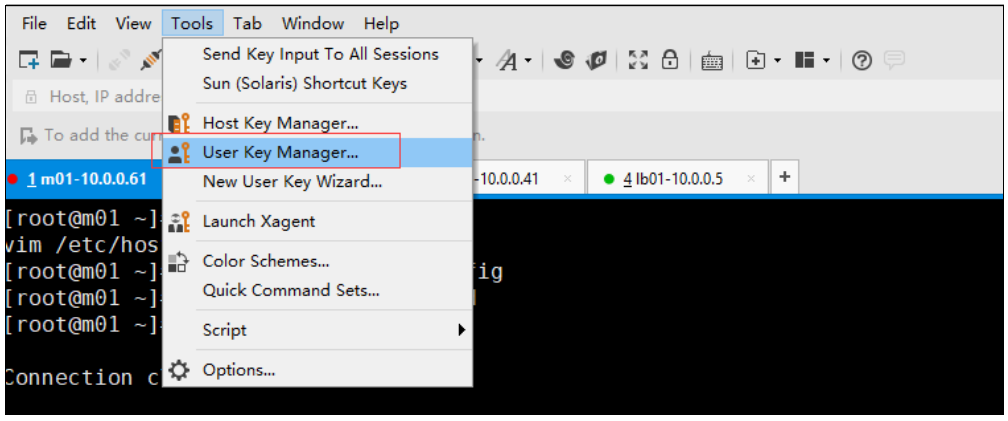
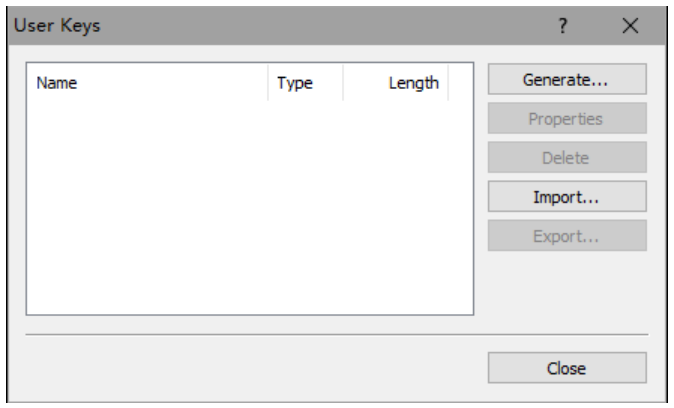
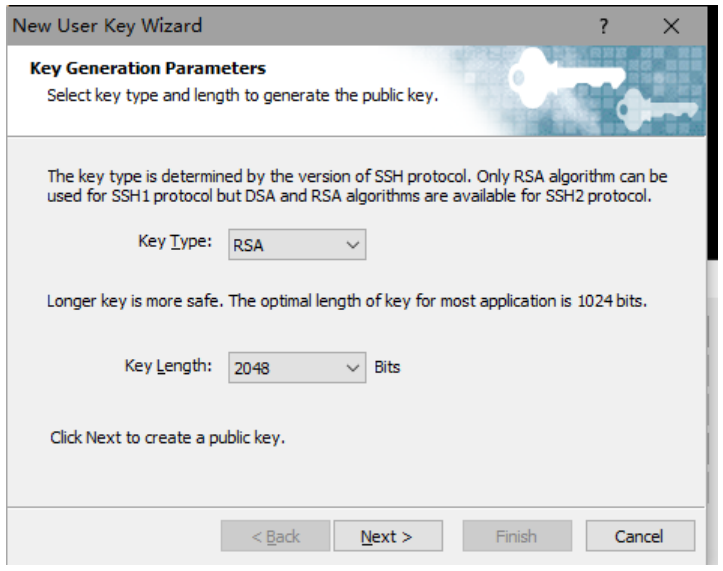
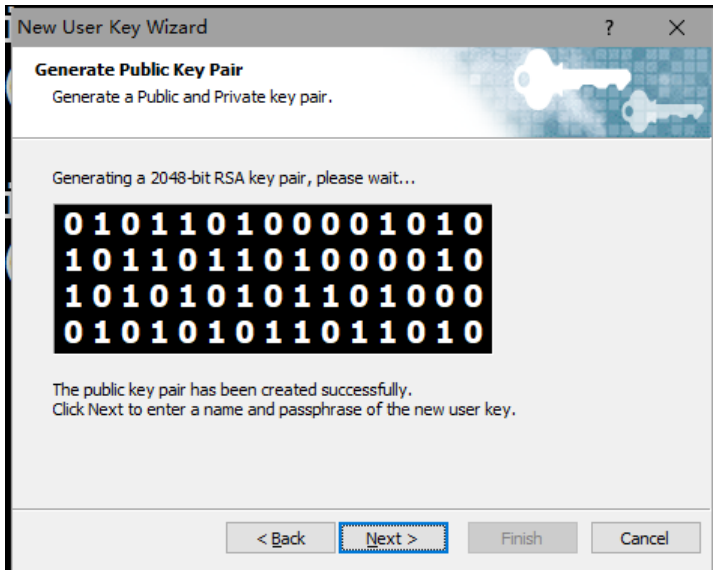
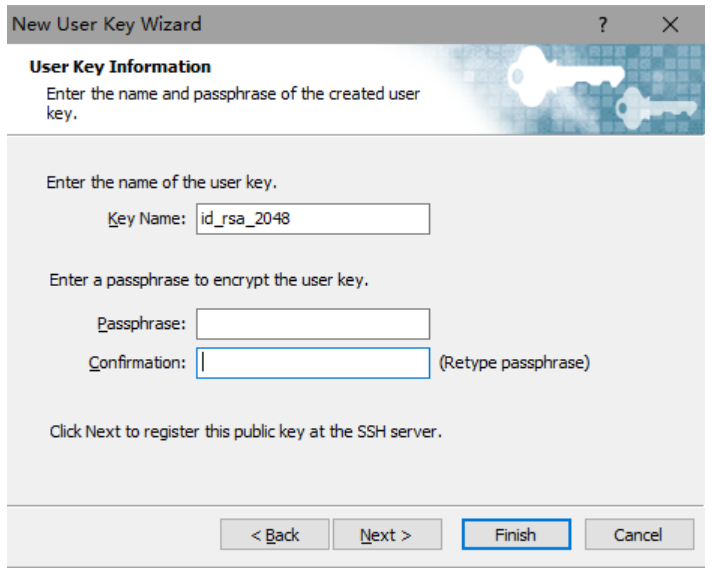
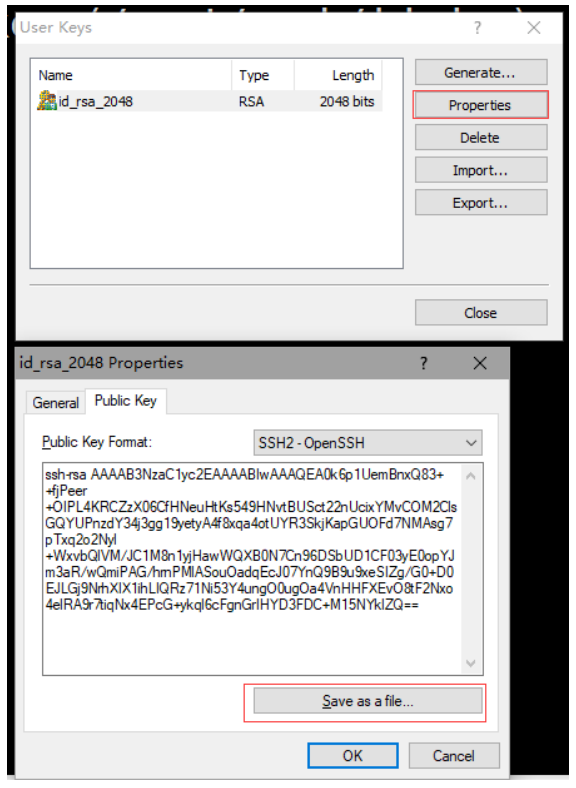
      2)使用Xshell生成密钥对

      image-20220524223210599

      image-20220524223252594

      image-20220524223321469

      image-20220524223345276

      image-20220524223415813

      image-20220524223450300

1
2
3
4
5
[roger@m01 ~]$ mkdir .ssh 
[roger@m01 ~]$ chmod 700 .ssh/
[roger@m01 ~]$ vim .ssh/authorized_keys
ssh-rsa AAAAB3NzaC1yc2EAAAABIwAAAQEAuJWo9sSLut7rrATebtwxBZXAoXINN8bXot9VIwXakKZ+711pFWlE2gI52Qkke5xCBMMah72DK00GjkXYEhMm/DxoXloO5ORPkszl5q9BcSjI3k0Ru9BGkwRqtGjzvrHsrSvunJJtglMpe8sEs7KYrzOmHCNxk60h6yxQzS88l76rMMqYDOeChjyyQloGqC4xSqHQFlEF1NgdIlg2o/q69mieH8S9igOeAXbZFGH8219zNTV+WJ/U7nRQGSXtVss8f2pfK0wGLQgz+nR0u3BJUpRevpcqcF+ybxm5QZb/X8NZEW5ca2YsLInxoRCBE88tzXH5K/obwX98kJ6vqlqZJw== rsa 2048-052422
[roger@m01 ~]$ chmod 600 .ssh/authorized_keys

免交互生成密钥对

1
2
3
4
ssh-keygen -t rsa -P '' -f ~/.ssh/id_rsa &>/dev/null 
-t:指定加密类型
-P:空密码
-f:秘钥生成的位置

免交互推送公钥

1
2
3
4
5
6
7
8
9
10
11
12
13
14
15
16
17
18
19
20
21
22
23
24
25
26
27
28
29
30
31
32
33
34
35
36
37
38
39
40
41
42
43
44
45
46
47
48
49
50
51
52
53
54
55
56
57
58
59
60
61
62
63
64
65
66
67
68
69
70
71
72
73
74
75
76
77
78
79
80
81
82
83
84
85
86
87
88
89
90
#不循环的写法
#!/bin/bash
ls -l ~/.ssh/id_rsa &>/dev/null || ssh-keygen -t rsa -P '' -f ~/.ssh/id_rsa &>/dev/null ssh-copy-id -i ~/.ssh/id_rsa.pub root@172.16.1.31
ssh-copy-id -i ~/.ssh/id_rsa.pub root@172.16.1.41
ssh-copy-id -i ~/.ssh/id_rsa.pub root@172.16.1.5
ssh-copy-id -i ~/.ssh/id_rsa.pub root@172.16.1.7
ssh-copy-id -i ~/.ssh/id_rsa.pub root@172.16.1.8

#循环的写法
#!/bin/bash
ls -l ~/.ssh/id_rsa &>/dev/null || ssh-keygen -t rsa -P '' -f ~/.ssh/id_rsa &>/dev/null
for n in `cat /root/1.txt`;do
ssh-copy-id -i ~/.ssh/id_rsa.pub root@$n
done

#解决密码交互问题
1)使用expect解决
[root@m01 ~]# yum install -y expect
#!/usr/bin/expect
set ip 172.16.1.31
set pass 1
set timeout 30

spawn ssh-keygen
expect {
"id_rsa):" {send "\r"; exp_continue}
"passphrase):" {send "\r"; exp_continue}
"again:" {send "\r"}
}
expect eof

spawn ssh-copy-id -i /root/.ssh/id_rsa.pub root@$ip
expect {
"(yes/no)" {send "yes\r"; exp_continue}
"password:" {send "$pass\r"}
}
#expect "root@*" {send "df -h\r"}
#expect "root@*" {send "exit\r"}
expect eof

2)使用sshpass解决
[root@m01 ~]# yum install -y sshpass
-p:指定密码
-f:从文件中取密码
-e:从环境变量中取密码
-P:设置密码提示
#ssh不需要输入yes的选项
[root@m01 ~]# ssh -o 'StrictHostKeyChecking no' root@172.16.1.7
[root@m01 ~]# sshpass -p 1 ssh-copy-id -o 'StrictHostKeyChecking no' -i ~/.ssh/id_rsa.pub root@172.16.1.8
[root@m01 ~]# cat send_public_key.sh
#!/bin/bash
ls -l ~/.ssh/id_rsa &>/dev/null || ssh-keygen -t rsa -P '' -f ~/.ssh/id_rsa &>/dev/null
for n in `cat /root/1.txt`;do
shpass -p 1 ssh-copy-id -o 'StrictHostKeyChecking no' -i ~/.ssh/id_rsa.pub root@$ip
done

[root@m01 ~]# cat /root/1.txt
172.16.1.31
172.16.1.41
172.16.1.5
172.16.1.7
172.16.1.8

#每台机器密码不一致的情况
#!/bin/bash
ls -l ~/.ssh/id_rsa &>/dev/null || ssh-keygen -t rsa -P '' -f ~/.ssh/id_rsa &>/dev/null
for n in `cat /root/1.txt`;do
pass=`echo $n|awk -F ':' '{print $2}'`
ip=`echo $n|awk -F ':' '{print $1}'`
sshpass -p $pass ssh-copy-id -o 'StrictHostKeyChecking no' -i ~/.ssh/id_rsa.pub root@$ip
done

[root@m01 ~]# cat /root/1.txt
172.16.1.31:1
172.16.1.41:2
172.16.1.5:3
172.16.1.7:4
172.16.1.8:111

#优化后不使用判断的脚本
#!/bin/bash
. /etc/init.d/functions
ls -l ~/.ssh/id_rsa &>/dev/null || ssh-keygen -t rsa -P '' -f ~/.ssh/id_rsa &>/dev/null
for n in `cat /root/1.txt`;do
pass=`echo $n|awk -F ':' '{print $2}'`
ip=`echo $n|awk -F ':' '{print $1}'`
sshpass -p $pass ssh-copy-id -o 'StrictHostKeyChecking no' -i ~/.ssh/id_rsa.pub root@$ip &>/dev/null && \
action "$ip send public key " /bin/true || \
action "$ip send public key " /bin/false
done

Google双向认证

Google Authenticator介绍

通常我们直接通过ssh输入密码连接服务器,但这样很容易出现暴力破解情况,所以我们可以结合google的动态认证+ssh密码,这样能够大大的提升登陆的安全。简单来说,就是当用户通过ssh登陆系统时,先输入google的随机验证码,然后在输入服务器的ssh密码

GoogleAuthenticator安装部署

1
2
3
4
5
6
7
8
9
10
11
12
13
14
15
16
17
18
19
20
21
22
23
24
25
26
27
28
29
30
31
32
33
34
35
36
37
38
39
40
41
42
#1.安装依赖
yum install -y pam-devel libpng-devel autoconf automake libtool
#2.下载Google apm插件
#官方下载地址
wget https://github.com/google/google-authenticator-libpam/archive/1.04.tar.gz
#个人下载地址
wget http://test.driverzeng.com/other/1.04.tar.gz
#3.解压插件
tar xf 1.04.tar.gz
#4.构建代码
#进入解压开的目录
[root@m01 ~]# cd google-authenticator-libpam-1.04/
#执行bootstrap构建
[root@m01 google-authenticator-libpam-1.04]# ./bootstrap.sh
#5.生成
[root@m01 google-authenticator-libpam-1.04]# ./configure
#6.编译 && 安装
[root@m01 google-authenticator-libpam-1.04]# make && make install
#7.检查插件是否安装
[root@m01 google-authenticator-libpam-1.04]# ll /usr/local/lib/security/
-rwxr-xr-x 1 root root 1021 May 25 09:15 pam_google_authenticator.la
-rwxr-xr-x 1 root root 133552 May 25 09:15 pam_google_authenticator.so
# 8.将安装好的插件,拷贝到系统库文件目录中
[root@m01 ~]# cp /usr/local/lib/security/pam_google_authenticator.so /usr/lib64/security/
#9.生成初始google认证识别码
[root@m01 ~]# google-authenticator
#认证令牌是否随时间变化 Do you want authentication tokens to be time-based (y/n) y Your new secret key is: 5HV5PHOI3HGJ6OCLTFDVV62FSY
Your verification code is 262995
Do you want me to update your "/root/.google_authenticator" file? (y/n) y
Do you want to disallow multiple uses of the same authentication token? This restricts you to one login about every 30s, but it increases your chances to notice or even prevent man-in-the-middle attacks (y/n) y
By default, a new token is generated every 30 seconds by the mobile app. In order to compensate for possible time-skew between the client and the server, we allow an extra token before and after the current time. This allows for a time skew of up to 30 seconds between authentication server and client. If you experience problems with poor time synchronization, you can increase the window from its default size of 3 permitted codes (one previous code, the current code, the next code) to 17 permitted codes (the 8 previous codes, the current code, and the 8 next codes). This will permit for a time skew of up to 4 minutes between client and server. Do you want to do so? (y/n) y
If the computer that you are logging into isn't hardened against brute-force login attempts, you can enable rate-limiting for the authentication module. By default, this limits attackers to no more than 3 login attempts every 30s. Do you want to enable rate-limiting? (y/n) y

##将Google 2FA接入SSH
#1.修改ssh认证配置
[root@m01 ~]# vim /etc/pam.d/sshd
auth required pam_google_authenticator.so
#2.修改SSH配置文件,关联Google认证
[root@m01 ~]# vim /etc/ssh/sshd_config
69 ChallengeResponseAuthentication yes
#3.重启sshd服务
[root@m01 ~]# systemctl restart sshd

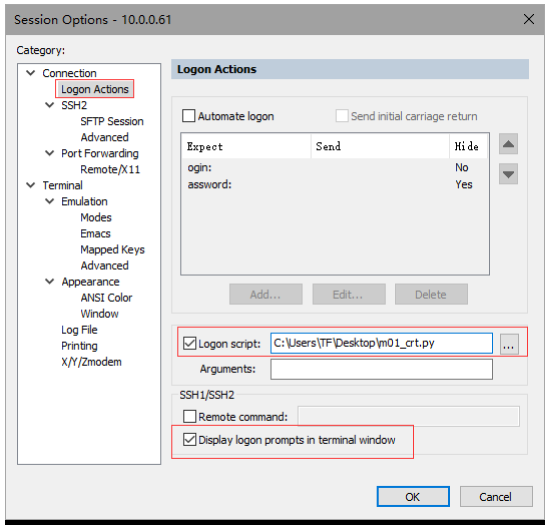
使用Python脚本登录CRT

image-20220525130858361

1
2
3
4
5
6
7
8
9
10
11
12
13
14
15
16
17
18
19
20
21
22
23
24
25
26
27
28
29
30
31
32
33
34
35
36
37
38
39
40
41
42
43
44
45
46
47
48
49
50
51
52
53
54
55
56
57
58
59
60
61
62
63
64
65
66
67
68
69
70
# $language = "python" 
# $interface = "1.0"
import hmac, base64, struct, hashlib, time,re

#获取当前脚本所在的tab对象
objTab = crt.GetScriptTab()
#objTab = crt.GetActiveTab()
objTab.Screen.Synchronous = True
objTab.Screen.IgnoreEscape = True
#获取终端名字
tabName=objTab.Caption
reIp=r'\d{1,3}\.\d{1,3}\.\d{1,3}\.\d{1,3}'
hostIp=re.findall(reIp,tabName)[0]
secretKey="Your new secret key is:"

def calGoogleCode(secretKey):
#secreKey 需要是8的倍数
t = int(time.time())//30
lens = len(secretKey)
lenx = 8 - (lens % 4 if lens % 4 else 4)
secretKey += lenx * '='
key = base64.b32decode(secretKey)
msg = struct.pack(">Q", t)
googleCode = hmac.new(key, msg, hashlib.sha1).digest()
o = ord(str(googleCode[19])) & 15
googleCode = str((struct.unpack(">I", googleCode[o:o+4])[0] & 0x7fffffff) % 1000000)
return googleCode.zfill(6)

def get_string(objTab,szStart,szPrompt):
objTab.Screen.WaitForStrings(szStart)
return objTab.Screen.ReadString(szPrompt)

def send_string(objTab,waitString,strings,selfSleepTime=20):
objTab.Screen.WaitForStrings(waitString)
time.sleep(0.0001)
for i in strings:
crt.Sleep(5)
objTab.Screen.Send(i)
#time.sleep(0.0001)
objTab.Screen.WaitForStrings(strings)
if strings[-1] != '\r':
objTab.Screen.Send('\r')
#msg(objTab.Screen.ReadString('[ q ]'))
#time.sleep(0.0001)

def send_pass(objTab,waitString,strings):
objTab.Screen.WaitForStrings(waitString)
for i in strings:
crt.Sleep(5)
objTab.Screen.Send(i)
if strings[-1] != '\r':
objTab.Screen.Send('\r')
time.sleep(0.01)

#发送2fa
send_pass(objTab,'Verification code:',calGoogleCode(secretKey))
#发送密码
send_pass(objTab,'Password: ','1') # '1' 是服务器的密码
#发送登录ip
send_string(objTab,'Opt> ',hostIp)

#objTab.Screen.WaitForStrings("[MFA auth]: ","")
#if objTab.Screen.WaitForStrings("Opt> ",1):
#发送登录ip 克隆会话,不需要二次验证码
#send_string(objTab,'Opt> ',hostIp)
#else:
#发送2fa
#send_pass(objTab,'[MFA auth]: ',calGoogleCode(secretKey))
#发送登录ip
#send_string(objTab,'Opt> ',hostIp)