文件管理 在linux中,一切皆文件,文件没有后缀区分(所谓的后缀是给用户看的)
文件管理就是对一个文件进行创建、复制、移动、查看、编辑、压缩、查找、删除等
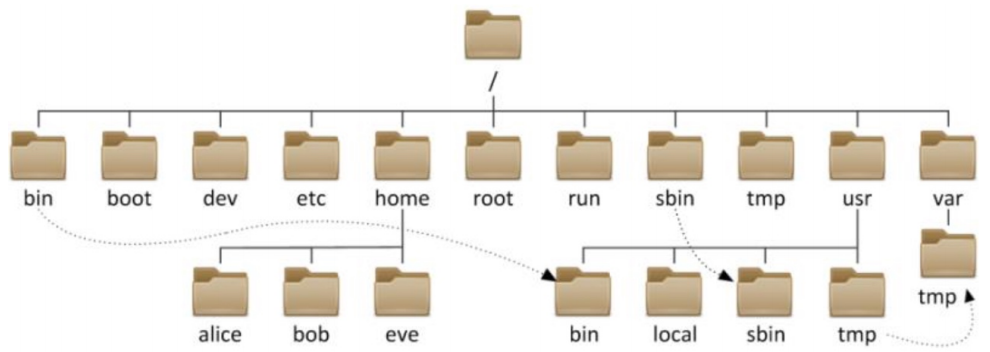
目录结构 几乎所有的计算机操作系统都使用目录结构组织文件,具体来说就是在一个目录中存放子目录和文件,而子目录中又会进一步存放子目录和文件,依此类推形成一个树状的文件结构,称为”目录树”
Windows:以多根的方式组织文件C:\、D:\
Linux:以单根的方式组织文件/
1 2 3 4 5 6 7 8 9 10 11 12 13 14 15 16 17 18 19 20 21 22 23 24 25 26 27 28 29 30 31 32 33 34 35 36 37 38 39 bin -> usr/bin sbin -> usr/sbin boot dev etc home lib -> usr/lib lib64 -> usr/lib64 media mnt opt proc root run srv sys tmp usr var ->:软链接方式 绿色:可执行程序
配置文件目录/etc
1 2 3 4 5 6 7 8 9 10 11 12 13 14 15 16 17 18 19 20 21 22 /etc/hostname /etc/hosts /etc/sysconfig/network-scripts/ifcfg-ens33 /etc/resolv.conf /etc/motd /etc/profile /etc/skel /etc/passwd /etc/shadow /etc/group /etc/gshadow
可变的目录/var
1 2 3 4 /var/log/messages /var/log/secure
设备相关目录/dev
1 2 3 4 5 6 7 8 9 10 11 12 13 14 15 16 17 /dev/sda /dev/sda1 /dev/sde4 /dev/null /dev/zero /dev/random /dev/pts/0 /dev/pts/1 /dev/cdrom
路径的定位
绝对路径:以’/‘开头的路径,就是绝对路径
相对路径:不以’/‘开头的路径,就是相对路径
1 2 3 4 5 6 7 8 9 10 11 12 cd /etc/hostname cd test/abc FQ:/abc/test和abc/test是一样吗 pwd cd [root@client ~] [root@client network-scripts] /etc/sysconfig/network-scripts
特殊目录 1 2 3 4 5 6 7 8 9 10 11 12 13 14 15 16 17 18 19 20 . :代表当前目录 .. :代表上一级目录 -:返回上一次所在目录 cd:返回当前用户家目录 [root@client ~] [root@client ~] [root@client ~] [root@client etc] [root@client /] [root@client /] [root@client src] -bash: cd: -/: 无效选项 cd: 用法:cd [-L|[-P [-e]]] [dir] ps:所谓的.和..目录实际上属于相对路径的一种表示形式
文件操作类命令 目录创建mkdir 1 2 3 4 5 6 7 8 9 10 11 12 13 14 15 16 17 18 19 20 21 22 23 24 25 26 27 28 29 30 31 32 33 34 35 36 37 38 mkdir [OPTION] 目录名 创建目录 [选项可有可无,可以有多个] 目录名字,可以有多个 -p:递归创建目录,如果目录已存在,则不创建,并且不报错 -v:打印目录的创建过程 [root@client ~] [root@client ~] [root@client ~] [root@client ~] [root@client ~] 没有这样的文件或目录,不能创建/d/wyk/dsb/250 [root@client ~] mkdir: cannot create directory ‘/d/wyk/dsb/250’: No such file or directory 目录不能创建,zls文件已存在 [root@client ~] mkdir: cannot create directory ‘zls’: File exists ps:使用mkdir创建目录,它的上一级目录必须存在,才能创建 /home/zls /home/zls/test1 /home/zls/test2 /home/oldboy /home/oldboy/test1 /tmp/oldboy /tmp/oldgirl /root/test /test1 /root/test /test2 /root/abc /backup [root@client ~]
文件创建touch 1 2 3 4 5 6 7 8 9 10 11 12 13 touch [OPTION] 文件名 touch命令 [选项] 文件名,可以有多个 [root@client ~] [root@client ~] [root@client ~] [root@client ~] [root@client ~] [root@client ~] ps1:touch想要创建文件,该文件的上级目录必须存在 ps2:{a..z}根据ASCII表进行创建
文件移动mv 1 2 3 4 5 6 7 8 9 10 11 12 [root@client ~] [root@client ~] [root@client ~] [root@client ~] touch file{1..3} mv file1 file2 file3 /opt/ mkdir dir{1..3} mv dir1/ dir2/ dir3/ /opt
显示目录结构tree 1 2 3 4 5 6 7 8 9 10 11 12 13 14 15 16 17 18 19 rm -fr /etc/yum.repos.d/* curl -o /etc/yum.repos.d/CentOS-Base.repo https://mirrors.aliyun.com/repo/Centos-7.repo curl -o /etc/yum.repos.d/epel.repo http://mirrors.aliyun.com/repo/epel-7.repo yum install -y tree -L:显示目录树的层级 -d:只查看目录 [root@client ~] /home/ob/ ├── dir1 ├── dir2 ├── dir3 ├── dir4 ├── dir5 │ └──dir6 └── dir7
文件复制cp
选项
说明
-p
保持文件属性
-r
递归复制,复制目录及目录下的所有文件
-a
相当于-rp,既可以拷贝目录,又可以保持文件属性
-i
提示是否覆盖(cp命令默认使用”cp -i”)
-v
显示拷贝的过程
1 2 3 4 5 6 7 8 9 10 11 12 13 14 15 16 17 18 19 20 21 22 23 24 25 26 27 28 29 30 31 32 33 34 35 36 cp [option] 源文件 目标文件 ps:默认只能拷贝文件 [root@localhost ~] [root@localhost ~] [root@localhost ~] [root@localhost ~] [root@localhost ~] [root@localhost ~] [root@localhost ~] [root@localhost ~] [root@localhost ~] [root@localhost ~] [root@localhost ~] cp: overwrite ‘/tmp/zhujiao’? [root@localhost ~] 1.使用转义符:让转义符后面的内容还原成原始状态 [root@localhost ~] 2.使用命令的绝对路径 [root@localhost ~] [root@localhost ~] ps:当拷贝文件有多个源文件的情况下,最后一个必须是目录,不能是普通文件,也不能不存在
删除命令rm
选项
说明
-i
提示是否删除(rm命令默认使用”rm -i”)
-r
递归删除
-f
强制删除force
-d
只能删除空目录
1 2 3 4 5 6 7 8 9 10 11 12 13 14 15 16 17 18 19 20 21 22 23 24 25 26 27 28 29 rm [OPTION] 文件名 ps:默认只能删除普通文件 [root@localhost ~] rm: remove regular empty file ‘/tmp/ooo’? [root@localhost ~] [root@localhost ~] [root@localhost ~] [root@localhost ~] [root@localhost ~] [root@localhost ~] ... .file4 [root@localhost ~] rm: descend into directory ‘/root/abc/’? y rm: remove regular file ‘/root/abc/oldboy.txt’? y rm: remove directory ‘/root/abc/’? y [root@localhost ~] [root@localhost ~] rm: cannot remove ‘/root/abc/’: Is a directory /root/abc是一个目录,rm不能直接删除目录
文件查看类命令 cat命令
选项
说明
-n
number 打印行号,显示行号
-E
end ,查看文件每一行的结尾,以$符表示
-T
Tab,查看文件中每一行内容是否含有制表符。以^I表示一个制表符
-A
既显示制表符,又显示文件的结尾
1 2 3 4 5 6 7 8 9 10 11 12 13 14 15 16 17 18 19 20 21 22 23 24 25 26 27 28 29 30 31 32 33 34 35 36 37 38 39 40 41 42 43 44 45 46 47 48 49 50 51 52 53 cat [OPTION] 文件名 ps:cat只能查看文件内容 [root@localhost ~] [root@localhost ~] [root@localhost ~] [root@localhost ~] 1 2 3 [root@localhost ~] cat: /tmp: Is a directory 原因:/tmp是一个目录 [root@localhost ~] [root@localhost ~] 1 $ 2 $ 3 $ 4 7 $ 5 2 0$ 6 9$ 7$ [root@localhost ~] 1^I^I 2^I3 4^I^I7 5^I2^I^I^I0 6 9 7 [root@localhost ~] 1^I^I $ 2 $ ^I3 $ 4^I^I7 $ 5^I2^I^I^I0$ 6 9$ 7$ [root@localhost ~]
more-less命令 1 2 3 4 5 6 7 8 9 10 11 12 13 14 15 16 17 18 19 20 21 more 文件名 按回车,一行一行向下显示 按空格,一页一页向下显示 Ctrl + b:向上查看 Ctrl + f:向下查看 less 文件名 按回车,一行一行向下显示 按空格,一页一页向下显示 Ctrl + b:向上查看 Ctrl + f:向下查看 输入/关键字,高亮显示,所有匹配到的内容 按n,查找下一个关键字 Shift + n 查找上一个关键字
head命令
选项
说明
-n
指定查看文件开头的前n行,n可以省略
1 2 3 4 5 6 7 8 head 文件名 默认显示一个文件的前10行内容 [root@localhost ~] [root@localhost ~] [root@localhost ~]
tail命令
选项
说明
-n
指定查看文件末尾的后n行,n可以省略
-f
follow,跟踪,动态跟踪一个文件的末尾
1 2 3 4 5 6 7 8 9 10 11 12 13 14 15 16 17 18 19 20 tail 文件名 默认显示一个文件的后10行内容 [root@localhost ~] [root@localhost ~] [root@localhost ~] [root@localhost ~] Mar 23 21:24:38 client systemd: Created slice User Slice of root. Mar 23 21:24:38 client systemd: Starting User Slice of root. Mar 23 21:24:38 client systemd: Started Session 1 of user root. Mar 23 21:24:38 client systemd-logind: New session 1 of user root. Mar 23 21:24:38 client systemd: Starting Session 1 of user root. Mar 23 21:24:46 client systemd: Started Session 2 of user root. Mar 23 21:24:46 client systemd-logind: New session 2 of user root. Mar 23 21:24:46 client systemd: Starting Session 2 of user root. Mar 23 21:38:29 client systemd: Starting Cleanup of Temporary Directories... Mar 23 21:38:29 client systemd: Started Cleanup of Temporary Directories.
文件过滤类命令 过滤grep
选项
说明
-n
打印行号 number
-A
after 查看过滤内容的后N行
-B
before 查看过滤内容的前N行
-C
center 查看过滤内容的前、后N行
-v
取反
-E
可以过滤多个结果
-o
只打印出过滤内容
-i
不区分大小写
1 2 3 4 5 6 7 8 9 10 11 12 13 14 15 16 17 18 19 20 21 22 23 24 25 26 27 28 29 30 31 32 33 34 35 36 37 38 39 40 41 42 43 44 45 46 47 48 49 50 51 52 53 54 55 56 57 58 59 60 61 62 63 |:管道符 作用:将管道符左边命令的标准输出,交给管道符右边命令的标准输入来处理 ^:以...开头 $:以...结尾 *:匹配*前面的内容至少0次或多次 .:匹配任意字符 [root@localhost ~] 卧槽 作者:曾老湿 江山风景美如画, 本想吟诗赠天下。 奈何自己没文化, 一句卧槽风好大。 就这么地吧。 谢谢大家。 EOF grep [option] 参数 条件 文件名 [root@localhost ~] [root@localhost ~] [root@localhost ~] [root@localhost ~] [root@localhost ~] [root@localhost ~] [root@localhost ~] [root@localhost ~] [root@localhost ~] [root@localhost ~] [root@localhost ~] [root@localhost ~] [root@localhost ~] [root@localhost ~] [root@localhost ~] [root@test ~] ps:[]表示区间 |:或 &:与 !:非 [root@localhost ~]
字符处理类命令 字符处理命令-排序sort
选项
说明
-t
指定分隔符
-k
指定按照某一列,进行排序
-n
按照阿拉伯数字排序
-r
reverse 倒叙排序
1 2 3 4 5 6 7 8 9 10 11 12 13 14 15 16 17 18 19 20 21 22 23 24 25 26 27 28 29 30 31 32 33 34 35 36 37 38 39 40 41 42 43 44 45 46 47 48 49 50 51 52 53 54 55 56 57 58 59 60 61 62 63 64 65 66 67 68 69 70 71 72 73 74 75 76 77 78 79 80 81 82 83 84 85 86 sort [option] 文件名 [root@www ~] b:3 c:2 a:4 e:5 d:1 f:11 EOF [root@www ~] a:4 b:3 c:2 d:1 e:5 f:11 ps:默认按照每一行的第一个字符进行排序,如果字符相同就往后推,字母按照a-z的顺序排序,排序不修改源文件内容 [root@www ~] [root@www ~] d:1 f:11 c:2 b:3 a:4 e:5 ps:按照排序的方式,只会看到第一个字符,11的第一个字符是1,按照字符来排序确实比2小 [root@www ~] d:1 c:2 b:3 a:4 e:5 f:11 [root@www ~] f:11 e:5 a:4 b:3 c:2 d:1 cat >> paixuti.txt <<EOF 192.168.3.1 00:0F:AF:81:19:1F 192.168.3.2 00:0F:AF:85:6C:25 192.168.3.3 00:0F:AF:85:70:42 192.168.2.20 00:0F:AF:85:55:DE 192.168.2.21 00:0F:AF:85:6C:09 192.168.2.22 00:0F:AF:85:5C:41 192.168.0.151 00:0F:AF:85:6C:F6 192.168.0.152 00:0F:AF:83:1F:65 192.168.0.153 00:0F:AF:85:70:03 192.168.1.10 00:30:15:A2:3B:B6 192.168.1.11 00:30:15:A3:23:B7 192.168.1.12 00:30:15:A2:3A:A1 192.168.1.1 00:0F:AF:81:19:1F 192.168.2.2 00:0F:AF:85:6C:25 192.168.3.3 00:0F:AF:85:70:42 192.168.2.20 00:0F:AF:85:55:DE 192.168.1.21 00:0F:AF:85:6C:09 192.168.2.22 00:0F:AF:85:5C:41 192.168.0.151 00:0F:AF:85:6C:F6 192.168.1.152 00:0F:AF:83:1F:65 192.168.0.153 00:0F:AF:85:70:03 192.168.3.10 00:30:15:A2:3B:B6 192.168.1.11 00:30:15:A3:23:B7 192.168.3.12 00:30:15:A2:3A:A1 EOF [root@localhost ~]
去重命令uniq 如果文件中有多行完全相同的内容,希望能删除重复的行,同时还可以统计出完全相同的行出现的总次数,那么就可以使用uniq命令解决这个问题,必须配合sort使用
1 2 3 4 5 6 7 8 9 10 11 12 13 14 15 16 17 18 19 20 21 22 23 24 uniq [option] [root@www ~] abc 123 abc 123 [root@www ~] 123 123 abc abc [root@www ~] 123 abc [root@www ~] 2 123 2 abc
文件内容截取命令cut
选项
说明
-d
指定分隔符
-f
取列,选择要打印的列内容
-c
按照字符来取内容
1 2 3 4 5 6 7 8 9 10 11 12 13 14 15 16 17 18 19 20 21 22 23 24 25 26 27 28 29 30 31 32 33 34 35 36 37 38 39 40 41 42 43 cut [option] 文件名 ps:cut默认没有分隔符 cat >> info.txt <<EOF I'm zls,18 years old QQ 133411023 I' m wyk,73 years old QQ 383838384 EOF [root@localhost ~] [root@localhost ~] [root@localhost ~] cat >> info.txt <<EOF I'm zls,18' years old QQ 133411023 I'm wyk,73' years old QQ 383838384 EOF [root@localhost ~] cut -d " " -f 1 blog.driverzeng.com_access.log | sort -n | uniq -c | sort -rn | head 8 101.69.218.44 7 58.215.115.67 6 58.215.115.30 5 58.215.115.35 4 58.215.115.62 4 36.156.89.176 4 36.156.89.148 4 183.162.236.187 4 183.162.236.172 3 58.215.115.75 [root@localhost ~] 32 /xmlrpc.php
文件统计命令wc
选项
说明
-l
line 行,统计行数
-w
word 单词,统计单词数
-c
char 字符,统计字符数
1 2 3 4 5 6 7 8 9 10 11 12 13 14 15 16 17 18 19 20 21 22 wc:统计文件的行数,统计文件的单词数量,统计文件的字符数量 wc [option] 文件名 [root@localhost ~] 11176 61033 670293 /etc/services 文件行数 单词数量 字符数量 [root@localhost ~] I'm zzgx,"18' years old QQ 133411023 I'm wyk,"103' years old QQ 383838384 [root@localhost ~] 2 info.txt [root@localhost ~] 10 info.txt [root@localhost ~] 72 info.txt
文件上传与下载 上传下载 1 2 3 4 5 6 7 8 9 10 11 [root@localhost ~] rz sz 文件名 [root@localhost ~] ps:只能虚拟机和物理机之间上传下载
wget命令 1 2 3 4 5 6 7 8 [root@localhost ~] wget 下载地址 -O:指定下载的位置和文件的名字 wget http://mirrors.aliyun.com/repo/Centos-7.repo wget -O /etc/yum.repos.d/CentOS-Base.repo http://mirrors.aliyun.com/repo/Centos-7.repo
文件属性及类型 文件属性 当我们使用ls -l 列目录下所有文件时,通常会以长格式的方式显示,其实长格式显示就是我们windows下看到的文件详细信息,我们将其称为文件属性,那整个文件的属性分为十列
1 2 3 4 5 6 7 8 9 10 11 12 13 14 15 16 17 18 19 [root@localhost ~] -rw-rwx--- 1 root root 4434 May 30 13:58 ks.cfg -rw-------. ①:第一个字符是文件类型,其他则是权限 1 ②:硬链接次数 root ③:文件属于哪个用户 root ④:文件属于哪个组 4434 ⑤:文件大小 May30 13:58 ⑥⑦⑧:最新修改的时间与日期 ks.cfg ⑨:文件或目录名称 文件的权限:Permission denied(权限被拒绝) rw- r-- r-- rwx rwx rwx r:read 读 w:write 写 x:exec 执行 -:该权限位上没有权限
文件类型 通常我们使用颜色或者后缀名称来区分文件类型,但很多时候不是很准确,所以我们可以通过ls -l以长格式显示一个文件的属性,通过第一列的第一个字符来进一步的判断文件具体的类型
1 2 3 4 5 6 7 8 9 10 11 12 [root@localhost ~] -rw-r--r-- 1 root root 56479 Mar 25 10:11 blog.driverzeng.com_access.log drwxr-xr-x 2 root root 6 Mar 29 08:39 zls -:普通文件 touch d:directory 目录 mkdir l:link 软链接文件(windows快捷方式) ln ----------------------------------------------------------- c:设备文件(char字符设备文件)和字符相关的设备,举例:打印机,终端 b:设备文件(block块设备文件)和存储相关的设备,举例:硬盘,U盘,磁盘分区 s:socket安全套接字文件,网络编程 p:pipe管道文件,父进程与子进程之间的通信文件
但有些情况下,我们无法通过ls -l查看文件的类型,比如:一个文件,它可能时普通文件、也可能时压缩文件、或者时命令文件等,那么此时就需要使用file来更加精确的判断这个文件的类型
1 2 3 4 5 6 7 8 9 10 11 12 13 14 15 16 17 18 19 20 21 22 file [options] 文件名 [root@localhost ~] /etc/hosts: ASCII text [root@localhost ~] /bin/ls: ELF 64-bit LSB executable, x86-64, version 1 (SYSV), dynamically linked (uses shared libs), for GNU/Linux 2.6.32, BuildID[sha1]=aa7ff68f13de25936a098016243ce57c3c982e06, stripped [root@localhost ~] /dev/sda: block special [root@localhost ~] /dev/tty1: character special [root@localhost ~] /etc/grub2.cfg: broken symbolic link to ../boot/grub2/grub.cfg [root@localhost ~] /home: directory ps:Linux文件扩展名不代表任何含义,仅为了我们能更好的识别该文件时说明类型
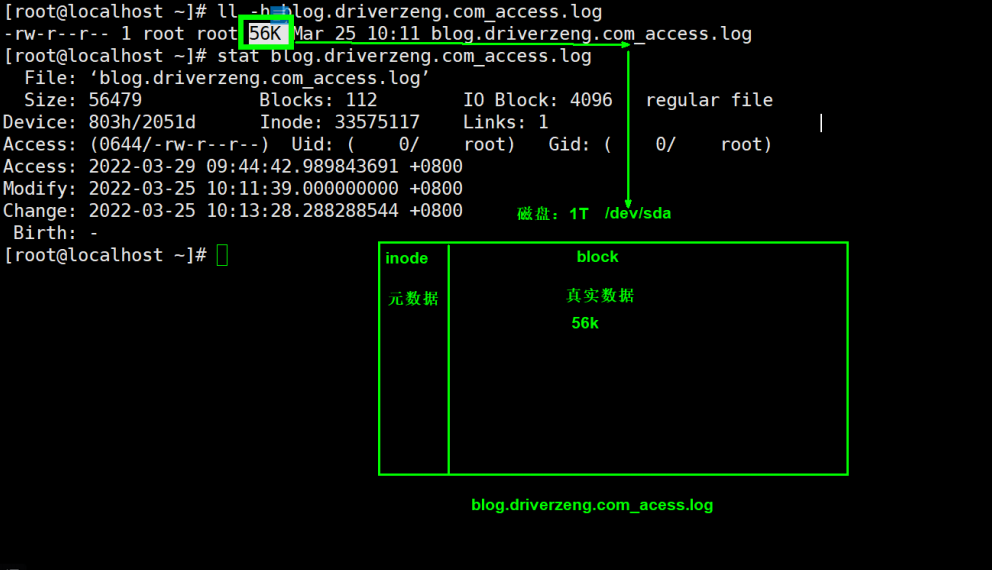
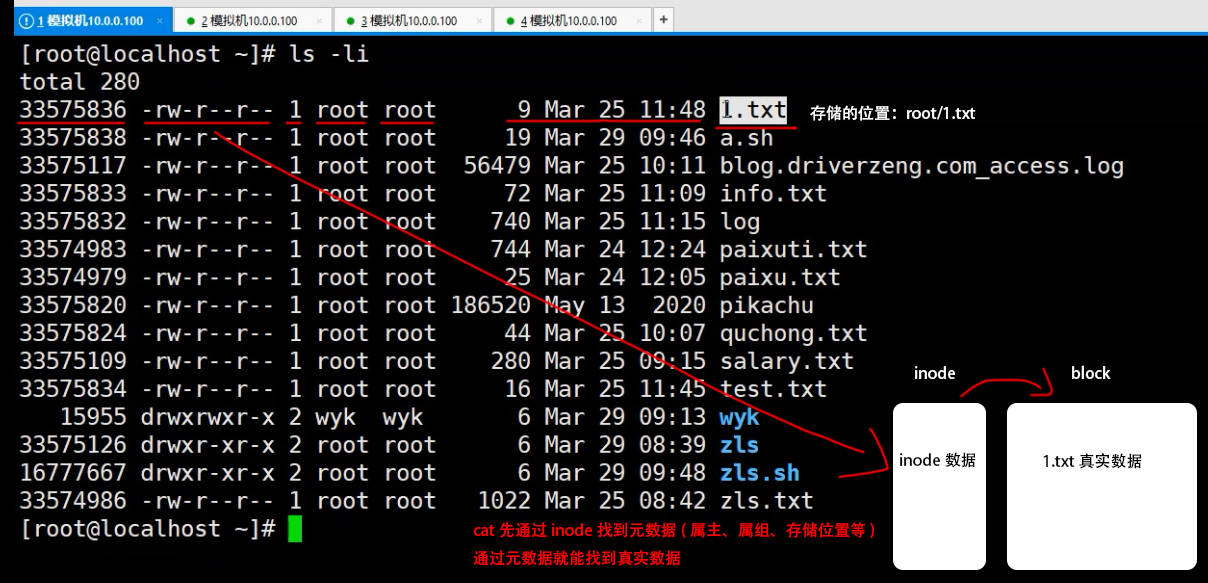
系统链接文件 一个文件在Linux中,会被分为两部分:
真实数据 :文件中的真实内容
元数据 :用来形容一个文件数据
一个文件在Linux中,存储也会被分为两部分:
查看磁盘空间 df
选项
说明
-h
human 人类可读
-i
查看 inode 空间
1 2 3 4 5 6 7 8 9 10 11 12 13 14 15 16 17 18 19 20 21 22 23 24 25 26 27 28 29 30 31 32 33 34 35 df [options] [root@localhost ~] Filesystem Size Used Avail Use% Mounted on /dev/sda3 19G 1.7G 17G 9% / devtmpfs 476M 0 476M 0% /dev tmpfs 487M 0 487M 0% /dev/shm tmpfs 487M 39M 449M 8% /run tmpfs 487M 0 487M 0% /sys/fs/cgroup /dev/sda1 497M 120M 378M 25% /boot tmpfs 98M 0 98M 0% /run/user/0 [root@localhost ~] Filesystem Inodes IUsed IFree IUse% Mounted on /dev/sda3 9.3M 35K 9.3M 1% / devtmpfs 119K 377 119K 1% /dev tmpfs 122K 1 122K 1% /dev/shm tmpfs 122K 750 121K 1% /run tmpfs 122K 16 122K 1% /sys/fs/cgroup /dev/sda1 250K 326 250K 1% /boot tmpfs 122K 1 122K 1% /run/user/0 [root@localhost ~] File: ‘nginx-1.20.2-1.x86_64.rpm’ Size: 2802126 Blocks: 5480 IO Block: 4096 regular file Device: fd00h/64768d Inode: 33575397 Links: 1 Access: (0644/-rw-r--r--) Uid: ( 0/ root) Gid: ( 0/ root) Context: unconfined_u:object_r:admin_home_t:s0 Access: 2022-04-30 14:10:58.648933728 +0800 Modify: 2022-04-30 14:10:58.709933724 +0800 Change: 2022-04-30 14:10:58.709933724 +0800 Birth: -
执行cat的过程
链接文件的种类
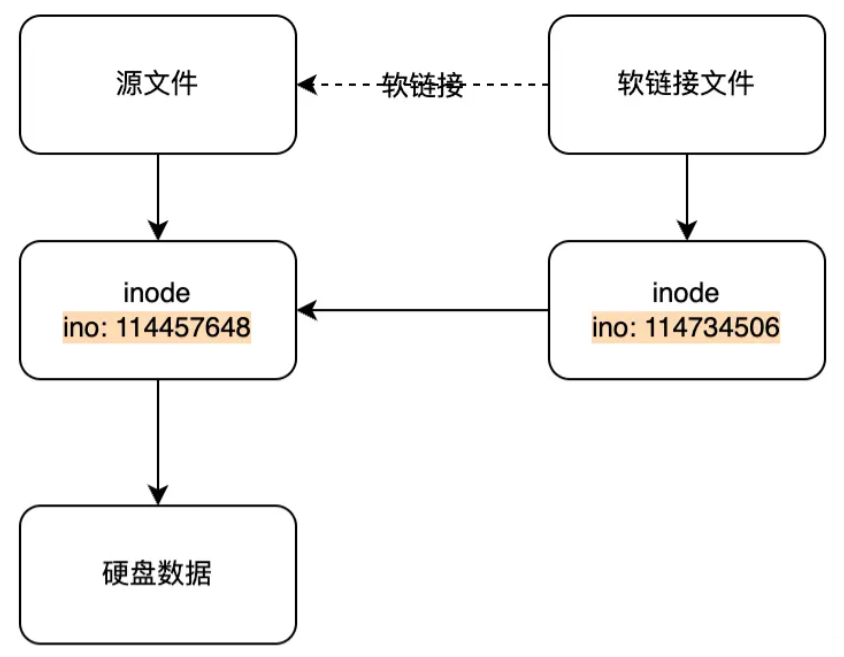
软链接文件
软链接相当于windows的快捷方式,软链接文件会将inode 指向源文件的block
1 2 3 4 5 6 7 8 9 10 11 12 13 14 15 16 17 18 19 20 21 22 23 24 25 26 27 28 29 ln:link 链接,创建链接文件 -s:soft 软,创建软链接文件 ln -s 源文件 链接文件的位置 [root@localhost ~] [root@localhost ~] total 196 lrwxrwxrwx 1 root root 11 Mar 29 10:54 1.txt -> /root/1.txt [root@localhost ~] [root@localhost ~] total 196 lrwxrwxrwx 1 root root 11 Mar 29 10:54 1.txt -> /root/1.txt lrwxrwxrwx 1 root root 11 Mar 29 10:55 2.txt -> /root/1.txt ps:多个软链接指向同一个block,不占多余空间 软链接文件,会受到源文件的影响,如果源文件删除,软链接文件也无法使用 1.软件升级 2.代码发布 3.不方便移动的目录 4.数据回滚 5.程序读取
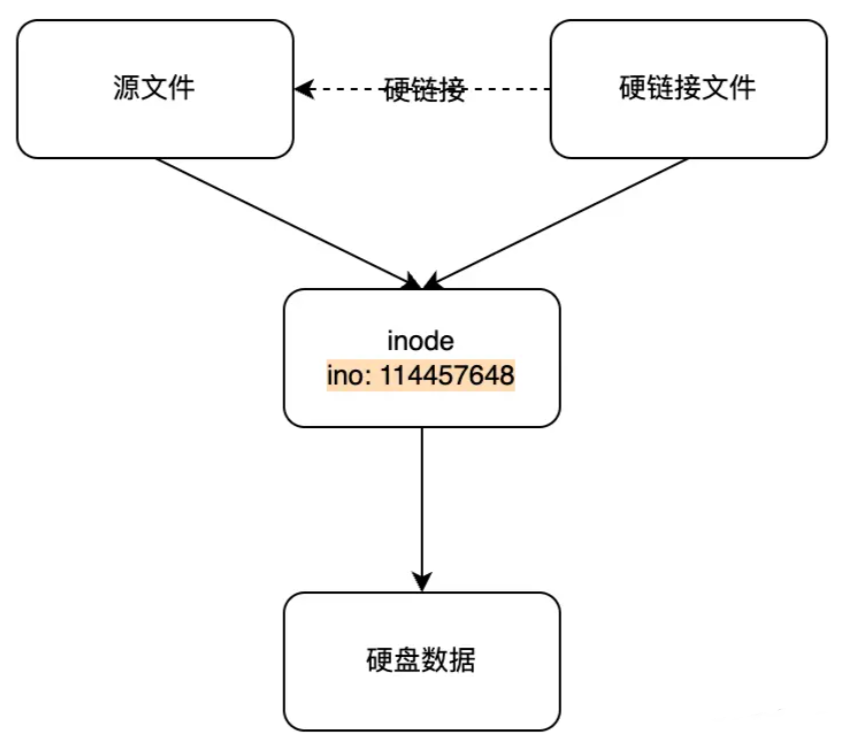
硬链接文件
若一个inode 对应多个文件名,则称这些文件为硬链接。换句话说,硬链接就是同一个文件使用了多个别名
1 2 3 4 5 6 7 8 9 10 11 12 13 14 15 16 17 18 19 20 21 22 23 24 25 26 27 28 29 30 31 32 33 34 35 36 37 38 39 40 ln 源文件 链接文件的位置 [root@localhost ~] [root@localhost ~] [root@localhost ~] 33575833 -rw-r--r-- 3 root root 72 Mar 25 11:09 /root/info.txt [root@localhost ~] 33575833 -rw-r--r-- 3 root root 72 Mar 25 11:09 /opt/info.txt [root@localhost ~] 33575833 -rw-r--r-- 3 root root 72 Mar 25 11:09 /opt/info1.txt [root@localhost ~] I'm zzgx,"18' years old QQ 133411023 I'm wyk,"103' years old QQ 383838384 [root@localhost ~] I'm zzgx,"18' years old QQ 133411023 I'm wyk,"103' years old QQ 383838384 [root@localhost ~] I'm zzgx,"18' years old QQ 133411023 I'm wyk,"103' years old QQ 383838384 1.硬链接文件,不会受到原文件的影响 2.所有硬链接文件的inode号与源文件相同 3.修改一个文件,其他文件都会改变 4.不允许给目录创建硬链接 5.默认情况下,新创建的目录,有两个硬链接,一个是目录本身,一个是该目录下的.目录 [root@localhost ~] 33575836 drwxr-xr-x 2 root root 6 Mar 29 11:52 /root/test [root@localhost ~] total 4 33575836 drwxr-xr-x 2 root root 6 Mar 29 11:52 . [root@localhost opt] ln: ‘/root/wyk’: hard link not allowed for directory
软链接使用场景实践
Q:软链接使用场景
1 2 3 4 5 6 7 8 9 10 11 12 13 14 15 16 17 18 19 20 21 22 23 24 25 26 27 28 [root@www ~] [root@www ~] [root@www ~] [root@www ~] drwxr-xr-x. 2 root root 6 3์ 5 12:23 dir lrwxrwxrwx. 1 root root 19 3์ 10 12:09 rainbow -> /data/rainbow-v1.1/ drwxr-xr-x. 2 root root 24 3์ 10 12:09 rainbow-v1.1 [root@www ~] 123 [root@www ~] [root@www ~] [root@www ~] [root@www ~] 456 [root@www ~] [root@www ~] 123
硬链接与软链接的区别
区别
硬链接
软链接
创建命令
ln
ln -s
对象
只能对普通文件创建
普通文件和目录
是否收到源文件影响
否
是
inode号
相同
不同
跨分区创建
不可以
可以
企业面试题 当前磁盘空间还剩余500G,但是就无法往里面写入数据,报错,磁盘空间满了
1 2 3 4 5 6 7 8 9 10 11 12 13 14 15 16 17 18 19 20 21 [root@www ~] [root@www ~] [root@www ~] [root@www ~] [root@www ~] [root@www data1] [root@www data1] touch: cannot touch ‘zls’: No space left on device
压缩和解压
为什么要对文件进行压缩 ?
压缩后的文件回避压缩前的文件小,一个28G的文件压缩后能到达6G
多个文件传呼很慢,但单个文件传输会很快,同时还能节省网络的消耗
常见压缩包类型
格式
压缩工具
.zipzip压缩工具
.gzgzip压缩工具,只能压缩文件,会删除原文件(通常配合tar使用)
.bz2bzip2压缩工具,只能压缩文件,会删除原文件(通常配合tar使用)
.tar.gz先使用tar命令归档打包,然后使用gzip压缩
.tar.bz2先使用tar命令归档打包,然后使用bzip压缩
压缩命令gzip
1 2 3 4 5 6 7 8 9 10 11 12 13 14 15 16 17 18 19 20 21 22 23 24 25 26 [root@localhost ~] gzip 普通文件名 gzip -d 文件名 1.压缩文件后,源文件不存在 2.只能压缩文件,不能压缩目录 3.压缩后,压缩包的位置在源文件的目录下 4.压缩后可以直接查看文件内容zcat 5.一个压缩包中,只会有一个文件 6.解压后,压缩包没了,只剩源文件 [root@localhost ~] [root@localhost ~] [root@localhost ~] 1.备份文件 2.当需要让某个文件不生效时 [root@localhost ~]
压缩命令zip
选项
说明
-r
递归压缩,包括目录下的所有文件
-l
查看压缩包里面的文件
-d
指定解压路径
1 2 3 4 5 6 7 8 9 10 11 12 13 14 15 16 17 18 19 20 21 22 23 24 25 26 27 28 29 30 31 [root@localhost ~] [root@localhost ~] zip [options] 压缩包名 文件 [root@localhost ~] [root@localhost ~] [root@localhost ~] 1.压缩文件后,源文件存在 2.可以指定压缩后保存的路径 3.可以压缩目录,也可以压缩文件,也可以指定多个文件一起压缩 4.压缩目录需要加选项,如果不加,压缩后,只有一个空目录,没有里面的文件 5.解压后,压缩包不会消失,如果同一目录下出现同名文件则会询问是否要覆盖 unzip [options] 压缩包名 [root@localhost ~] Archive: python.zip replace python/1.txt? [y]es, [n]o, [A]ll, [N]one, [r]ename: A [root@localhost ~] [root@localhost ~]
归档命令tar
选项
说明
-c
创建新的归档文件
-x
对归档文件解包
-v
输出命令的归档或解包的过程
-f
指定包文件名,多参数f写最后
-t
列出归档文件里的文件列表
-z
使用gzip压缩归档后的文件
-j
使用bzip2压缩归档后的文件
-J
使用xz压缩归档后的文件
-C
指定解压目录位置
-X
排除指定文件
-h
打包软链接
-P
压缩时带绝对路径,解压时按绝对路径解压
1 2 3 4 5 6 7 8 9 10 11 12 13 14 15 16 17 18 19 20 21 22 23 24 25 26 27 28 29 30 31 32 33 34 35 36 37 38 39 40 41 42 43 44 45 46 47 48 49 50 51 52 53 54 55 56 57 58 59 60 61 62 63 64 65 [root@localhost ~] tar [options] 压缩包名 文件名 [root@localhost ~] [root@localhost ~] [root@localhost ~] [root@localhost ~] [root@localhost ~] [root@localhost ~] [root@localhost ~] [root@localhost ~] [root@localhost ~] [root@localhost ~] [root@localhost ~] [root@localhost ~] [root@localhost ~] 1.txt 2.txt [root@localhost ~] [root@localhost ~] [root@localhost ~] [root@localhost ~] lrwxrwxrwx. 1 root root 22 Mar 24 16:39 /etc/grub2.cfg -> ../boot/grub2/grub.cfg [root@localhost ~] [root@localhost ~] [root@localhost ~] total 0 lrwxrwxrwx 1 root root 22 Mar 24 16:39 grub2.cfg -> ../boot/grub2/grub.cfg [root@localhost ~] [root@localhost ~] [root@localhost ~] [root@localhost ~] 1.压缩文件后,源文件存在 2.目录和文件都可以压缩 3.压缩后,压缩包的位置可以指定任意目录 4.可以查看压缩包里有哪些文件,但是查看不了文件内容 5.一个压缩包中,可以有多个文件或目录 6.解压后,压缩包还在,源文件也可以随意指定路径 -C 7.万能解压命令:xf 注意:tar命令在解压开文件时,如果有文件名冲突,则不会询问,直接覆盖 tar命令,在打包时,会自动删除绝对路径的"/" 以后打包,尽量使用相对路径,cd 到需要打包目录或文件的上级目录
企业案例 数据库物理备份
1 2 3 4 5 6 7 8 9 10 11 12 13 14 15 16 17 18 19 20 21 22 [root@localhost ~] [root@localhost ~] [root@localhost ~] create database lol; show databases; use lol; create table user(id int,user varchar(10),password varchar(10),money int); insert into user(id,user,password,money) values(1,'wcj' ,'123' ,10); [root@localhost ~] [root@localhost lib] [root@localhost lib] [root@localhost lib] [root@localhost lib] [root@localhost lib] [root@localhost lib]
传输海量小文件
1 2 3 4 [root@localhost lib] [root@localhost lib]
网络传输海量小文件
1 2 3 4 5 6 7 8 9 10 [root@localhost ~] [root@hostB ~] [root@hostB ~] [root@hostA ~] tar: Removing leading `/' from member names
文件查找 find查找概述
find命令可以根据不同的条件进行查找文件:文件名称、文件大小、文件时间、属主属组、权限等
find命令语法
命令
路径
选项
表达式
动作
find
path
options
expression
action
查找
地区
妹子
18-25岁
?
find查找实例 基于名称查找
1 2 3 4 5 6 7 8 9 10 11 12 touch /etc/sysconfig/network-scripts/{ifcfg-eth1,IFCFG-ETH1} [root@roger ~] [root@roger ~] [root@roger ~] [root@roger ~]
基于大小查找
1 2 3 4 5 6 7 8 [root@roger ~] [root@roger ~] [root@roger ~]
基于类型查找
1 2 3 4 5 6 7 8 9 10 11 12 13 14 [root@roger ~] [root@roger ~] [root@roger ~] [root@roger ~] [root@roger ~] [root@roger ~] [root@roger ~]
基于时间查找
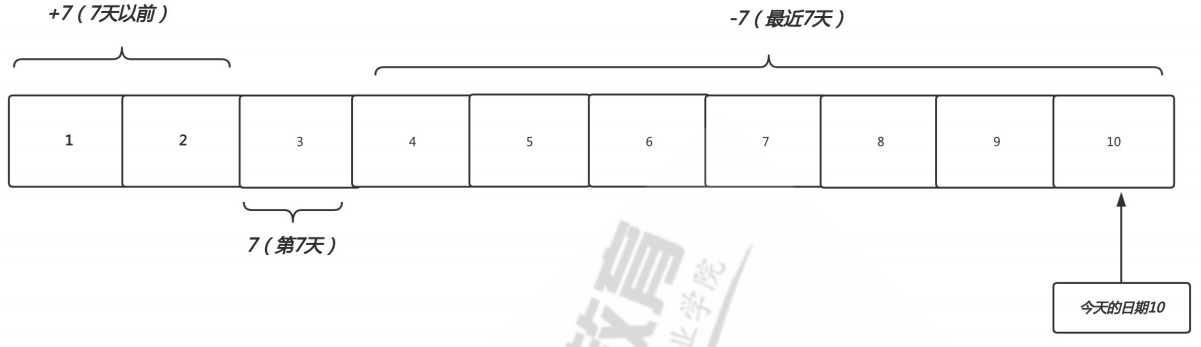
1 2 3 4 5 6 7 8 9 10 11 12 13 14 15 16 17 18 19 20 21 22 23 24 25 26 27 stat 文件名-atime:文件访问时间查找 -mtime:文件内容创建,修改时间查找 -ctime:文件属性,修改时间查找 Num:查找第N天的文件(不包括今天) +Num:查找第N天之前的所有文件(不包括今天) -NUm:查找从今天开始算,7天内的文件 [root@roger ~] [root@roger ~] [root@roger ~] [root@roger ~] [root@localhost ~] for i in `seq -w 30`;do date -s 202204$i && touch file-$i ;done [root@localhost opt] [root@roger ~]
基于用户查找
1 2 3 4 5 6 7 8 9 -user -group -nouser -nogroup 并且:-a 或者:-o 非:! [root@roger ~] [root@roger ~] [root@roger ~] [root@roger ~] [root@roger ~]
基于权限查找
1 2 3 4 5 6 7 8 9 10 11 12 13 14 15 16 包含:- [root@roger ~] [root@roger ~] [root@web ~] [root@web ~] [root@web ~] [root@localhost ~] 属主权限位,有一个r或者有一个w就满足条件 属组权限位,有一个r就满足条件 其他用户权限位,有一个r就满足条件
基于层级查找
1 2 3 4 -maxdepth 针对目录层级查找 [root@localhost ~]
find逻辑运算符
符号
作用
-a
与
-o
或
-not | !
非
1 2 3 4 5 6 7 8 9 [root@roger ~] [root@roger ~] [root@roger ~] [root@roger ~]
find动作处理 查找到一个文件后,需要对文件进行如何处理find的默认动作时-print
动作
含义
-print
打印找到的内容(默认)
-ls
以长格式显示的方式打印找到的内容
-delete
删除查找到的文件(仅能删除空目录)
-ok
后面跟自定义shell命令(会提示是否操作)
-exec
后面跟自定义shell命令(标准写法-exec ;)
find结合exec
1 2 3 4 5 [root@roger ~] [root@roger ~] [root@roger ~]
find结合xargs
1 2 3 4 5 [root@roger ~] [root@roger ~] [root@roger ~]
find结合grep
1 2 3 4 5 -n: 显示行号 -R:递归搜索 -i:忽略大小写 应用程序链接数据库的密码是xxx 但是我不知道是那个文件; [root@roger ~]
扩展 文件输入 > 1 2 3 4 5 6 7 8 9 10 11 12 13 14 15 [root@localhost ~] [root@localhost ~] [root@localhost ~] 5 [root@localhost ~] > 6 > EOF EOF:End Of 以....结尾,不是固定用法,规范用法 注意:cat查看文件时,会将文件所有内容全部加载到内存里
命令查找which 1 2 3 4 5 6 7 8 9 10 11 12 13 14 15 16 17 18 which 只能查找命令 [root@localhost ~] alias grep='grep --color=auto' /usr/bin/grep [root@localhost ~] /usr/bin/mkdir [root@localhost ~] alias cp='cp -i' /usr/bin/cp [root@localhost ~] alias mv='mv -i' /usr/bin/mv [root@localhost ~] alias rm='rm -i' /usr/bin/rm
awk 1 2 3 4 5 6 过滤列 awk + [选项] + 'NR==数字{print $n}' n代表第几列 -F 指定分割符号 (默认是以空格为分割符) NR==数字 取行 [root@localhost ~]
selinux 1 selinux:美国安全局NASH设置的最高安全权限